


Well guys the X is about 90% done!!
And I can tell you so far it freakin jams with no battery issue…so far! Lol
The system starts w a 300 cb under the hood with 100% ofc 0 ga running to the rear.
The front dash had no speakers so I installed DS18 3.5’s and crossed them over at 500hz.
The A pillars have MB Quart QSD tweeters crossed over at 4000hz
The front doors I modified to accept DS18 8” mid bass with a floor of 80hz and a 500hz ceiling.
The rear doors have MMATS Pro Audio 6.5’s full range.
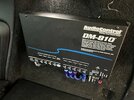
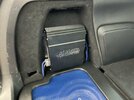
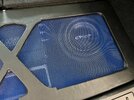
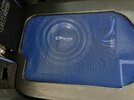
The rear are 2 CT Sounds 10” Ozone drivers powered by a 2000 watt MMATS Pro Audio class D.
The front doors are powered by bridging channels 1-4 of a 6 channel 1500 watt MMATS Pro Audio amp.
The dash and tweets are powered by channels 5-6 of the MMATS Pro Audio amp.
This is all controlled by Audio Control 810 DSP!
I still am going to frame the MMATS amp and DSP but wanted to report since a ton of y’all are waiting on this build!
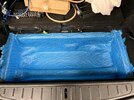
I glassed in the bottom well of the trunk then built a frame and secured it.
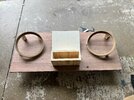
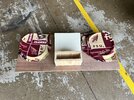
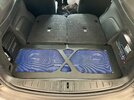
Next I built the top with the Ozone 10’s aimed inward and backward at 35 degrees.
The top is slot ported with a 90 degree port 2.5x9x18.
I pressed the top in place and will secure when I’m confident I don’t need to go back in.
Both amps are protected by Stinger 150amp cb’s.
I have a Bluetooth connection to my iPhone for tuning the DSP.
I also have a bass knob connected to the DSP and an on/off switch for the entire DSP/amps turn on.
The back 2 seats work as intended so it’s still a functional 6 seater!
Thoughts??
And I can tell you so far it freakin jams with no battery issue…so far! Lol
The system starts w a 300 cb under the hood with 100% ofc 0 ga running to the rear.
The front dash had no speakers so I installed DS18 3.5’s and crossed them over at 500hz.
The A pillars have MB Quart QSD tweeters crossed over at 4000hz
The front doors I modified to accept DS18 8” mid bass with a floor of 80hz and a 500hz ceiling.
The rear doors have MMATS Pro Audio 6.5’s full range.
The rear are 2 CT Sounds 10” Ozone drivers powered by a 2000 watt MMATS Pro Audio class D.
The front doors are powered by bridging channels 1-4 of a 6 channel 1500 watt MMATS Pro Audio amp.
The dash and tweets are powered by channels 5-6 of the MMATS Pro Audio amp.
This is all controlled by Audio Control 810 DSP!
I still am going to frame the MMATS amp and DSP but wanted to report since a ton of y’all are waiting on this build!
I glassed in the bottom well of the trunk then built a frame and secured it.
Next I built the top with the Ozone 10’s aimed inward and backward at 35 degrees.
The top is slot ported with a 90 degree port 2.5x9x18.
I pressed the top in place and will secure when I’m confident I don’t need to go back in.
Both amps are protected by Stinger 150amp cb’s.
I have a Bluetooth connection to my iPhone for tuning the DSP.
I also have a bass knob connected to the DSP and an on/off switch for the entire DSP/amps turn on.
The back 2 seats work as intended so it’s still a functional 6 seater!
Thoughts??
Attachments
-
 74198B78-20AC-4F21-9573-8DF8CC193E7C.jpeg622.8 KB · Views: 168
 -
 AD9EA547-68B4-49F1-B42D-57B9D3022EEC.jpeg824.2 KB · Views: 96
 -
 60114464-0886-40EA-8A28-0CE13C3847EB.jpeg975.2 KB · Views: 104
 -
 F4B80E52-4F7F-4B84-BC4B-8327A4FB7882.jpeg676.1 KB · Views: 109
 -
 46B6E450-D044-4E7E-B914-A48D0331AC23.jpeg562.5 KB · Views: 111
 -
 CF4F1E85-DAAC-4B94-8418-3475CD6ECCC8.jpeg534.1 KB · Views: 111
 -
 299039D0-B56A-4D0E-9177-200B479CDE28.jpeg1.1 MB · Views: 114
 -
 E29162BE-C604-4A7D-BD38-EC8373664C9B.jpeg1.1 MB · Views: 98
 -
 6C6CC380-CE88-44BF-A767-23881DD35D73.jpeg1.1 MB · Views: 110
 -
 C12EAEC8-86A3-4F01-B38D-B48AF11EDFEC.jpeg753.8 KB · Views: 108

