silentcorp
Member
I bought a pack of 100 of those green plastic clips. If anyone is in or near Denver and needs some just let me know. They are looking for a good home!


You can install our site as a web app on your iOS device by utilizing the Add to Home Screen feature in Safari. Please see this thread for more details on this.
Note: This feature may not be available in some browsers.


I'm hoping someone can provide a quick answer as I'm in the middle of the install and a little lost as to what to do with the switch plug given I don't have an in-cabin switch. Is this not to be used?
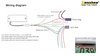
View attachment 469621
In some of the videos it appears a purple wire from the main wiring harness gets tapped into this but I don't have a purple wire in my harness (just blue yellow red). The only purple wire I see is in the original switch that I plugged into the y-adapter.
View attachment 469619
So the white wire doesnt tap into anything? I'm literally just daisy chaining?That is attached to a wire on the lid of the trunk. Check around 19:45 in this vid:
So the white wire doesnt tap into anything? I'm literally just daisy chaining?
i believe the white wire is soldered to one of the other wires under the fabric tape, then it goes down the tube into one of the connectors, but i don't think it matters. that white wire should be soldered on the trunk lid side.So the white wire doesnt tap into anything? I'm literally just daisy chaining?
Yup, it's confusing as MANY of the videos are installing a different kit. Well, the exact same hardware (it all comes from Hansshow) but other companies repackage it and sell it themselves. Those other kits often times had different instructions, or ways to tap into the power.
The one we all got in this group buy does not need you to use any taps.
Are you sure?
The kick foot sensor has 3 wires. One goes to a ground nut. The second goes to a 12 volt power source such as the battery terminal. The third wire (a green wire according to a confusing instruction sheet I saw) gets connected to somewhere I’m not clear about. This green wire has no connector on it. So it has to be spliced your some other sure some how. Either a posi-tap or by soldering? And to where is it connected.
You are right there are white wires cut in the updated kit. I think I’ll just posi lock them.i believe the white wire is soldered to one of the other wires under the fabric tape, then it goes down the tube into one of the connectors, but i don't think it matters. that white wire should be soldered on the trunk lid side.
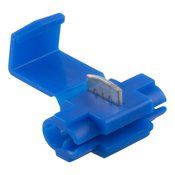
Power wire is red not purple - are they trying to throw us off on purpose!?Here is the info for installing the foot sensor. You will have to either posi-tap or solder the three wires.
Here is the info for installing the foot sensor. You will have to either posi-tap or solder the three wires.
i would be careful with that white wire. it's supposed to be cut on the connector side that goes into the computer/board, and the white wire, not sure if it is related to the cut one, should be already soldered from manufacturer, to one of the wires in the trunk lid. i can't remember which one.You are right there are white wires cut in the updated kit. I think I’ll just posi lock them.
i used these, but they were red. 18-22 guage. from pep boys. worked perfectly. a little bulky but did the trick.Thank you. So it looks like at least 3 posi-taps are needed. Anyone have a source for the correct size position-tap?
I had the same issue. Had a Hansshaw installer trying to install the frunk kit yesterday. They had two major issues. First issue was the latching of the frunk. After they got that addressed, then when they put everything back together, when the frunk closed, it sort of “taco’d” in the middle of the frunk. The middle was higher than the front and back of the body and it wasn’t flush. They removed the frunk kit, returned it to stock and frunk is flush again. Glad to hear that I wasn’t the only one with this issue.Just got some info from my Hansshaw kit installer, he was informed some of the kits shipped has a defective frunk strut. This issue is preventing the frunk from closing flush. They are working on the problem he said.
Are you sure?
The kick foot sensor has 3 wires. One goes to a ground nut. The second goes to a 12 volt power source such as the battery terminal. The third wire (a green wire according to a confusing instruction sheet I saw) gets connected to somewhere I’m not clear about. This green wire has no connector on it. It has to be connected some how. Either a posi-tap or by soldering? And to where is it connected.
i would be careful with that white wire. it's supposed to be cut on the connector side that goes into the computer/board, and the white wire, not sure if it is related to the cut one, should be already soldered from manufacturer, to one of the wires in the trunk lid. i can't remember which one.
i used these, but they were red. 18-22 guage. from pep boys. worked perfectly. a little bulky but did the trick.
It should be soldered like this pic i have that shows the wiring harness that goes in the trunk lid, it should not be dangling loose-ended.So what should I do with the white wire that's dangling on that connector? Leave it hanging?