I've had my S85 for a few months, and I already had the itch to make some changes, so I figured I'd try my hand at changing the interior pieces from beige to black. I had posted a thread asking for a more detailed guide how to remove the headliner since a few folks on the forum had done it, but I was overwhelmed with the deafening silence so I decided to make one myself. ")
Materials.
Paint: Duplicolor Vinyl and Fabric paint in Charcoal Gray (HVP111 Dupli-Color Vinyl and Fabric Coating, Charcoal Gray, 11 oz. | 9382590 | Pep Boys). The can looks different on the shelf, but same product number.
Painter's tape
Xacto knife
Pry tools / screwdrivers
Torx 15 screwdriver
Disclaimer: This is the largest arts & crafts project I've done on a car and I am by no means a pro, so please forgive some of my relatively neanderthal methods for making this happen. I'm open to constructive criticism or tips for the next people trying this project! This is also my first tutorial post, so if I left anything out, apologies, but I'm happy to answer questions as they come up.
This total project is probably going to take quite some time on my current pace, but I'll update this thread with my progress...but for now, here we go:
STAGE 1: REMOVING AND PAINTING SUN VISORS
I tried so many different ways of negotiating these things out, but was slowly starting to mess up the plastic, so I asked a Tesla tech for advice while my car was in for service.
Step 1. Remove the "C" shaped piece from the hinged part of the visor
This piece has a number of teeth that lock into the base, but if you start with the open side of the "C" and carefully pry the end away from the center, you can get a small screwdriver into the gap to release the tab from the hole. Once you do this on both sides of the piece, the rest of the teeth pop out relatively easy. Just go slow, be careful, and try not to chew up the plastic with whatever tool you're using. After this piece comes out, there is a Torx 15 screw holding the base in. Remove that screw. You'll see this in the next pictures, but the base has a curved hook that points toward the passenger cabin, so you'll need to rotate the base/push it towards the windshield in order to get the visor assembly out.

Step 2. Remove the hook bracket.
This is WAY easier than Step 1. Unfortunately I didn't take any pictures of this, but there's a tab you pop out on the windshield side of the hook, which exposes a screw that will release the hook from the ceiling. Here's a pic of the pieces removed (missing the hook tabs, but bonus pic of my pup to make up for it). You can see the hook shape on the main assembly, to which I was referring in Step 1. For reference, you're looking at the passenger side visor on the left, and driver's side visor on the right.

Step 3. Prepare to paint.
Obviously you don't want paint on the mirrors or that super sexy warning label, so tape as accurately as you can. For the mirror, I had a little extra over the edges, for which I used a credit card to tuck the extra under the mirror. For the warning label, I used the corner of a credit card as a template to cut the curves. WARNING: the Duplicolor paint does not adhere well to the hard plastic surfaces. I ended up stripping off the paint in most of those places (you'll see why later).


Step 4. Paint
I painted in several light coats, per the youtube video from some of the other threads. Because of all the nooks and crannies, this takes a while. If the mirror cover is open, it blocks part of the visor, so you need to paint it open and closed. In addition, to get into the crevice where the mirror meets the fabric, you have to pull back the mirror/fabric to paint and get maximum coverage (I got lots of paint on my hands). Patience is your friend here - add coats, and keep rotating to see if you missed any spots. Another warning - if you did end up painting the mirror cover, you might spray over the rubber feet...once the paint is dry, it's going to chip off, so let it dry and clean up the nubs.

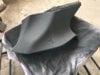
Before and after. Notice that the paint tone is pretty different between the plastic and the fabric.

Step 5. Extra credit
I didn't really like the two tone color, so I decided to try using vinyl for the first time. This is where I discovered that the paint came right off the plastic parts. If you're going to do vinyl, you probably don't want to paint the plastic pieces (except inside the mirror cover). Here you can see where the vinyl ends and the paint remains inside the mirror cover, as well as the rubber nubs cleared of paint. I will also likely need to find a different solution for the straight piece across the "U" shape bracket since it's very hard to hook the visor now due to the incremental...girth. Also working with such tiny spaces due to small pieces was, in a word, frustrating.

I also wrapped the hinge area (PITA) and covered up the emergency warning label using the painter's tape as a guide. Will likely put a "TESLA" sticker on top of that when I can find the right one. You can see the paint chipping off the mount base at the bottom left. It'll be covered by the "C" bracket so I left it alone.

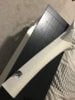
Also wrapped the hooks - again the decreased diameter from the wrap is creating an issue with actually getting the visor locked back in. Wrapped vs. painted. TP provided for contrast.

Here are all the pieces in one shot, with a mints case sprayed to show the contrast of the paint on plastic vs. fabric. You can also see the paint on the internal hook of the visor attachment point, and how it's already chipping from just moving the thing around (and bumping into things).

Vinyl is the 3M 1080 CF12 (https://smile.amazon.com/gp/product..._act_title_2?smid=A10111992WJRYRFBZH9IS&psc=1)
So these are pretty much done, but they can't go back in until I get the rest of the headliner painted and reinstalled.
Another note - the paint leaves the fabric feeling a bit rough, not quite as smooth/soft as OEM. It's as if the paint sits on the surface vs. absorbing into the fabric, so I do wonder if handling the pieces over time will wear the paint layer down...
Next step: B pillar - info available is pretty scarce, but it sounds like I have to take off the bottom half to get the top half off. Can anyone confirm?
Hope you enjoyed, and see you for the next installment!
Eric
Materials.
Paint: Duplicolor Vinyl and Fabric paint in Charcoal Gray (HVP111 Dupli-Color Vinyl and Fabric Coating, Charcoal Gray, 11 oz. | 9382590 | Pep Boys). The can looks different on the shelf, but same product number.
Painter's tape
Xacto knife
Pry tools / screwdrivers
Torx 15 screwdriver
Disclaimer: This is the largest arts & crafts project I've done on a car and I am by no means a pro, so please forgive some of my relatively neanderthal methods for making this happen. I'm open to constructive criticism or tips for the next people trying this project! This is also my first tutorial post, so if I left anything out, apologies, but I'm happy to answer questions as they come up.
This total project is probably going to take quite some time on my current pace, but I'll update this thread with my progress...but for now, here we go:
STAGE 1: REMOVING AND PAINTING SUN VISORS
I tried so many different ways of negotiating these things out, but was slowly starting to mess up the plastic, so I asked a Tesla tech for advice while my car was in for service.
Step 1. Remove the "C" shaped piece from the hinged part of the visor
This piece has a number of teeth that lock into the base, but if you start with the open side of the "C" and carefully pry the end away from the center, you can get a small screwdriver into the gap to release the tab from the hole. Once you do this on both sides of the piece, the rest of the teeth pop out relatively easy. Just go slow, be careful, and try not to chew up the plastic with whatever tool you're using. After this piece comes out, there is a Torx 15 screw holding the base in. Remove that screw. You'll see this in the next pictures, but the base has a curved hook that points toward the passenger cabin, so you'll need to rotate the base/push it towards the windshield in order to get the visor assembly out.
Step 2. Remove the hook bracket.
This is WAY easier than Step 1. Unfortunately I didn't take any pictures of this, but there's a tab you pop out on the windshield side of the hook, which exposes a screw that will release the hook from the ceiling. Here's a pic of the pieces removed (missing the hook tabs, but bonus pic of my pup to make up for it). You can see the hook shape on the main assembly, to which I was referring in Step 1. For reference, you're looking at the passenger side visor on the left, and driver's side visor on the right.
Step 3. Prepare to paint.
Obviously you don't want paint on the mirrors or that super sexy warning label, so tape as accurately as you can. For the mirror, I had a little extra over the edges, for which I used a credit card to tuck the extra under the mirror. For the warning label, I used the corner of a credit card as a template to cut the curves. WARNING: the Duplicolor paint does not adhere well to the hard plastic surfaces. I ended up stripping off the paint in most of those places (you'll see why later).
Step 4. Paint
I painted in several light coats, per the youtube video from some of the other threads. Because of all the nooks and crannies, this takes a while. If the mirror cover is open, it blocks part of the visor, so you need to paint it open and closed. In addition, to get into the crevice where the mirror meets the fabric, you have to pull back the mirror/fabric to paint and get maximum coverage (I got lots of paint on my hands). Patience is your friend here - add coats, and keep rotating to see if you missed any spots. Another warning - if you did end up painting the mirror cover, you might spray over the rubber feet...once the paint is dry, it's going to chip off, so let it dry and clean up the nubs.
Before and after. Notice that the paint tone is pretty different between the plastic and the fabric.
Step 5. Extra credit
I didn't really like the two tone color, so I decided to try using vinyl for the first time. This is where I discovered that the paint came right off the plastic parts. If you're going to do vinyl, you probably don't want to paint the plastic pieces (except inside the mirror cover). Here you can see where the vinyl ends and the paint remains inside the mirror cover, as well as the rubber nubs cleared of paint. I will also likely need to find a different solution for the straight piece across the "U" shape bracket since it's very hard to hook the visor now due to the incremental...girth. Also working with such tiny spaces due to small pieces was, in a word, frustrating.
I also wrapped the hinge area (PITA) and covered up the emergency warning label using the painter's tape as a guide. Will likely put a "TESLA" sticker on top of that when I can find the right one. You can see the paint chipping off the mount base at the bottom left. It'll be covered by the "C" bracket so I left it alone.
Also wrapped the hooks - again the decreased diameter from the wrap is creating an issue with actually getting the visor locked back in. Wrapped vs. painted. TP provided for contrast.
Here are all the pieces in one shot, with a mints case sprayed to show the contrast of the paint on plastic vs. fabric. You can also see the paint on the internal hook of the visor attachment point, and how it's already chipping from just moving the thing around (and bumping into things).
Vinyl is the 3M 1080 CF12 (https://smile.amazon.com/gp/product..._act_title_2?smid=A10111992WJRYRFBZH9IS&psc=1)
So these are pretty much done, but they can't go back in until I get the rest of the headliner painted and reinstalled.
Another note - the paint leaves the fabric feeling a bit rough, not quite as smooth/soft as OEM. It's as if the paint sits on the surface vs. absorbing into the fabric, so I do wonder if handling the pieces over time will wear the paint layer down...
Next step: B pillar - info available is pretty scarce, but it sounds like I have to take off the bottom half to get the top half off. Can anyone confirm?
Hope you enjoyed, and see you for the next installment!
Eric