Hey Tesla Club!
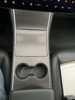
New to the forums, veteran to forum lurking. Recently got my '18 LR DM and am IN LOVE. Purchased a few wraps for the logos and interior, but ran into EXTREME frustration when attempting to do the cup portion of the vinyl wrap.
Any experienced ones who've had success? I've watched the 45 minute video 423 times, and effed up my first wrap, way too warped to attempt again. Have the last one, so wanna do it right with (hopefully) ya'lls help.
Thanks in advance!