Welcome to Tesla Motors Club
Discuss Tesla's Model S, Model 3, Model X, Model Y, Cybertruck, Roadster and More.
Register

My Model 3 Audio SQ Build Log (Helix, Audiofrog, HAT)

This site may earn commission on affiliate links.
Hello everyone,

I've decided to start a build log to detail my adventures with installing an upgraded audio system. I have a 2021 Model 3 SR+ that I picked up in December 2020. After realizing that the stock system is pretty poor, I'd did the bare minimum upgrade of using a TeslaOffer harness to enable the missing front speakers. I also attempted to use a powered RockFord Fosgate P300 10" sub, but didn't at all like the results.

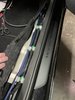
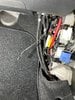
After spending some time talking to a local higher end audio shop, lots of time in the forums, I've decided that what I needed to do was invest in a DSP, a quality sub, and some quality front components. The goal will be to have a 3-way audio system up front. So that means I'll just run the front doors, sail tweets, and left/right dash mids. I will disable the center mid/tweeter and the "imaging" speakers in the A-pillars. I'll also use the factory rear door speakers for rear fill. Since I don't have any rear deck speakers in my car, I'll leave that alone. All of the speakers except the subwoofer will be driven by a Helix V Eight MK2 DSP. A sub will have seperate amplification. My other goal is to keep this as simple as possible with as little equipment needed to do it.

As of January 28th, this is what I have in hand and on order:

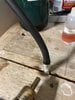
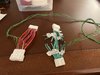
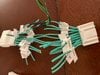
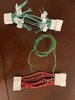
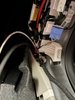
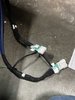
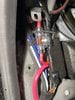
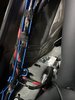
Teslaoffer harness - ($79) Will modify to send all the audio to and from the amp/dsp.
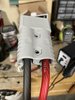
Helix V Eight MK2 DSP - ($1300) This gives you 8 75W amplified channels, and 10 processed channels
D'Amore E350.2 Amp - ($179) 350W x 1 bridged at 4ohm
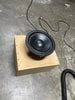
Hybrid Audio Clarus C10SW D2 - ($200 used) 10" subwoofer
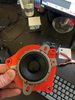
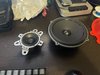
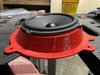
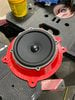
Audiofrog GS60 - ($280) 6.5" speakers for front doors
Audiofrog GS25 - ($230) 2.5" wideband mids for L/R dash
Audiofrog GS10 - ($230) 1" tweeters for sail panels
Knonoise Kollosus Edition Sound Deadener - ($150) 35 sq. foot of CLD material for trunk and doors
Absolute C10BK carpet - ($25) Black carpet for the sub box and amp rack.
4ga wire, 8ga wire, 16ga wire, fuses, dist blocks, etc.

Left to order:
Some form of closed cell foam to put over the CLD in the doors (probably will use Resonix).

Current Progress:

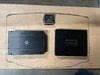
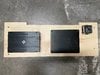
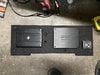
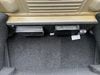
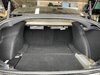
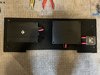
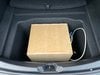
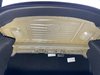
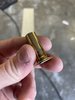
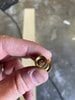
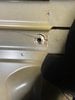
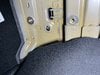
I've decided that the subwoofer will live in the "sub trunk", and the amps will all be mounted on a board that will mount on the trunk deck. I've already ordered up some "plus nuts" and inserted them in the factory holes in the trunk deck. Now I'll be able use use some 5/16 bolts to mount up a board. Next step is to cut up a piece of 1/2" plywood.

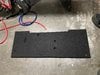
Built a prototype box for testing out of 3/4" MDF for the subwoofer. Most likely I'll keep it and just put a nice trim panel over the top. It's .83 cu feet sealed as recommended by HAT.
 

Attachments

  • IMG_3735.jpeg
    IMG_3735.jpeg
    640.7 KB · Views: 1,506
  • IMG_3737.jpeg
    IMG_3737.jpeg
    473 KB · Views: 367
  • IMG_3874.jpeg
    IMG_3874.jpeg
    412.2 KB · Views: 369
  • IMG_3901.jpeg
    IMG_3901.jpeg
    294.5 KB · Views: 342
  • IMG_3902.jpeg
    IMG_3902.jpeg
    324.6 KB · Views: 345
  • IMG_3904.jpeg
    IMG_3904.jpeg
    424.8 KB · Views: 339
  • IMG_3905.jpeg
    IMG_3905.jpeg
    768.3 KB · Views: 337
  • IMG_3920.jpeg
    IMG_3920.jpeg
    532.7 KB · Views: 342
  • IMG_3934.jpeg
    IMG_3934.jpeg
    432.8 KB · Views: 385
Ok, so already some changes. Decided to not get the Audiofrog GS10 tweeters because they're on backorder, and the retail versions would require modifications to the factory sail panel. Instead I'm going to go with the Dayton AN25's and use the nicely made brackets here: Amped Garage Model 3 Door Tweeter Bracket - Dayton Audio AN25(F/TI)

Also picking up some connectors for all the speakers on that same site.
 
  • Like
Reactions: byeLT4
Doing some more work on things slowly. I have a 3 year old so I pretty much only work in this late nights. I got my audiofrog GS60 and GS25 speakers finally. Using Travis Llado’s fantastic guide and 3D printable files (Tesla Model 3 Stereo - Part 1: Door Insulation) I printed up the blank adapter plates for the mids and door speakers. Did a little cutting and the speakers fit well.

I also ordered a 3” port so I can build a ported box. The sealed box sounds clean but isn’t getting very loud.
 

Attachments

  • 3DBCF47D-9AC4-426E-BE1F-EDD7D0A4F3A0.jpeg
    3DBCF47D-9AC4-426E-BE1F-EDD7D0A4F3A0.jpeg
    426.2 KB · Views: 387
  • 1C97D693-EFF8-4767-8923-19D4A22246D1.jpeg
    1C97D693-EFF8-4767-8923-19D4A22246D1.jpeg
    380.2 KB · Views: 377
  • 81C2BB87-93E9-4980-9C4A-DAC967BE6EBD.jpeg
    81C2BB87-93E9-4980-9C4A-DAC967BE6EBD.jpeg
    461.4 KB · Views: 380
  • BB0F9B8C-987E-4D81-9AF8-D0D8C03C75C8.jpeg
    BB0F9B8C-987E-4D81-9AF8-D0D8C03C75C8.jpeg
    409.4 KB · Views: 375
  • AD6568BB-B243-40C4-99A8-8B3F5BADE526.jpeg
    AD6568BB-B243-40C4-99A8-8B3F5BADE526.jpeg
    540.8 KB · Views: 407
Must watch thread for me!!! How do you plan on powering your amp? I haven't got a solid solution for that.

At the moment the plan is to run 4ga wire from the penthouse to a 150A fuse and then from there into the trunk and into a distribution block with fuses for each amp. I’m going to try it and see if it has any issues.

since this project is in flux, I’m sure I’ll be making changes. I’ve already decided to skip the DAmore amp and have a Helix M one amp on the way for the sub. Then my two amps both match.
I’m also heavily considering putting the amps in the trunk well and fiberglassing an enclosure for the sub in the factory spot. We’ll see how motivated I am. I do like the idea of making the amps easier to get to and hiding the sub.
 
More parts arrived today.

From crutchfield, a T-Spec VPNB2 power/ground distribution and fuse block. Also some fuses for the whole show.

From Amped Garage, a set of 3D printed adapters for the Dayton AN25D tweeters, and wiring adapters for the factor speaker connectors!.

I'm really excited about the Amped Garage connectors, they look like they're high quality OEM style connectors. These should make it easy to hook up my Audiofrogs and not have to cut any of the factory wiring in the doors or dash.

The power/ground dist. block is nice that it's all in one so I can run my power and grounds all from one central place.

Some other thoughts.. I've decided I'm going to mount my amps in the trunk well, and build a top over it so that I can still use the well to hold the charging adapters, etc. I'll be following Travis' lead here, but not cutting the carpet tub since I don't have as much equipment. I'll also be building a standard ported trunk box for my sub to try it that way. Eventually I'll fiberglass a place for the sub in the OEM location, but I want to get the sub up and running right away.
 

Attachments

  • IMG_3993.jpeg
    IMG_3993.jpeg
    822.9 KB · Views: 411
Last edited:
Got some more parts on the way.. seems like it never ends, but there are a lot of details.

Zip ties with screw hole - ($8) For organizing and routing all the wires on the amp rack board.
4 Gauge heavy duty quick disconnect ($16) - Will be nice to be able to quickly disconnect the whole amp system for testing or removal/emergencies.
Stinger 4ga Fuse Holder ($15)- A mini-ANL fuse holder for the main fuse. This will be put right near the penthouse where I connect the main wire.
Tesa Fabric Tape ($14) - For wrapping wires, etc.

I feel like I probably have enough things to actually start the project now. First step is getting the Helix DSP hooked up and using the input signal analyzer to figure out what frequency ranges we're getting in the SR+'s ICE.
 
Took the carpet tub out of the trunk tonight. I removed the bottom foam piece and set the tub on a 1/2” sheet of plywood and traced the outline. I’ll be cutting out the board soon and wrapping it in carpet. Just playing with amp layout today.
 

Attachments

  • 9FA42688-08CF-420E-A00D-90DDD09211F5.jpeg
    9FA42688-08CF-420E-A00D-90DDD09211F5.jpeg
    509.8 KB · Views: 397
  • CA3AC479-4190-448A-AC5F-7FA8D884F0A4.jpeg
    CA3AC479-4190-448A-AC5F-7FA8D884F0A4.jpeg
    517.4 KB · Views: 381
  • Like
Reactions: byeLT4
Well, going back and forth in where to put the amps led me full circle. I’m going to put them on a board underneath the rear deck. Here’s the options and why:

Mount on back of left rear seat - would give enough room but I’d have to cut the carpet on the back of the seat and routing wires would be tricky. The amps would have good airflow but they’re exposed if the seats ever need to be folder down.

Mount in trunk well - lots of room to work with. Need to slice a few holes for wires to enter the tub. Amps would be hidden with the top panel on. However that could compromise airflow to them.

And finally, mounting in the deck - the least destructive option. Can use the plus’nuts as mentioned about to mount bolts in factory holes. I won’t have to cut any carpet. Wires route in nicely from the passenger side in up. Also would have a decent amount of room.

So I went for it. I went ahead and cut a piece of 1/2” plywood 30” long by about 11 deep. Then I cut a notch out in the middle so it clears the rear seat latch point. I screwed in 4 5/16” furniture hangar screws into the plus nuts with their sharp pointy ends facing down. The beheld the board up to the deck, lined it up and pushed it into the points on the hangars to mark drill points. I then used an 11/32 bit to drill 4 holes and slotted them a little for adjustability. The test for works and looks good. Now to wrap it in carpet and mount these amps!
 

Attachments

  • 907E43D3-C2C1-479D-B153-D3A3AE6D6564.jpeg
    907E43D3-C2C1-479D-B153-D3A3AE6D6564.jpeg
    675.4 KB · Views: 363
  • 707CA287-1D53-4D1F-BF52-D948EE05AD62.jpeg
    707CA287-1D53-4D1F-BF52-D948EE05AD62.jpeg
    659.4 KB · Views: 353
  • A6F768F1-523F-4A96-BD47-1904800FF929.jpeg
    A6F768F1-523F-4A96-BD47-1904800FF929.jpeg
    369.7 KB · Views: 360
Did some work on the amp rack last night. Drilled holes in it so I can route wires behind it as there should be space on most of the board for that.

Used 3M super 90 spray adhewivr and put some carpet on the board and mounted up the amps and power block.
Now to test fit and route wires.
 

Attachments

  • A0C4F734-B77E-464B-B793-F53C32411050.jpeg
    A0C4F734-B77E-464B-B793-F53C32411050.jpeg
    777.3 KB · Views: 343
  • 54F02F38-FB86-4D85-969E-9A8DFA4FC198.jpeg
    54F02F38-FB86-4D85-969E-9A8DFA4FC198.jpeg
    715.2 KB · Views: 375
  • Like
Reactions: byeLT4
And here's a test fit will all the amps and power block mounted, and installed in the trunk. Still need to make the mounting holes a little more slotted for adjustment, but overall it fits well! I may have to put some carpet on that ugly metal too.
 

Attachments

  • IMG_4113.jpeg
    IMG_4113.jpeg
    711.8 KB · Views: 382
  • IMG_4114.jpeg
    IMG_4114.jpeg
    658.9 KB · Views: 385
  • Like
Reactions: muhteeus
Got the amp rack pretty much ready to go except for some RCA cables. Since there’s a lot of snow I’m leaving the Tesla in the garage a few days. Started getting the wiring runs going. I also am looking at the TeslaOffer harness. You can see they parallel ran the door tweets, a pillar speakers and dash mids all together. I don’t see any caps for crossing over and that’s a 1.34 ohm load on the ICE. Basically I’ll chop the rear deck wires out of the harness and chop the fron harness in two. Then I’ll solder in my input and outputs. This is a lot of wire to run, but the speedwire should make it quick and easy. I have a black run of a speedwire competitor I’m using for high level output along with a white 4-conductor wire. I need 12 wires out from the ICE to get front woofer range, front mid/high range, and rear door. I’ll have two blue runs of 9 conductor speedwire to output to everything from the Helix.
 

Attachments

  • EB7B1C8F-6FC8-42EE-9A75-521833C84035.jpeg
    EB7B1C8F-6FC8-42EE-9A75-521833C84035.jpeg
    805 KB · Views: 381
  • 7DCD3F01-6104-4F6F-B1AD-C0C839899ECB.jpeg
    7DCD3F01-6104-4F6F-B1AD-C0C839899ECB.jpeg
    604.3 KB · Views: 392
  • 450C0846-9FD7-4EE8-B449-A8E67C4BF1F7.jpeg
    450C0846-9FD7-4EE8-B449-A8E67C4BF1F7.jpeg
    633.8 KB · Views: 373
  • BC54E580-E1D6-4A26-8D0B-195F8199533C.jpeg
    BC54E580-E1D6-4A26-8D0B-195F8199533C.jpeg
    557.3 KB · Views: 356
  • 131FCFBE-772F-4AA8-BF5D-EA7ADF651205.jpeg
    131FCFBE-772F-4AA8-BF5D-EA7ADF651205.jpeg
    375.9 KB · Views: 387
  • E1230014-7E50-4BD1-9962-38CF2C3D09E9.jpeg
    E1230014-7E50-4BD1-9962-38CF2C3D09E9.jpeg
    416 KB · Views: 369
  • Like
Reactions: byeLT4
Today was a short session of wire prep and running. I hacked up the TeslaOffer Harness and labeled everything I need. I removed the section of the harness that sends signal to the rear deck, and also the sections that send signal to the A pillar tweeters. At this point you end up with two harnesses, one at the ICE computer and the other down at the connector near the seats. That connector now only serves one purpose - to send audio to the left door tweeter.

I also soldered up some 4GA wires to my quick disconnect plugs. The first one I tried a torch, but that got so hot it burned the insulation. Instead I got out my hot air station for SMT work and cranked it to 500C. I fed a bunch of solder in once it was hot and the connections are solid. Now I'll have a nice safe way to disconnect the amps if I need to.

Did some labelling, and then ran the speedwire bundles (blue) next to the factory wires. In the white cable tunnel I put the black DBLink and white 4-conductor wires. I would love to fit it all in that tunnel but I don't think there's enough room. This way inputs and outputs are seperate. Tommorrow I'll actually solder it all up and then get the power situation under control.
 

Attachments

  • IMG_4162.jpeg
    IMG_4162.jpeg
    406 KB · Views: 366
  • IMG_4164.jpeg
    IMG_4164.jpeg
    366.9 KB · Views: 347
  • IMG_4166.jpeg
    IMG_4166.jpeg
    504.2 KB · Views: 378
  • IMG_4167.jpeg
    IMG_4167.jpeg
    449.3 KB · Views: 353
  • IMG_4168.jpeg
    IMG_4168.jpeg
    530.7 KB · Views: 344
  • IMG_4169.jpeg
    IMG_4169.jpeg
    476.1 KB · Views: 347
  • IMG_4171.jpeg
    IMG_4171.jpeg
    402.3 KB · Views: 327
  • IMG_4172.jpeg
    IMG_4172.jpeg
    344.5 KB · Views: 320
  • IMG_4173.jpeg
    IMG_4173.jpeg
    451.3 KB · Views: 335
Tonight's small progress, running the wiring from front to back. Connected up the input wire to the hacked up wiring harness.

And some more video of this step:

I also attached a picture of the completed connection from the input bundles of wires to the harness. Tomorrow I'll do the outputs!
 

Attachments

  • Input Harness Wired.jpeg
    Input Harness Wired.jpeg
    754.1 KB · Views: 304
  • Like
Reactions: byeLT4
About to go to bed here, but did some more late night work tonight. Finished soldering up all of the connections and built my harness, got the wire lengths all the way I wanted them. Everything is heat shrinked then wrapped up in the fabric (tesa) tape.

I also got the 4ga power wire all run from the penthouse back to my quick disconnect, and then into the amp rack distribution blocks. I plugged it all in after doing a hard system power off/reset. Checked all the voltages at the amps, and everything is looking good!

Now the next part will be finishing up some things on the amp board. I need to slot the mounting holes a little so I can adjust the position of it slightly. I also need to run the RCA cable from the Helix V Eight DSP to the M one amp for the subwoofer, and then also wire up all the speakers to the DSP. Then I can plug in my laptop, get a basic setup done on the DSP and plug in the front harness and test everything out!

Once the core system is in place and working then I'll have to get the new speakers installed.

Oh another cool thing, I got a great deal on a used Helix Director! The director is a cool little touch screen/knob remote interface for the DSP so I can adjust lots of things as I want to. That means I'll have to run that cable and figure out where to mount that device (center console).
 

Attachments

  • IMG_4231.jpeg
    IMG_4231.jpeg
    582.9 KB · Views: 300
  • IMG_4233.jpeg
    IMG_4233.jpeg
    1,013.1 KB · Views: 287
  • IMG_4234.jpeg
    IMG_4234.jpeg
    614.9 KB · Views: 281
  • IMG_4235.jpeg
    IMG_4235.jpeg
    652.9 KB · Views: 300
  • IMG_4236.jpeg
    IMG_4236.jpeg
    405.3 KB · Views: 309