Welcome to Tesla Motors Club
Discuss Tesla's Model S, Model 3, Model X, Model Y, Cybertruck, Roadster and More.
Register

Ride height calibration

This site may earn commission on affiliate links.
tesla theory of operation of air suspension on model s and x 2019 and newer

Chassis height front - unladen (measured at the HV battery) 173.5 ± 5 mm
Chassis height rear - unladen (measured at the HV battery) 177.6 ± 5 mm
Chassis height front - unladen (measured at suspension bolt) 259 mm
Chassis height rear - unladen (measured at suspension bolt) 192 mm
Leveling rate between 1 mm/s and 10 mm/s
Reservoir fill capacity > 3 bar/minute
Minimum average wheel height (in normal system operation) -40 mm
Maximum average wheel height (in normal system operation) 41 mm
Leveling hysteresis ±5 mm of target level
Maximum system pressure (seen at the reservoir) 18 bar
Minimum system pressure (set by internal check valve of the compressor) 3.6 bar

Calibrate Air Suspension

During the the ride height calibration process, a correction value (offset) for each of the four sensors is calculated and stored permanently in the ECU’s EEPROM (Electrically Erasable Programmable Read Only Memory). A "perfect" vehicle that matches CAD exactly would have calibration offsets of 0. In reality each corner may need a small offset to match the ride height sensor values with the actual vehicle ride height.

Performing a ride height calibration is required when removing or replacing height sensors, after changing the TAS2 ECU, when performing repairs on the suspension or before a wheel alignment.

Ride height calibration of the vehicle height must be performed at STANDARD ride height on a 4-wheel alignment lift (see the Service Manual for more information). During ride height calibration, Toolbox asks the technician to confirm the wheel type and check the tire pressures. Always refer to the Service Manual for the latest information on ride height; General Information > Technical Data > Wheel alignment > Suspension Bolt Height.

Once wheel type and tire pressures are confirmed, vehicle will level to high ride height and then lowered to standard ride height. By doing this the vehicle will try to level all 4 corners to 0 ± 5 mm (standard).

Physically measure the actual ride height between the ground (4-post lift) and the bottom of the chassis at pre-selected points. These heights should be entered in Toolbox. These values should not differ much from the ride height specification. The ride height for Palladium X is 259 mm for the front suspension and 192 mm for the rear suspension

Toolbox sends the 4 measured ride height values to the vehicle. The vehicle will calculate an offset value for each of the corners. These offsets are used to match the measured ride heights with the ride height sensor values. This process is called 'ride height calibration'.

Example: Vehicle levels from STANDARD to HIGH and back to STANDARD. It ends at the following ride heights (all nicely within the ±5 mm window):

  • sensor FL = 3 mm
  • sensor FR = -2 mm
  • sensor RL = 0 mm
  • sensor RR = 2 mm
Measured ride height are:

  • measured FL = 260 mm
  • measured FR = 261 mm
  • measured RL = 190 mm
  • measured RR = 189 mm
The vehicle will calculate the following offsets:

  • Offset = sensor - (measured - spec)
  • Offset FL = 3 - (260 - 259) = 2 mm
  • Offset FR = -2 - (261 - 259) = -4 mm
  • Offset RL = 0 - (190 - 192) = 2 mm
  • Offset RR = 2 - (189 - 192) = 5 mm
Let's reason the offset value for FL (use the same reasoning for the other corners): Tesla Air Suspension ECU (TAS2) positioned the vehicle at 3 mm (3 mm too high). Physically, the vehicle is at a height of 260 mm (1 mm too high). Would TAS2 have positioned the vehicle 3 mm lower at exactly 0mm, the measure height would have also been 3 mm lower, so 258 mm. 258 mm is 1 mm lower than spec. So we need to apply an offset of -1 to compensate for that error. So the ride height calibration value for FL is -1 mm.
 
So I have a question about the procedure of the caliberation. Hopefully you or someone else will be able to help. I have a 2022 Model S. The right front shock was damaged, along with the inner tie rod and a few other suspension components. Those have all been replaced and the car is working fine. Except it is giving me an "Air Suspension Needs Service" error on the screen. So, I purchased the parts to connect the car to Toolbox and have subscribed to Toolbox for a month. I have put the car on flat ground and made sure the tire size is correct. I have raised it to very high and back down to standard. I have used a digital laser measuring tape to measure from the ground to the suspension bolt heads as I checked with a Tesla Tech and verified that is the spot to measure from. These measurements are quite a bit different than the factory standard measurements. Also they are different than the measurements the car thinks it is at using the Toolbox check ride height action. My measurements are FR 160mm FL 169mm RR 140mm and RL142mm. The car says it is at 255 for the fronts and 155 for the rears. When I enter the actual measurements that I took, Toolbox refuses the numbers as they are too far from the factory numbers. So, I entered the factory numbers in the fields and it accepts those and does it's thing to caliberate the suspension. The error goes away for a few miles and then it comes back. My question is, should I be entering in false measurements that are only 5 off of the factory settings until the car adjusts it to where it should be? Is this the way it is normally done? Seems that it should just take the numbers and make the adjustment offset. I only have toolbox for a week or so left and I would love to get this figured out. I also can't figure out why my numbers are so far from the factory numbers. My car does not look to be too high or too low. The ride height looks pretty spot on to me. I would actually love it if I could just kill the warning message and run as it is, but it would be nice to have it correct.

I can do some screenshots of toolbox later today if that helps.
 
So, raise to very high and then low. Enter toolbox. Reset the caliberation. Read the ride height through toolbox? Measure the actual height from the chassis bolt to the floor at the 4 corners. Open Caliberate the suspension in toolbox under actions. Enter in the actual values measured on the car and hit run. Once completed, raise the vehicle to very high and then back to low. Is that it?

I have done this once or twice, I think. So many times and so many fails. Each time I enter in the actual measurements, it tells me it can't use that data because it is outside of the 25mm difference. If the car is not within 25mm of what it thinks it should be, 255 for the front and 150 on the rear, it rejects the info and won't caliberate.
 
Last edited:
Great post. Where are the reference suspension bolt height that you measure from?.

Also in theory is sounds like the car has a 25mm variable, so for example if you want to lower the car without using lowering links you could add +25mm to the factory height it expects?

When it asks you the heights to enter I assume that the suspension bolt height and not the chassis height (134.2mm and 133.5mm)
 
You guys rock. Following that procedure worked like a charm. Mostly. Seems that my car times out about half the time when running the raise to very high and very low in the level the air suspension. I started with very high and then had toolbox take it to very low and then I did the measurements. Super low readings, but who cares, as long as it works. Drove about 10 miles home and the errors are not there. I hope it lasts. Thanks to all who helped.
 
Great post. Where are the reference suspension bolt height that you measure from?.

Also in theory is sounds like the car has a 25mm variable, so for example if you want to lower the car without using lowering links you could add +25mm to the factory height it expects?

When it asks you the heights to enter I assume that the suspension bolt height and not the chassis height (134.2mm and 133.5mm)
The measurements are at the front and rear chassis bolt heads to the ground. Today I measured with the car at very low and the measurements were 119 and 115 in the front and 124 for both the rears.
 
  • Like
Reactions: Visionary
The measurements are at the front and rear chassis bolt heads to the ground. Today I measured with the car at very low and the measurements were 119 and 115 in the front and 124 for both the rears.

Oh ok I will have to check where they are on my '23 S. The alignment pdf states the front suspension bolt height is 221m and the rear is 147mm ('21 and up cars). I'm assuming that is in the low setting.
 
You guys rock. Following that procedure worked like a charm. Mostly. Seems that my car times out about half the time when running the raise to very high and very low in the level the air suspension. I started with very high and then had toolbox take it to very low and then I did the measurements. Super low readings, but who cares, as long as it works. Drove about 10 miles home and the errors are not there. I hope it lasts. Thanks to all who helped.

Did you do the calibration on your driveway / garage ?. I have to check the level of mine later to see how level it is.
 
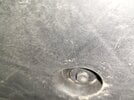
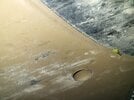
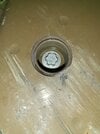
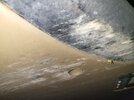
I will shoot a photo of the bolts you are to measure to. They are fairly obvious when you are under there. Everything is flat excpet for the bolt that is in a recessed area. In the front it is a 25mm bolt and in the rear, it is a 15mm maybe.

I used my father in laws driveway which is flat and level. It may not be an alignment rack level, but close enough. I have a dewalt laser tape measure that shoots a laser out and measures the distance. Nice and accurate. Following the procedure from MobileClimate above, I measured my car with it at very low. Makes it a bit hard to get under to measure, but the bolts are not that far in. Maybe 12-14 inches.
 
Here are the bolts to measure to. When looking at the bottom side of the car, it is near the rear axle and is the only one on each side that is recessed. It makes sense once you see it. Anyway, I shot the actual bolts and then a side view to show how it looks when staring from the side while laying on the ground. LOL.

Sorry about the little grasshopper. He snuck into the shot.
 

Attachments

  • 20230713_234751_resized.jpg
    20230713_234751_resized.jpg
    1.1 MB · Views: 207
  • 20230713_234756_resized.jpg
    20230713_234756_resized.jpg
    1 MB · Views: 94
  • 20230713_234819_resized.jpg
    20230713_234819_resized.jpg
    1,010.1 KB · Views: 86
  • 20230713_234925_resized.jpg
    20230713_234925_resized.jpg
    971.5 KB · Views: 77
  • 20230713_234939_resized.jpg
    20230713_234939_resized.jpg
    830.5 KB · Views: 74
  • 20230713_234943_resized.jpg
    20230713_234943_resized.jpg
    810.4 KB · Views: 91
Thanks for the pictures!. I will look for them on my S and check the height of them vs what the spec. I'm trying to dial everything before I take it for a alignment.

So the dewalt laser tape is on the ground and shoots a red beam to the bolts and gives you the height?. I have a similar tape measure to that I think.

Since you measured in low, did that cause the ride height to increase?. I actually spoke to a tesla tech yesterday and they say they use medium height for ride height calibrations.

For toolbox v3, I just need to get a Ethernet cable (I have a 2023) and then connect it to my laptop to use?. Thanks!.
Hopefully you have just the rj45 connection. Mine was the new, but slightly old, special connector. So I needed the media converter, special cable, rj45 to usbc connector and power supply for the media converter. Have you pulled down the panel beneath the mcu screen yet to make sure you have the right connector? Mine is a 2022 and I would have thought it would be the rj45 connector, but was wrong.
 
check the service menu what are the current codes?

here is a service tip on a limp home mode..do a search under the article menu in TB3

Compressor alerts due to ground corrosion​

Description

Firmware Details
Steps To Test
Steps To Fix


Effects
Causes

DESCRIPTION​


Tesla Air Suspension (TAS) compressor connector X088 has a melted and/or corroded ground. This may cause intermittent alerts.
c4171a67-b5b9-454d-b3e4-8d78a3b7af5e.jpg

FIRMWARE DETAILS​


None

STEPS TO TEST​


  1. Confirm one or more of the following alerts are present on the vehicle or in the logs:
    • TAS_a222_compressorPrefillFault
    • TAS_a213_yellowWarningLamp
    • TAS_217_LimpHomeMode
  2. Measure the power and ground at X088.
    • Note: Ground may be intermittent.
  3. Measure the resistance at connector X088 Pin 2 to GND_FR_RH1.
  4. If resistance is as expected, perform a wiggle test.
  5. Inspect connector Pin 2.
  6. Perform a push pull test of the wire from the back.

If connector X088 ground is corroded, then this is the issue.

STEPS TO FIX​


  • For Tesla Service Centers, repair or replace the harness. Refer to SI-17-17-002 for more information.
  • For third-party repair, follow the instructions in the relevant documentation to determine whether the issue identified can be repaired or the harness must be replaced:

FILTER CAUSES AND EFFECTS:​

Select model to filter by

EFFECTS​


POSSIBLE CAUSES​


None
 
Last edited:
check the service menu what are the current codes?

here is a service tip on a limp home mode..do a search under the article menu in TB3

Compressor alerts due to ground corrosion​

Description

Firmware Details
Steps To Test
Steps To Fix


Effects
Causes

DESCRIPTION​


Tesla Air Suspension (TAS) compressor connector X088 has a melted and/or corroded ground. This may cause intermittent alerts.
c4171a67-b5b9-454d-b3e4-8d78a3b7af5e.jpg

FIRMWARE DETAILS​


None

STEPS TO TEST​


  1. Confirm one or more of the following alerts are present on the vehicle or in the logs:
    • TAS_a222_compressorPrefillFault
    • TAS_a213_yellowWarningLamp
    • TAS_217_LimpHomeMode
  2. Measure the power and ground at X088.
    • Note: Ground may be intermittent.
  3. Measure the resistance at connector X088 Pin 2 to GND_FR_RH1.
  4. If resistance is as expected, perform a wiggle test.
  5. Inspect connector Pin 2.
  6. Perform a push pull test of the wire from the back.

If connector X088 ground is corroded, then this is the issue.

STEPS TO FIX​


  • For Tesla Service Centers, repair or replace the harness. Refer to SI-17-17-002 for more information.
  • For third-party repair, follow the instructions in the relevant documentation to determine whether the issue identified can be repaired or the harness must be replaced:

FILTER CAUSES AND EFFECTS:​

Select model to filter by

EFFECTS​


POSSIBLE CAUSES​


None
Thank you for your reply, I checked Compressor and all it's working fine and currently have following error codes:
- EAS_w007_EAS_LevelingNotPossible
- THC_w0130_radLeftShutrNoFeedbk
The problem is Front Suspension are working fine but Rear suspension not responding at all.
Any guideline, how can I reset the calibration?
I followed from steps in TB3 but have following errors
1690467753576.png

1690467804395.png


Thank you for your help ; )
 
You want to reset the calibration put in tas service mode by using the screen and then set for high using toolbox 3 then back to low check height and then enter into tool box the measurements should be close
I'm experiencing some Tesla service frustration re: ride height calibration.

Is "tas service mode" and "toolbox 3" something that a Plaid S owner can gain access to without Tesla assistance? I'd love to remove Tesla Service from this loop.