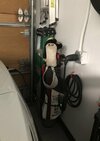
Now that I’ve downloaded the Wall Connector manual (shoulda done that before my original post), I see that the Wall Connector also supports conduit entry from the top or bottom. So, I’m considering 2 options (picture added for clarity):
- Remove the junction box with the 14-50 and connect the existing conduit directly to the top entry of the Wall Connector (cleanest approach), or
- Remove the 14-50 from the junction box and run another short conduit to the Wall Connector
The service loop in the junction box is relatively short, so… Option 1 would require placing the splicers inside the Wall Connector wire box (if allowed) or carefully shortening the conduit (with the existing wires inside) so I have a sufficient service loop. I also need to research how to properly splice wires for a 240V/50A load.