As I'd posted in another thread, I was in the process of trying to add Next Gen front seats to my 2014 Model S. I had missed the window for Tesla to do it (and I didn't want to pay over $6,000...), but this is my one bugaboo with our December 2014 build: the seats are not that comfortable for long drives (which we do several times each year).
I found a set of Next Gens here in the SF Bay Area. Unfortunately for me, I didn't recognize till after I got home that one was a 2015 vintage (passenger), while the drivers seat was built in December 2016.
The passenger seat was a direct swap. One wiring harness and the air bag connector. However, when I went to replace the drivers seat, I recognized the newer seat had connectors had been totally changed by Tesla, and were not compatible with an older car. I reached out to the prior owner, who had said these seats had been in his 2013 S. I didn't really get anywhere, as he said he had a mechanic do the swap, and he said the wiring harnesses needed to be changed from seat to seat. Looking closely, this appeared to me to be a very involved process, and quite frankly, the harness in the drivers seat did not appear to ever have been touched, let alone removed, swapped for a 2013 harness, then returned to the 2016 configuration.
Not wanting to tear the seat apart to get all the wires out (there are 25 wires in the two connectors of the 2014 seat), I started looking at other options. Doing a wire by wire comparison, I found that the 2016 seat only has 24 wires. The one extra wire in the 2014 seat is red with a green stripe. Acquiring a wiring diagram for the 2014 seat, it appears this extra wire is the ground wire for the seat heater. In the 2016 seat, the seat heater ground ties into another wire before the harness, resulting in one less wire.
Otherwise, all the wires match up color for color. Since I didn't want to tear the seat apart to replace the wires, I decided to explore simply cutting off the connectors from the 2014 seat and attaching them to the 2016 one (there is also a three wire harness for the air bag mounted in the seat. The connector is also different between the two seats, though the wire colors are consistent).
A couple of points if you ever decide to pull your own seats out:
1. Be sure to turn the power off in the vehicle before disconnecting or connecting any wiring...
2. There are two different sized Torx bolts holding the seat in: the two outer rails are secured by T-40 bolts, while the inner rails are held down with T-47 bolts. Before starting this, I didn't have a T-47 wrench. I quickly found out that a T-45 socket (that I did have) won't cleanly pull these two bolts. Buy a T-47 socket and save yourself lots of aggravation...
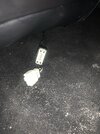
I initially cut the connectors off the 2016 seat. In doing so, I recognized there are two blue wires of similar size and two same sized yellow wires. One of the blue wires is the power for the underseat light. I marked both sides of the cut with black ink to differentiate them. Likewise, I determined where one of the yellow wires terminated at the Memory Seat Module harness (MSM), and marked that wire similarly.
Speaking of the MSM, be sure to take the MSM out of your seat and put it in the replacement one. This will apparently save you lots of grief, as I have been told that if you don't do this the new seat won't work in your car. (I swapped mine, and everything works fine).
The 2014 has one connector with 8 wires, one with 17, and the three wire airbag connector. I put a male insulated crimp connector on each wire coming out of the seat. There is a large black, a large red, and a medium sized green/yellow wire. Each of these got a larger connector, while all the rest got a smaller one.
I really hesitated in cutting the connectors off my 2014 seat, as I worried that if this didn't work (or something shorted out), it was going to be a nightmare to remedy. I waited several days before deciding this afternoon to move forward. I pulled the driver's seat out, and proceeded to do the deed.
Working slowly and meticulously, I added a female insulated crimp connector to each wire of the 2014 seat harnesses. I had left about 4" of wire on each harness, and ignored the red/green wire in the harness. I plugged each in, checked to be sure the connections were all solid, then wrapped each connection bundle with tape. I did the same with the airbag harness.
Putting the seat into the car, I plugged the connectors into the sockets, and loosely bolted the seat down. With trepidation, I turned the car back on, and low and behold, everything works. No error messages, all the functions are there, and the memory module (while having to have settings reset) works fine. Bolted the seat all the way in, and test drove it. So much more support than the original seats!!
The last thing I need to do is go to a body shop and have the tethers installed between the door panels and the doors (new with the Next Gen seats). I looked into the airbag timing, and have been assured that the change is so minute that it is not a problem, so for now I am not going to worry about having the airbag control module refreshed...
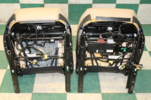
Here are some photos. While I just finished this today, I am already glad I went this route. I knew that if I tried remove the wiring harnesses completely from the seat that I would screw something up majorly...
Here are a few photos;
View attachment 285819 View attachment 285820 View attachment 285821View attachment 285822


"