Today i made some progress, and got the seat heaters to work, both sides.
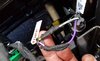
I used the controller from the old seats, and basicly it works like this.
On the input you have 3 wires, Ground, Line-BUS then 14V.
You might just want to check that you do have 14V there just to be sure, if not then some fuse have gone.
Then on the output you have two main connectors.
The two grey wires are for Temp-sensor in the seat.
This will be like 10-20 Kohm depending og the temperature inside the seat.
(might be even more, or less but its in the Kohm reange anyways.
And the black connectors are for each heater element.
Each heat element will be like 3-4 ohm.
There are two heater elements, one for the back, and one for the bottom.
And you really have to connect ALL 6 wires to the controller before it will give any power out.
The new seats will have temp sensor both in the back and in the seat.
Since the controller only has one input you have to chose, and I chose to use only the one for the seat.
View attachment 533600 View attachment 533601 View attachment 533602 View attachment 533603


") maybe it'll work lol
maybe it'll work lol