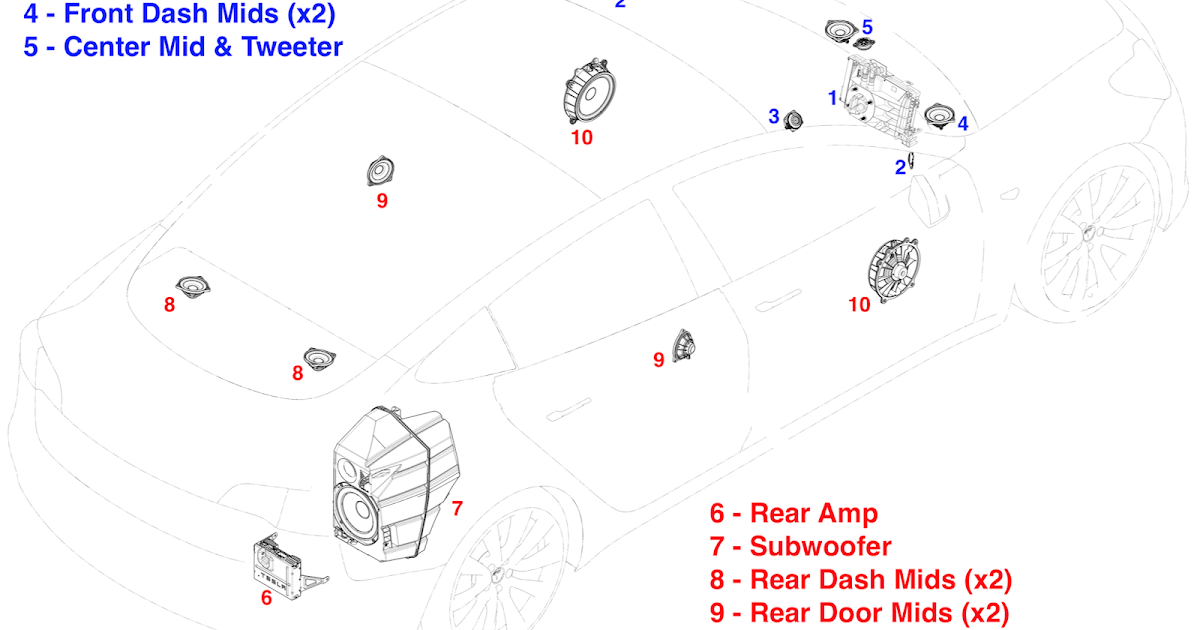
Part of that was my fault. It isn't a "complete" kit in that if you watch the video, you will see them mention a mounting bracket for the XLCA2 (LOC unit) that goes near the factory amp area. That is something they just fabricated for that install. It is light enough as another user mentioned it can just "float" next to the power amp or add velcro to mount it in the well and out of the way. The VADM1 amplifier will get mounted further up if you mount the same place as the video and there is room in the void below it that you can feel comfortable installing with the self-tapping screws.
It seems they have issues from time-to-time shipping with incomplete boxes though. My amp didn't come with the cables and an Amazon review of the VADM1, a customer was missing the terminal block you screw your speakers into, so take account of what you receive. From what I can gather:
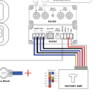
VADM1 should (probably) come with:
1. 4 pin terminal block (mine was already inserted) for screwing in the speaker leads
2. 3.5 mm to RJ11 connector for the remote bass control (mine was absent)
3. Remote bass control (without LED). Mine came with it, but missing the cable and the XLCA2 came with it so I could adjust the bass if I wanted with this.
4. 4 pin white connector to RCA (required to connect to XLCA2) (mine was absent and they had to ship it)
5. Allen wrench to adjust power terminals
6. Mounting screws
XLCA2 should (probably) come with:
1. RJ11 to RJ11 cable for bass control
2. Remote bass control with LED
3. Mounting bracket attachments
4. Mounting screws
5. (2) wiring terminal blocks
The wiring kit includes the expected materials so you can see if you have them. I used the remote wire sense, the speaker cable, the power cable, ground cable, fuse, and RCA plugs from it. The power and ground cable already come with one end having a connector.
IMPORTANT:
Before going to work on the system, find the link to mountain pass performance reset routine and unplug the negative battery terminal and open the contact connector under the seat. Another user pointed out a good idea in removing the fuse in the fuse block before connecting everything and then installing that last. Be sure you have a full 12V battery and/or leave your frunk open.
You don't need to use positaps or t-taps if you get a stripper that spreads the insulation. They sell one at ACE hardware for $17 to $20. You make a miltiary splice by spreading the wire to tap into with this and using a small precision screwdriver or pick to make a hole in the wires and feed your wire to insert in there, close the hole and wrap the inserted wire around the exposed area. Then use electrical tape around it and place a few zip ties over it to keep it firmly in place. One mistake I made was trying to go back and spread one further and accidentally clipped some strands, so ended up grabbing the soldering iron for that one. The cost is going to be roughly the same if you use positaps, but you get a tool you can use for quick stripping down the road if you are working on your car or your house.
The jack nuts are tricky to get to install. I stripped the one that came with it and if the friction wrench that is coming today doesn't hold it in place, I may just have to resort to zip ties with some padding between the frame and the speaker box mount to keep it from rattling.
Tools needed:
1. 10 mm socket and wrench/driver
2. 13 mm socket and wrench/driver
3. wire stripper
4. electrical tape
5. precision flathead screwdriver
6. allen wrench set (I don't think the wire kit came with one for the fuse block)
7. friction wrench (maybe)
8. cheap multimeter is helpful - check continuity between terminals at the plug for the factory amp and test voltages. Placing in VAC and measuring the output of the RCAs from the XLCA2, you will see enough change when music is playing to confirm you are getting output.
Material that helps but probably isn't absolutely needed:
1. Tesa Tape
2. utility knife to trim away factory tesa tape carefully and/or scissors.
3. velcro strips to mount the XLCA2 and/or the VADM1. Both are plenty light enough that industrial velcro are probably ok. Note you will want to avoid covering the factory label like I did. Luckilly the box has the serial number on it.
4. 3.5mm to RCA adapter to plug into your cell phone to test the amp if there is no sound
If you have a factory amp and want to continue using it: Allyn recommended wiring the speakers out of phase to prevent it from cancelling out the factory sub. In their setup they kept both connected and that is what they did for a sound they liked. I have mine wired this way because I listen to a wide range of music and really like getting that drum hit that the smaller sub will do better at.
I think that is about it. HTH
Links for items I ordered:
Strippers:
https://www.amazon.com/gp/product/B000OQ21CA/ref=ppx_yo_dt_b_asin_title_o01_s00?ie=UTF8&psc=1
(I saw a generic set at Ace when getting the headphone to RCA adapter)
Tesa tape:
https://www.amazon.com/gp/product/B00XPDVER2/ref=ppx_yo_dt_b_asin_title_o01_s00?ie=UTF8&psc=1
Pick set (in hindsight, the precision flathead screwdriver would've done the job):
https://www.amazon.com/gp/product/B002KS1E7I/ref=ppx_yo_dt_b_asin_title_o01_s00?ie=UTF8&psc=1
Friction wrench (don't know yet if it works):
https://www.amazon.com/gp/product/B00NWJJLXS/ref=ppx_yo_dt_b_asin_title_o00_s00?ie=UTF8&psc=1
I saw a specific jack nut insertion tool on there for around $50 but it doesn't come with the mandrel so you would end up spending over $100 just to mount the sub with that.