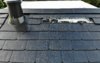
Here are a few more...MORE PIX PLEASE!!!!!!!!!!!!!!!!!!!!!!!!!!!!!!!!!!!!!!!!!!!!!!!!!!!!!!!


Welcome to Tesla Motors Club
Discuss Tesla's Model S, Model 3, Model X, Model Y, Cybertruck, Roadster and More.
Register
Install the app
How to install the app on iOS
You can install our site as a web app on your iOS device by utilizing the Add to Home Screen feature in Safari. Please see this thread for more details on this.
Note: This feature may not be available in some browsers.
-
Want to remove ads? Register an account and login to see fewer ads, and become a Supporting Member to remove almost all ads.
You are using an out of date browser. It may not display this or other websites correctly.
You should upgrade or use an alternative browser.
You should upgrade or use an alternative browser.
Going for it - new Solar Roof install scheduled
- Thread starter TheRedPill
- Start date
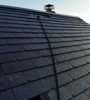

The surface of the tiles is slippery, similar to that of a metal or slate roof, so walking on the roof is not recommended. They are easily strong enough to support the weight, but quite slippery. Previous roof was shake, and it, too was quite slippery when moist due to moss growth etc - I used an articulating/folding ladder over the ridge as a temporary scaffolding. I plan on using similar method for this one - difference now would be to take care of the metal ridge cover.Can you walk on the roof?
patrick40363
Active Member
I was curious how you would get to a vent stack to fix it or the side of your chimney.The surface of the tiles is slippery, similar to that of a metal or slate roof, so walking on the roof is not recommended. They are easily strong enough to support the weight, but quite slippery. Previous roof was shake, and it, too was quite slippery when moist due to moss growth etc - I used an articulating/folding ladder over the ridge as a temporary scaffolding. I plan on using similar method for this one - difference now would be to take care of the metal ridge cover.
A folding ladder carefully straddling over the apex of the pitched roof should do the trick. The ladder opens up to match exactly the angle of the roof pitch. This is what I did for the shake roof before.I was curious how you would get to a vent stack to fix it or the side of your chimney.
Yes, this is V2.Thanks for all of the info. I assume that this is a V2 roof and not V3?
@woferry, how does this seem to compare to yours? Pretty much identical or have they changed/upgraded anything?
woferry
Member
Only thing I've noticed is that Tesla seems to be using more non-glass pieces around unusual edges/flashings. It's not nearly as obvious here since there's hardly any interruptions in the roof, but underneath the chimney it seems there's a large filler piece that spans more than one row before the tiles begin again. It's a lot more obvious in the pictures from this article, namely the second picture ("copious amounts of framing" caption), where the tiles pointing towards the camera use a 5-sided (what I'd call "house shaped", if you look at it with a tilted head) filler piece against (what appears to be) straight-cut tiles, where in mine the tiles are cut diagonally and the same (smaller) trim piece normally used on straight edges was used (though under the ridge to the right it seems they still did diagonal cuts).
I'd point to a picture in my album for reference, but I've switched ISPs in the past week, and while I'm still paying for web hosting from my old ISP until I fully-transition, they've set my monthly quota to 0 bytes (so what am I paying for???), so I'm trying to get that straightened out.
I'd point to a picture in my album for reference, but I've switched ISPs in the past week, and while I'm still paying for web hosting from my old ISP until I fully-transition, they've set my monthly quota to 0 bytes (so what am I paying for???), so I'm trying to get that straightened out.
That is very nice. Please keep us updated on how well this all works. I’m following your roof install closely since I've got a Tesla slate tile roof reserved. Hopefully they start manufacturing the other tile selections soon.Here are a few more...
We are doing a "Max Solar" install, where the solar coverage is about 70% of total tile area. Roof size is relatively small.That looks great! I really hope Tesla pulls their gear together and ramps up this Tesla Roof stuff. Yours looks nice.
Question: what % of the roof did you get covered in active cells vs. non-solar tiles? I know you figured out a limit of 10kW per PG&E so selected 10kW, but I wonder what the max theoretical kW your roof could produce using these tiles is. I also know that maxing out the solar tile % (100%) is very expensive, and requires bribing the Tesla engineers (and likely going off-grid if the utility doesn't allow it, basically making the idea impossibly expensive due to massive backup requirements (10x the storage minimum)).
boriszima
Member
We are doing a "Max Solar" install, where the solar coverage is about 70% of total tile area. Roof size is relatively small.
Very cool. Roof looks amazing. If you need more kW production, can you simply remove fillers and add solar roof shingles? Or wires that were ran at certain gage can only carry certain amp and or voltage. In other words, is it easy to add more to your current setup?
woferry
Member
With "Max Solar" (same that I got) in theory every tile that could be producing is (the rest are non-producing due to setbacks or flashings or places where the 3-tile PV Modules simply couldn't fit). So it likely isn't possible to add any more PV Modules as they're designed in the v2 design. I kinda doubt any v2 installs are anything other than max solar so far, when they first talked to me they said if the system wasn't above 10kW they'd have shelved my design and gotten back to me (much) later. So of the 3 sizes they offered me the only one that would lead to an install when it happened was the max solar option.
The wiring is basic MC4 cable, rated for 600V (though it looks like Tesla keeps the string size below ~475V Voc, at least based on what they told me about my design), and the v2 PV Module Isc is 8.35A which I get the impression isn't that different from more traditional panels. The roof wiring is all series, so the current isn't an issue, its just how many PV Modules can be strung together before the Voc gets too high. The fact that each block in the Diode Trunk Harness can support a maximum of 4 PV Modules might lead to some re-do of the DTH runs if more modules were added later, which could get messy I'd guess.
The wiring is basic MC4 cable, rated for 600V (though it looks like Tesla keeps the string size below ~475V Voc, at least based on what they told me about my design), and the v2 PV Module Isc is 8.35A which I get the impression isn't that different from more traditional panels. The roof wiring is all series, so the current isn't an issue, its just how many PV Modules can be strung together before the Voc gets too high. The fact that each block in the Diode Trunk Harness can support a maximum of 4 PV Modules might lead to some re-do of the DTH runs if more modules were added later, which could get messy I'd guess.
Only thing I've noticed is that Tesla seems to be using more non-glass pieces around unusual edges/flashings. It's not nearly as obvious here since there's hardly any interruptions in the roof, but underneath the chimney it seems there's a large filler piece that spans more than one row before the tiles begin again. It's a lot more obvious in the pictures from this article, namely the second picture ("copious amounts of framing" caption), where the tiles pointing towards the camera use a 5-sided (what I'd call "house shaped", if you look at it with a tilted head) filler piece against (what appears to be) straight-cut tiles, where in mine the tiles are cut diagonally and the same (smaller) trim piece normally used on straight edges was used (though under the ridge to the right it seems they still did diagonal cuts).
I'd point to a picture in my album for reference, but I've switched ISPs in the past week, and while I'm still paying for web hosting from my old ISP until I fully-transition, they've set my monthly quota to 0 bytes (so what am I paying for???), so I'm trying to get that straightened out.
For ours, on the rear side of the pitched roof, it transitions to a flat foam roof section. For this transition on the lower edge of the roof, they stopped the tiles two rows before and used flashing material along the length of the edge. The flashing is formed sheet metal, appears to be painted galvanized steel.
For the top ridge, on the both the front and rear surfaces, they stopped the tiles three rows before the top ridge. The front stopped one row before the lower edge (where the gutter goes).
pwrusty
Member
Super excited for you. I signed docs in March 2019 for a "max" 14KW system in OC - So Cal. Each momth I get a notice they're still awaiting the permitting approval. Your pictures look great. Keep us posted on the output.
I'm worried the system won't be started before 12/31/19 in order to get the 30%ITC (drops to 26% in 2020??) and I want to ensure I get the full credit (or Tesla comps the difference?).
Anyone out these committed to the contract and still awaiting an install date?
Several have been put up in LA, but supposedly I'm one of the first in OC.....
Super excited for you. I signed docs in March 2019 for a "max" 14KW system in OC - So Cal. Each momth I get a notice they're still awaiting the permitting approval. Your pictures look great. Keep us posted on the output.
I'm worried the system won't be started before 12/31/19 in order to get the 30%ITC (drops to 26% in 2020??) and I want to ensure I get the full credit (or Tesla comps the difference?).
Anyone out these committed to the contract and still awaiting an install date?
Several have been put up in LA, but supposedly I'm one of the first in OC.....
Congrats! --> Let's hope your system all goes in before the end of year.
My system is currently on pause - this was self inflicted.
Just a head's up for you, that this caused unforseen delays of at least ~4 weeks for my project.
I threw a wrench in right about the time they were finished installing the roof tiles - I added a last minute change to add a third Powerwall, so they had to go back and redo the calculations, design drawings, etc.
Getting everyone back in sync and rescheduled was the main issue. Tesla uses different crews: Subcontractor Crew, Solar Roof Crew, PowerWall Crew, Wall Charger Crew. Add to this the city permitting requirements. The crews need to work in a sequence, with one crew having to wait to finish before the next crew starts, and ideally, all of this should be in lockstep.
After our restart, Tesla came back in and installed all of the electrical wall boxes plus the three Powerwall mounting brackets.
We now have to wait an additional 4 weeks for the city approval and Tesla to continue install.
Next steps for us:
- wait for city to approve PW bracket mounting
- city approves PW brackets
- Tesla comes in to wire up the RSDs (solar panel mandatory Rapid ShutDown safety circuits), hang the PWs and finish all wiring, then install 2 Wall Connectors (car chargers).
- wait for city to approve setup
- city comes in to approve finished setup
- apply with PGE for Permission To Operate (PTO)
- wait for PGE to say "go"
- throw the switch - plug-n-pray!
woferry
Member
So you're not stacking the 3 PW's, but 3 separate brackets? I don't know what sort of planning/permit discussions Tesla had with San Jose before my install, but thankfully the city inspector was out about 2 hours after they had the bracket on the wall, so they hung the bracket first thing, started preparing the backup loads panel, then the inspector showed/signed-off, and they had the PW hanging off the bracket all in one day (nothing was wired-up yet, though). The actual circuit re-wiring, conduit from PW to backup panel & commissioning of the PW was all done by my TSR project lead while the rest of the crew was working on the roof (well, he took one of the crew to help handle the conduit in the crawl space). But yeah, normally San Jose doesn't seem to do anything fast, so I'm not surprised a change mid-execution would blow up the schedule pretty bad (one missing shot of fireproof caulk blew up my project 2 weeks for a second city inspection).
Interesting also that they held off on the RSDs, I wonder if they're waiting for a newer date code unit like I'd heard about on my service call (mentioned on my thread). I haven't heard anything about the ones Delta was supposed to be sending to me yet.
I eventually plan to go from 1 PW to 2, though it really doesn't make sense until I add AC or electrify some other major appliance. I naively figured adding a second one later would be easy, but between having to go through the permit/inspection (and I guess PTO) process again, I'm sure it won't be nearly as easy as I'd hoped.
KSilver2000
Active Member
Ulmo
Active Member
Doing it now will make it easier to have it done and over with. The additional capability of 3 batteries instead of 2 will make you a lot more comfortable with your system. Yes, it's too bad they have so many lockstep steps, but that's said and done.Congrats! --> Let's hope your system all goes in before the end of year.
My system is currently on pause - this was self inflicted.
Just a head's up for you, that this caused unforseen delays of at least ~4 weeks for my project.
I threw a wrench in right about the time they were finished installing the roof tiles - I added a last minute change to add a third Powerwall, so they had to go back and redo the calculations, design drawings, etc.
Getting everyone back in sync and rescheduled was the main issue. Tesla uses different crews: Subcontractor Crew, Solar Roof Crew, PowerWall Crew, Wall Charger Crew. Add to this the city permitting requirements. The crews need to work in a sequence, with one crew having to wait to finish before the next crew starts, and ideally, all of this should be in lockstep.
After our restart, Tesla came back in and installed all of the electrical wall boxes plus the three Powerwall mounting brackets.
We now have to wait an additional 4 weeks for the city approval and Tesla to continue install.
Next steps for us:
- wait for city to approve PW bracket mounting
- city approves PW brackets
- Tesla comes in to wire up the RSDs (solar panel mandatory Rapid ShutDown safety circuits), hang the PWs and finish all wiring, then install 2 Wall Connectors (car chargers).
- wait for city to approve setup
- city comes in to approve finished setup
- apply with PGE for Permission To Operate (PTO)
- wait for PGE to say "go"
- throw the switch - plug-n-pray!
Thanks. The cost is significantly lower if doing it at the same time as the other two, as installation cost is essentially included and we get full ITC credit of 30%. ITC phase-out beings end of this year.Doing it now will make it easier to have it done and over with. The additional capability of 3 batteries instead of 2 will make you a lot more comfortable with your system. Yes, it's too bad they have so many lockstep steps, but that's said and done.
So you're not stacking the 3 PW's, but 3 separate brackets? I don't know what sort of planning/permit discussions Tesla had with San Jose before my install, but thankfully the city inspector was out about 2 hours after they had the bracket on the wall, so they hung the bracket first thing, started preparing the backup loads panel, then the inspector showed/signed-off, and they had the PW hanging off the bracket all in one day (nothing was wired-up yet, though). The actual circuit re-wiring, conduit from PW to backup panel & commissioning of the PW was all done by my TSR project lead while the rest of the crew was working on the roof (well, he took one of the crew to help handle the conduit in the crawl space). But yeah, normally San Jose doesn't seem to do anything fast, so I'm not surprised a change mid-execution would blow up the schedule pretty bad (one missing shot of fireproof caulk blew up my project 2 weeks for a second city inspection).
Interesting also that they held off on the RSDs, I wonder if they're waiting for a newer date code unit like I'd heard about on my service call (mentioned on my thread). I haven't heard anything about the ones Delta was supposed to be sending to me yet.
I eventually plan to go from 1 PW to 2, though it really doesn't make sense until I add AC or electrify some other major appliance. I naively figured adding a second one later would be easy, but between having to go through the permit/inspection (and I guess PTO) process again, I'm sure it won't be nearly as easy as I'd hoped.
Yes, decided not to stack the three. To stack requires floor mounting and we have a concrete shoulder/lip on the garage floor that would require 3" spacers to bring the walls to match this offset, and I want to maximize the usable floor space in the garage. If triple stacked, there would be a 4ft x 2ft keep-away zone on the garage floor. With them wall mounted, I can still use the floor space, and the wall space (with 6" offset).
pwrusty
Member
I
I don't think I'll have the same delays. Had 2 PW2 installed November 2017 and have been using TOU to fill them at night and use during day. I toyed with the idea of putting in a 3rd PW but decided against it before the signed agreement in March 2019. I'm getting some hopefuly emails from my project director that we're awaiting LA gov't approval of ou project proposal and then they will give a timetable on installation. I'm still hopeful for installation to start before 12/31/19 but time is ticking!
Anyone have installation dates coming up? I'd like to know how backed up they are or where the bottleneck on getting these installed is. My understanding of the 30% ITC is it just has to be started by 12/31/19.......Anyone with furtherknowledge, please chime in.
Congrats! --> Let's hope your system all goes in before the end of year.
My system is currently on pause - this was self inflicted.
Just a head's up for you, that this caused unforseen delays of at least ~4 weeks for my project.
I threw a wrench in right about the time they were finished installing the roof tiles - I added a last minute change to add a third Powerwall, so they had to go back and redo the calculations, design drawings, etc.
Getting everyone back in sync and rescheduled was the main issue. Tesla uses different crews: Subcontractor Crew, Solar Roof Crew, PowerWall Crew, Wall Charger Crew. Add to this the city permitting requirements. The crews need to work in a sequence, with one crew having to wait to finish before the next crew starts, and ideally, all of this should be in lockstep.
After our restart, Tesla came back in and installed all of the electrical wall boxes plus the three Powerwall mounting brackets.
We now have to wait an additional 4 weeks for the city approval and Tesla to continue install.
Next steps for us:
- wait for city to approve PW bracket mounting
- city approves PW brackets
- Tesla comes in to wire up the RSDs (solar panel mandatory Rapid ShutDown safety circuits), hang the PWs and finish all wiring, then install 2 Wall Connectors (car chargers).
- wait for city to approve setup
- city comes in to approve finished setup
- apply with PGE for Permission To Operate (PTO)
- wait for PGE to say "go"
- throw the switch - plug-n-pray!
I don't think I'll have the same delays. Had 2 PW2 installed November 2017 and have been using TOU to fill them at night and use during day. I toyed with the idea of putting in a 3rd PW but decided against it before the signed agreement in March 2019. I'm getting some hopefuly emails from my project director that we're awaiting LA gov't approval of ou project proposal and then they will give a timetable on installation. I'm still hopeful for installation to start before 12/31/19 but time is ticking!
Anyone have installation dates coming up? I'd like to know how backed up they are or where the bottleneck on getting these installed is. My understanding of the 30% ITC is it just has to be started by 12/31/19.......Anyone with furtherknowledge, please chime in.
Similar threads
- Replies
- 23
- Views
- 2K
- Replies
- 13
- Views
- 520
- Replies
- 48
- Views
- 4K