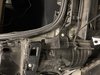
Thanks for the pics. Looks like I have the same struts. Does your hood closing look smooth (like Frugal Tesla Guy)? Here's a link to a vid on how my frunk closes. It cannot go all the way down and kind of bounces at the end (because of the struts' limitation), but still short of contacting the lock. Anyone have a similar closing action? Hanshow said to raise the locking block up, but I don't see how the large gap would be made up, not to mention still have to bend the hood. Also, the hood probably wouldn't line up with the body panels properly. right now, without the struts on, the hood matches all body panels well when closed.