In a previous post I mentioned purchased two PPF kits from Tesbros. One was the full front kit (hood, fenders, bumper, mirrors, headlights and fog lights) and the other was the exterior bundle kit (rockers, door handles, tail lights, trunk, door edges, and headlights again). Here’s my experience:
TLDR: If you’re a confident DIY-er, you can tackle this project.
INSTALL
I did the entire “exterior bundle” kit by myself. I taped some clean plastic sheet on the ground under the car in case something slid off, but that never happened. One thing to note: the little weeping holes for the tail lights were not weeded already on my kit - you’ll have to punch them out yourself. Nothing here was too difficult as most of the areas are flat. The rocker is the one place you have to be extra careful not to let any part slip off the car onto the ground.
I had a helper on the front kit which was much more involved. Having help was key in three ways: getting the ppf off the backing, getting it on the car without touching the ground or clothing, and was also helpful having him do the stretching while I tacked down the other end.
TIME
It took about two hours to set up, wash and prep the car following the prep videos. My car has less than 300 miles on it so it wasn’t very dirty or hard to clean. I did the “exterior bundle” in about three hours by myself (rockers, trunk, tail lights, etc) My help came when I started the front kit. Total time for the front kit with two people was about 5 hours.
DIFFICULTY
Never did I feel like I was close to disaster, but I had previously done the interior ppf kit so I had some practice, and I did watch the videos about 3 times through while waiting for it to be delivered. If I attempted some of the bigger pieces alone, especially the bumper, it might be a different story. If you are patient and careful about every step, making sure to keep things clean, that things are lined up properly, and going slowly to make sure you’ve got all your bubbles out before tacking down, then I would say it’s more “time consuming” than it is “difficult”. Tesbro’s directions are extremely thorough. The closer you stick to them, the less problems you’ll have.
RESULTS
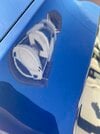
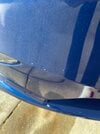
I wasn’t expecting everything to be lined up perfectly, and I was expecting a few bubbles here and there that would dissipate over time, and I even allowed myself to accept I might have a few flaws I couldn’t eliminate as the cost of doing the job myself. I also prepared for the reality that I might totally ruin a piece or two and have to repurchase it (at a discount). For me the money still saved would be worth it and I knew I would also enjoy the process. I was pleasantly surprised by the results. Even though I was careful to get all the bubbles out during the install, I woke up the next day to find NEW bubbles all over the place. It seems this is from residual liquid consolidating into pockets overnight. Assuming these small bubbles will mostly dissipate as they are supposed to, then I am very happy with the job. Below you’ll see some pictures of the bubbles I’m talking about. Even since I took the photos some of them have mellowed out. Hopefully in a week or two it’ll be looking pretty darn good! I’ll try to come back and post some pics after a couple weeks.
QUICK TIPS
Don’t drop the clay bar or the squeegees. They are slippery!
Don’t skip the practice kit. The more feel you have for things the better you’ll do!
The tutorials also have pictures beneath the video of the order in which to tack down each piece. I printed these full size on paper so it’d be easier to refer to in the middle of the install instead of trying to find it and zoom in on my phone in the heat of the moment.
If you are alone you can use the round tesbros stickers that keep the ppf rolls together or painters tape to stick the backing down on to your table while you peel off the pieces.
I didn’t have any folding tables so I taped some painters plastic to the garage floor to give me a surface to lay out the PPF and peel it off. Just be careful not to step on the plastic.
CONCLUSION
If you are a patient, thorough, and careful do-it-yourselfer, and you have some backup help if you need it, then this is absolutely doable with acceptable results. If you are a perfectionist, impatient, or don’t like to take a deep dive into tutorials/directions, then maybe have it done for you.
TLDR: If you’re a confident DIY-er, you can tackle this project.
INSTALL
I did the entire “exterior bundle” kit by myself. I taped some clean plastic sheet on the ground under the car in case something slid off, but that never happened. One thing to note: the little weeping holes for the tail lights were not weeded already on my kit - you’ll have to punch them out yourself. Nothing here was too difficult as most of the areas are flat. The rocker is the one place you have to be extra careful not to let any part slip off the car onto the ground.
I had a helper on the front kit which was much more involved. Having help was key in three ways: getting the ppf off the backing, getting it on the car without touching the ground or clothing, and was also helpful having him do the stretching while I tacked down the other end.
TIME
It took about two hours to set up, wash and prep the car following the prep videos. My car has less than 300 miles on it so it wasn’t very dirty or hard to clean. I did the “exterior bundle” in about three hours by myself (rockers, trunk, tail lights, etc) My help came when I started the front kit. Total time for the front kit with two people was about 5 hours.
DIFFICULTY
Never did I feel like I was close to disaster, but I had previously done the interior ppf kit so I had some practice, and I did watch the videos about 3 times through while waiting for it to be delivered. If I attempted some of the bigger pieces alone, especially the bumper, it might be a different story. If you are patient and careful about every step, making sure to keep things clean, that things are lined up properly, and going slowly to make sure you’ve got all your bubbles out before tacking down, then I would say it’s more “time consuming” than it is “difficult”. Tesbro’s directions are extremely thorough. The closer you stick to them, the less problems you’ll have.
RESULTS
I wasn’t expecting everything to be lined up perfectly, and I was expecting a few bubbles here and there that would dissipate over time, and I even allowed myself to accept I might have a few flaws I couldn’t eliminate as the cost of doing the job myself. I also prepared for the reality that I might totally ruin a piece or two and have to repurchase it (at a discount). For me the money still saved would be worth it and I knew I would also enjoy the process. I was pleasantly surprised by the results. Even though I was careful to get all the bubbles out during the install, I woke up the next day to find NEW bubbles all over the place. It seems this is from residual liquid consolidating into pockets overnight. Assuming these small bubbles will mostly dissipate as they are supposed to, then I am very happy with the job. Below you’ll see some pictures of the bubbles I’m talking about. Even since I took the photos some of them have mellowed out. Hopefully in a week or two it’ll be looking pretty darn good! I’ll try to come back and post some pics after a couple weeks.
QUICK TIPS
Don’t drop the clay bar or the squeegees. They are slippery!
Don’t skip the practice kit. The more feel you have for things the better you’ll do!
The tutorials also have pictures beneath the video of the order in which to tack down each piece. I printed these full size on paper so it’d be easier to refer to in the middle of the install instead of trying to find it and zoom in on my phone in the heat of the moment.
If you are alone you can use the round tesbros stickers that keep the ppf rolls together or painters tape to stick the backing down on to your table while you peel off the pieces.
I didn’t have any folding tables so I taped some painters plastic to the garage floor to give me a surface to lay out the PPF and peel it off. Just be careful not to step on the plastic.
CONCLUSION
If you are a patient, thorough, and careful do-it-yourselfer, and you have some backup help if you need it, then this is absolutely doable with acceptable results. If you are a perfectionist, impatient, or don’t like to take a deep dive into tutorials/directions, then maybe have it done for you.