Welcome to Tesla Motors Club
Discuss Tesla's Model S, Model 3, Model X, Model Y, Cybertruck, Roadster and More.
Register

Liftgate adjustment DIY info on 2023 refresh

This site may earn commission on affiliate links.
My liftgate was badly misaligned from the factory in every possible direction, and my Service Center refused to fix the issue, along with most other build quality issues with my car. I am going to have to accept that this $100K car just does not come with a bumper to bumper factory warranty.

So I decided to fix the liftgate myself, as I have done with most of the build issues, and I am happy to share what I learned, which is a lot. Since most people on this forum don't seem like the type that would take on such a daunting task, I won't go to the effort to make a big DIY, but I'll share some bullet points and be happy to answer any questions that come up.

Here are key bullet points:

- The factory service manual that you can download from Tesla has not been updated completely for the refresh model, but it's still somewhat useful to review
- The hinge bolts into the liftgate control the height, the hinge bolts into the body control left/right alignment and forward and backward.
- The manual shows removing the back glass to be able to access the bolts for the hinge. The headliner near the back of the car needs to be pulled down to access those nuts.
- I was able to loosen and tighten the bolts without removing the glass by using a torx socket held by a small vice grip to grab the exposed portion of the bolts. Only a 1/2 turn is enough to loosen the bolts to adjust that part of the hinge.
- I was able to remove a minimum of the interior to be able to pull down the headliner enough to get a power ratchet to loosen and tighten those nuts. You need to remove the side seat bolsters, the side panels, and the panel around the seat belt. There are 10mm bolts holding the headliner in along with the normal push pins.
- Most important: You must remove the struts on the left and right to have any hope to adjust the hinges. Those struts put too much force on the liftgate to be able to force the hinges into place. Fine hinge adjustment becomes easy when the struts are removed.
- I used a sturdy wooden stick, cut to size, to hold up the liftgate while doing the work. I put a microfiber towel on top of the stick to protect the decklid I did it all by myself, so it can be done with one person even though it's really a 3 person job.
- Unless you take the glass off and really remove the headliner, the adjustment process is iterative where you move the hinges and check and then adjust again. This job would have been incredibly simple to get right in the factory with the back glass off and before the interior is added. Amazing disregard for quality that they don't bother to make sure the liftgate is correct at that stage.
- Start with getting the height correct before doing the left and right and forward and backward adjustments. The left and right height also slightly affects the forward and backward adjustment.
- In my case, there is no way to get the liftgate to fit 100% correctly m because of the poor build quality of the body and the liftgate itself. Clearly some of their robots need to be fired. But if that is the case with your car, there are compromises that can be made to make it fit well enough where no one will notice.
- While adjusting the forward and backward of the hinge, be very careful that the back glass and the pano glass do not hit each other and you end up with both broken.
- I needed to also adjust the latch striker position to fine tune the fit, which is very easy to do. Take care to check the clearance around the bottom of the liftgate and the bumper. In my case, lining up perfectly with the fenders caused interference with the bumper and body near the taillights.

No doubt it's an intimidating task for a DIY'er, which is clearly why my lazy Service Center squirmed out of standing behind their product. The job is definitely one of those that most will tell you to leave to a professional, but if you are handy and super meticulous and careful, you can do it too. I am sure if I took it to a body shop, they would insist to remove the back glass and more of the interior, and it would become a very large bill with probably more problems created than fixed.


8508700496_6928a3822b_b.jpg

"Tesla Model S" by cdorobek is licensed under CC BY 2.0.
Admin note: Image added for Blog Feed thumbnail
 
Last edited:
One more quick question: based on your experience, do you believe it is possible for me to be able to use my fingers to shift the decklid and hinge when only the two bolts on the decklid side are loosened? Or did you have all 4 bolts bolts first loosened on both sides of the hinge (both decklid and body frame) and then the hinge was shifted in the tight area via reaching in with your fingers? I am trying to determine if it is possible for me to try adjusting just the decklid side of the hinge but having a difficult time visualizing how I would push/shift the hinge when only the decklid side is loosened. Thank you so much again!
 
One more quick question: based on your experience, do you believe it is possible for me to be able to use my fingers to shift the decklid and hinge when only the two bolts on the decklid side are loosened? Or did you have all 4 bolts bolts first loosened on both sides of the hinge (both decklid and body frame) and then the hinge was shifted in the tight area via reaching in with your fingers? I am trying to determine if it is possible for me to try adjusting just the decklid side of the hinge but having a difficult time visualizing how I would push/shift the hinge when only the decklid side is loosened. Thank you so much again!

Yes, only adjusted one side of each hinge at a time.
 
  • Like
Reactions: fburns3
Late to the party, but I have a 2023 LRMS that has the issue of the hatch lights not aligning with the body tail lights looking across/level; trunk is about 1/8 to 1/4" too high (not closing enough into the body?). I turned the 2 rubber plugs that are about 2/3 down on the body on each side of the hatch in as far as they would go, and that helped a VERY tiny bit. I had Tesla service look at the issue and they adjusted the stricker for the closing latch and that "appears" to have added another TINY bit, but honestly, it still is off. It needs about 1/8" more downward travel to properly align the lights all the way across. If it requires major disassembly I might forgo as it's not terrible, but enough to make we wish it could be better. Thoughts ?
 
Late to the party, but I have a 2023 LRMS that has the issue of the hatch lights not aligning with the body tail lights looking across/level; trunk is about 1/8 to 1/4" too high (not closing enough into the body?). I turned the 2 rubber plugs that are about 2/3 down on the body on each side of the hatch in as far as they would go, and that helped a VERY tiny bit. I had Tesla service look at the issue and they adjusted the stricker for the closing latch and that "appears" to have added another TINY bit, but honestly, it still is off. It needs about 1/8" more downward travel to properly align the lights all the way across. If it requires major disassembly I might forgo as it's not terrible, but enough to make we wish it could be better. Thoughts ?

Just adjust the latch striker yourself. It's super easy. The kick panel covering the latch just pulls off and you have plenty of access to the striker. Mark its current location and then do trial and error to get the hatch closing just right. Make sure the bump stops are all the way in before starting so the latch isn't fighting them, and when the liftgate is sitting correctly, adjust the bump stops using a sheet of paper to tell when they are touching the frame the right amount.
 
  • Like
Reactions: dsc888 and fburns3
One more quick question: based on your experience, do you believe it is possible for me to be able to use my fingers to shift the decklid and hinge when only the two bolts on the decklid side are loosened? Or did you have all 4 bolts bolts first loosened on both sides of the hinge (both decklid and body frame) and then the hinge was shifted in the tight area via reaching in with your fingers? I am trying to determine if it is possible for me to try adjusting just the decklid side of the hinge but having a difficult time visualizing how I would push/shift the hinge when only the decklid side is loosened. Thank you so much again!
Let me know how things turn out for you. I like your detailed questions you posed to @TLLMRRJ and I think there are many of us in the same boat. I am still in a holding pattern with Tesla service to see what they will do for my ill fitted hatch as well as they keep pushing my service appointment due to parts not being available. I have a flakey right repeater camera that needs to be swapped and it seems like they can't get a hold of the module.

I too have to adjust the hight and need to "rotate" the hatch ever so slightly to get the gaps to line up better. I can play with the striker but I rather do that as a LAST resort since I don't want the hatch to close hard and loudly. The height is the biggest issue for me then the gaps left to right.
I am more than happy to update everyone. I live in Maryland between Baltimore and DC (Go O's), and with the muggy humid conditions right now, I am likely going to delay trying to follow the great guidance from @TLLMRRJ until early September. For now, I held in that open/close button so my liftgate does not open all the way and also rub against the roof line of the car. @dsc888 - can you please post photos of your car with the gap/height issues? Also, when you refer to "rotate", are you referring to part 2 of the guidance from @TLLMRRJ in which the second set of hinge bolts underneath and attached to body frame are loosened to allow a slight shift to the left/right or front/back for alignment (and not height)? I want to be so fully certain before I start doing these adjustments myself and want to clarify what you mean by rotate.

One more thing -- I have been frequently thinking through all the adjustment steps, and something occurred to me this weekend during my assembly of a small Ikea wardrobe-type closet. I had to adjust the hinges on the vertical wood doors for proper vertical alignment and had to loosen both sets of hinges at the top and bottom to do that. I then realized that to adjust the driver-side height gap on my car, I likely will not be able to just loosen the one set of bolts on the driver side hinge alone but also the passenger side hinge, even though the passenger side height gap is fine. Yet another question for @TLLMRRJ - am I correct that to adjust the height on only one side I will need to loosen both hinges?
 
  • Like
Reactions: dsc888
I likely will not be able to just loosen the one set of bolts on the driver side hinge alone but also the passenger side hinge, even though the passenger side height gap is fine. Yet another question for @TLLMRRJ - am I correct that to adjust the height on only one side I will need to loosen both hinges?

There's enough slop in the hinges to make small adjustments to one side of the hinge without touching the other side. But you can loosen the other side to let it settle if you want.
 
  • Like
Reactions: fburns3 and dsc888
One more thing -- I have been frequently thinking through all the adjustment steps, and something occurred to me this weekend during my assembly of a small Ikea wardrobe-type closet. I had to adjust the hinges on the vertical wood doors for proper vertical alignment and had to loosen both sets of hinges at the top and bottom to do that. I then realized that to adjust the driver-side height gap on my car, I likely will not be able to just loosen the one set of bolts on the driver side hinge alone but also the passenger side hinge, even though the passenger side height gap is fine. Yet another question for @TLLMRRJ - am I correct that to adjust the height on only one side I will need to loosen both hinges?

Click on this URL below to go directly to my post:


It's actually on page 2 that you will see my post with pic regarding my issues. But in summary, my hatch is sitting about 2mm TOO HIGH on the right and is rotated too far BACKWARDS on the same side as well allowing the tail lights to be too far back on the hatch vs the module on the quarter panel. It's almost as though the hatch somehow slipped on the right backwards slightly.

I feel that my Tesla service center will tell me to go to a bodyshop to have mine fixed. It's a bit too askew for their techs to do. Not only that but the adhesive they glued that back glass on the hatch is also oozing out the sides as well. So maybe they can remove my back glass, adjust the hinge for height and re-install the glass properly all in one felled swoop.

But judging from what @TLLMRRJ said, that might require the removal of the interior trip pieces in the back to get access to the bolts that allow the hinge to move forward/backward and L/R. I wonder if they can simply pull down the very back of the headliner from the rear and access the bolts holding the hinge that way. Hmmm.
 
  • Like
Reactions: fburns3
But judging from what @TLLMRRJ said, that might require the removal of the interior trip pieces in the back to get access to the bolts that allow the hinge to move forward/backward and L/R. I wonder if they can simply pull down the very back of the headliner from the rear and access the bolts holding the hinge that way. Hmmm.

I pulled down the back part just enough to get my 3/8 power ratchet to the hinge bolts. Don't be fooled, it's a complete pain to disassemble enough of the interior in the back to get that access. They definitely don't make it easy.
 
  • Like
Reactions: fburns3 and dsc888
I pulled down the back part just enough to get my 3/8 power ratchet to the hinge bolts. Don't be fooled, it's a complete pain to disassemble enough of the interior in the back to get that access. They definitely don't make it easy.
Hi again @TLLMRRJ - I have been meticulously thinking through every possible step I need to take. In your original "before" photos, you had a substantial gap on the driver side of the car between the liftgate and body behind the rear door. Did you adjust the hinge bolts that are into the liftgate side to lower the liftgate to reduce the gap, or did you adjust the hinge bolts into the body on both driver and passenger body-side hinges to twist/rotate the liftgate left/right to close that gap? The reason I ask is because I cannot observe a difference in the actual height of the liftgate at the point where it meets the pano glass roof top in the before and after photos, so I assume it was the shifting/twisting left/right that helped close the gap. I guess I am a bit confused what adjustments you made in the hinge bolts into the liftgate side, because I do not see a height difference. Thanks again!
 
There's enough slop in the hinges to make small adjustments to one side of the hinge without touching the other side. But you can loosen the other side to let it settle if you want.
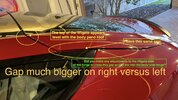
@TLLMRRJ, I attached an edited photo from your Model S to further clarify my question. It appears that, prior to all of your adjustments, your liftgate, was level/even with the pano roof and roof body. So, my question is: did you make any adjustment to the hinge on the liftgate side? My understanding from your notes is that the liftgate side of the hinge only control any height differential, which it appears you did not have. Or did adjusting the liftgate-side hinge also help in closing the gap along the body? Please see the attached photo I further mocked up with my notes. Thank you!
 

Attachments

  • Tesla liftgate gap driver side.jpeg
    Tesla liftgate gap driver side.jpeg
    417.8 KB · Views: 89
@TLLMRRJ, I attached an edited photo from your Model S to further clarify my question. It appears that, prior to all of your adjustments, your liftgate, was level/even with the pano roof and roof body. So, my question is: did you make any adjustment to the hinge on the liftgate side? My understanding from your notes is that the liftgate side of the hinge only control any height differential, which it appears you did not have. Or did adjusting the liftgate-side hinge also help in closing the gap along the body? Please see the attached photo I further mocked up with my notes. Thank you!

I adjusted both sides of the hinge on the driver’s side to move it forward and down.

I couldn’t move the liftgate toward the front of the car enough without being crooked left to right, so I lowered it slightly below level with the body. To the eye, you don’t notice it without getting out a straight edge.

My lid just does not fit in the body correctly, which could be an issue with the lid’s stamping or the welding of the body panels. Either way, shockingly bad assembly by a car company that supposedly uses tons of robotic automation to avoid these issues.
 
  • Like
Reactions: fburns3
@TLLMRRJ, one last question: For the hinge bolts into the liftgate that control the height - I was able to get an E6 torx socket per your guidance. To loosen those bolts, am I correct in my plan that I must turn them clockwise with the torx socket, since I think I am turning the end portion of the bolt? Then, I turn them back a half-turn counterclockwise to tighten the bolt again in the liftgate-side hinge? These are of course the opposite directions when typically tightening or loosening a bolt. Thank you again!
 
@TLLMRRJ, one last question: For the hinge bolts into the liftgate that control the height - I was able to get an E6 torx socket per your guidance. To loosen those bolts, am I correct in my plan that I must turn them clockwise with the torx socket, since I think I am turning the end portion of the bolt? Then, I turn them back a half-turn counterclockwise to tighten the bolt again in the liftgate-side hinge? These are of course the opposite directions when typically tightening or loosening a bolt. Thank you again!

Yes, they are regular bolts going through regular sets of threads, so the bolt heads need to be turned clockwise to loosen them. If you are turning the bolts from their tips, then from the perspective of the tip, they need to be turned clockwise to make the bolt heads turn counterclockwise.

It only took a half turn for me, but if you need a little more or less that will be obvious. You don't want the hinges to be flopping around, just enough to slide them on the liftgate.

Can't emphasis enough to not to try to prove me wrong that you can make fine adjustments to these hinges without removing the struts on one end!
 
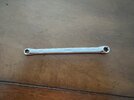
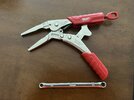
So, thanks to @TLLMRRJ , I was able to procure an E6-size torx wrench from Amazon(photo attached). That way, I can get in and under the liftgate hinge bolt instead of using the ingenious method that you used. I was also able to remove the struts per your guidance, and I had a nice setup to prop the liftgate open. I then went ahead to loosen the two bolts on the first hinge. I had a little bit of panic when I felt the wrench slip on the torx end of the bolt. @TLLMRRJ , you are right - the metal is soft. So, I stopped because I could not gently loosen that bolt. @TLLMRRJ , did you encounter slippiness/stripping when trying to loosen any of your liftgate-side hinge bolts? Did you just move ahead with a Vise-grip type tool to continue the process? I am worried that if I continue, I will not be able to tighten or even later grip the hinge bolts because the star points (torx ends) strip so easily. I also have a nice vice-grip tool to use once I hear back from you (also photo attached). I welcome your thoughts and guidance and cannot thank you enough for getting me to this point!
 

Attachments

  • my torx wrench.jpg
    my torx wrench.jpg
    273.2 KB · Views: 47
  • torx wrench and vise grip.jpg
    torx wrench and vise grip.jpg
    476.1 KB · Views: 46
So, thanks to @TLLMRRJ , I was able to procure an E6-size torx wrench from Amazon(photo attached). That way, I can get in and under the liftgate hinge bolt instead of using the ingenious method that you used. I was also able to remove the struts per your guidance, and I had a nice setup to prop the liftgate open. I then went ahead to loosen the two bolts on the first hinge. I had a little bit of panic when I felt the wrench slip on the torx end of the bolt. @TLLMRRJ , you are right - the metal is soft. So, I stopped because I could not gently loosen that bolt. @TLLMRRJ , did you encounter slippiness/stripping when trying to loosen any of your liftgate-side hinge bolts? Did you just move ahead with a Vise-grip type tool to continue the process? I am worried that if I continue, I will not be able to tighten or even later grip the hinge bolts because the star points (torx ends) strip so easily. I also have a nice vice-grip tool to use once I hear back from you (also photo attached). I welcome your thoughts and guidance and cannot thank you enough for getting me to this point!

I had only one of the 4 bolts strip with my Torx socket. A Torx socket holds more of the tip than a Torx monkey wrench, but the the ribs are so soft that I still had the issue even with a socket.

Just use the vice grips to grab and turn the end of the screw in that case. The ribs will be obliterated by the vice grip, but that's just not an issue. I found the center of the screw to be pretty strong, compared to the ribs, so I didn't feel like it was going to break off by grabbing it with a vice grip.
 
  • Like
Reactions: fburns3
I had only one of the 4 bolts strip with my Torx socket. A Torx socket holds more of the tip than a Torx monkey wrench, but the the ribs are so soft that I still had the issue even with a socket.

Just use the vice grips to grab and turn the end of the screw in that case. The ribs will be obliterated by the vice grip, but that's just not an issue. I found the center of the screw to be pretty strong, compared to the ribs, so I didn't feel like it was going to break off by grabbing it with a vice grip.
Hi @TLLMRRJ , again thank you for all advice. I attempted to make my liftgate adjustments today. The screws just wouldn't turn. I ended up using a combo of the vice grip and torx socket, but the ribs just stripped right away, even with me being slow and careful. I then attempted to use my vice grips to grab on to the screw, but I could not get any leverage to actually turn the screw - it was so tight. Did you go ahead and grab some of the exposed threads of the screw too to gain the leverage you needed? I am afraid that my screws are so tight that I can't do this repair myself and will ultimately have to bring it in to Tesla service, which I do not want to do. How were you able to get the screws to turn? Did you find them as super tight as I have?
 
Hi @TLLMRRJ , again thank you for all advice. I attempted to make my liftgate adjustments today. The screws just wouldn't turn. I ended up using a combo of the vice grip and torx socket, but the ribs just stripped right away, even with me being slow and careful. I then attempted to use my vice grips to grab on to the screw, but I could not get any leverage to actually turn the screw - it was so tight. Did you go ahead and grab some of the exposed threads of the screw too to gain the leverage you needed? I am afraid that my screws are so tight that I can't do this repair myself and will ultimately have to bring it in to Tesla service, which I do not want to do. How were you able to get the screws to turn? Did you find them as super tight as I have?

Hate to ask, but are you sure you are turning the screws in the correct direction to loosen them?

I did not need to grab the threads at all, but I did have one that I needed to grab the tip when the ribs became rounded off and it was no problem with the tip in vice grips.
 
Hate to ask, but are you sure you are turning the screws in the correct direction to loosen them?

I did not need to grab the threads at all, but I did have one that I needed to grab the tip when the ribs became rounded off and it was no problem with the tip in vice grips.
Hi @TLLMRRJ , I tried to turn the screw in a clockwise direction to loosen it, since I assumed I was working on the back side of the screw. Was I correct? As soon as I began trying to turn the screw, the ribs just sheared right off, and I was working very slowly and carefully. Thanks so much.