


Welcome to Tesla Motors Club
Discuss Tesla's Model S, Model 3, Model X, Model Y, Cybertruck, Roadster and More.
Register
Install the app
How to install the app on iOS
You can install our site as a web app on your iOS device by utilizing the Add to Home Screen feature in Safari. Please see this thread for more details on this.
Note: This feature may not be available in some browsers.
-
Want to remove ads? Register an account and login to see fewer ads, and become a Supporting Member to remove almost all ads.
You are using an out of date browser. It may not display this or other websites correctly.
You should upgrade or use an alternative browser.
You should upgrade or use an alternative browser.
Model 3 DIY Light kits: Review and installation tips, with pics
- Thread starter GreenHokie
- Start date

PauliePucks
3rd Party Accessory Junkie
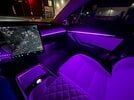
Ok so I got the door streamers done and I really love the way they look. I’m finally done with this kit woohoo. Overall I think I am at about 16 hours total.
If you’re serious about ambient lighting, this is night and day to any product you’ll find on Amazon. The work is worth is IMO and the touch screen control has really grown on me.
These door streamers are BRIGHT too! I had to lower the kit brightness for the first time tonight.
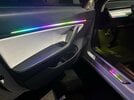
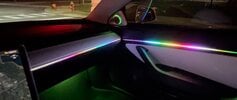
Here’s pics of solid purple (my fave) and then the streamer rainbow effect
These streamers were designed for the rear doors and were a little short, so I centered them on the door panel to get them as close to the dash panel as I could. I think they look good!
I’m finishing the edits on the install video and should have it posted tomorrow some time if anyone wants to punish themselves lol it’s truly worth it!
If you’re serious about ambient lighting, this is night and day to any product you’ll find on Amazon. The work is worth is IMO and the touch screen control has really grown on me.
These door streamers are BRIGHT too! I had to lower the kit brightness for the first time tonight.
Here’s pics of solid purple (my fave) and then the streamer rainbow effect
These streamers were designed for the rear doors and were a little short, so I centered them on the door panel to get them as close to the dash panel as I could. I think they look good!
I’m finishing the edits on the install video and should have it posted tomorrow some time if anyone wants to punish themselves lol it’s truly worth it!
Attachments
EatsShoots
Member
Purple is my go-to color for LED. Love it. That does look sick. 16 hours scares me, thoughOk so I got the door streamers done and I really love the way they look. I’m finally done with this kit woohoo. Overall I think I am at about 16 hours total.
If you’re serious about ambient lighting, this is night and day to any product you’ll find on Amazon. The work is worth is IMO and the touch screen control has really grown on me.
These door streamers are BRIGHT too! I had to lower the kit brightness for the first time tonight.
Here’s pics of solid purple (my fave) and then the streamer rainbow effect
These streamers were designed for the rear doors and were a little short, so I centered them on the door panel to get them as close to the dash panel as I could. I think they look good!
I’m finishing the edits on the install video and should have it posted tomorrow some time if anyone wants to punish themselves lol it’s truly worth it!

PauliePucks
3rd Party Accessory Junkie
It’s totally doable. You can do it over several days/weeks. The install is modular so you can tackle a different part every time. Once you get the main wiring done it’s pretty straightforward. I was also videoing the entire install so it did take me a bit longer as I was moving my equipment around.Purple is my go-to color for LED. Love it. That does look sick. 16 hours scares me, though
PauliePucks
3rd Party Accessory Junkie
Just posted the install video on my channel - it’s about 1.5 hours long but broken down by chapter for easy navigation lol
Oops forgot the link! (Thanks @GreenHokie)
Disclaimer: I did pay for this kit, but received a discount for producing this video. I’m sharing link for this thread since I’ve been active in it for some time and am an avid ambient lighting fan. Mods can delete if necessary!
Oops forgot the link! (Thanks @GreenHokie)
Disclaimer: I did pay for this kit, but received a discount for producing this video. I’m sharing link for this thread since I’ve been active in it for some time and am an avid ambient lighting fan. Mods can delete if necessary!
Last edited:
PauliePucks
3rd Party Accessory Junkie
Just edited my post. Forgot to attachLink for the lazy or technically challenged…
rogersmj
Member
Paulie, do you know is there a way to install this without having the touchscreen control on the center console, and still have everything work?Ok so I got the door streamers done and I really love the way they look. I’m finally done with this kit woohoo. Overall I think I am at about 16 hours total.
If you’re serious about ambient lighting, this is night and day to any product you’ll find on Amazon. The work is worth is IMO and the touch screen control has really grown on me.
These door streamers are BRIGHT too! I had to lower the kit brightness for the first time tonight.
Here’s pics of solid purple (my fave) and then the streamer rainbow effect
These streamers were designed for the rear doors and were a little short, so I centered them on the door panel to get them as close to the dash panel as I could. I think they look good!
I’m finishing the edits on the install video and should have it posted tomorrow some time if anyone wants to punish themselves lol it’s truly worth it!
I’m fine controlling it from an app (because I’ll pretty much set it to one color and leave it), and I want the center console to still look OEM.
I want the OEM/finished look of these more expensive laser-engraved kits (as opposed to the tacked-on light pipe ones), but I don’t want a visible control panel.
Kwwakaba
New Member
I actually just finished installing something similar today! It’s Hansshow’s light kit and pretty happy with it so far.

 www.hautopart.com
My only complaint is that the kit didn’t come with light strips for the rear doors or for underneath the seats in the back which sucks cause the site advertises them being there. I’ve reached out to support to get some answers but wondering if anyone else got this kit and also missed these pieces.

2021+ Model 3/Y Laser Carving Ambient Lighting Upgrade Kit
Light up your Tesla car with this Ambient Lighting Upgrade Kit . This elegant light will completely change the sleek style you deserve for your tesla Model 3/Y
www.hautopart.com
My only complaint is that the kit didn’t come with light strips for the rear doors or for underneath the seats in the back which sucks cause the site advertises them being there. I’ve reached out to support to get some answers but wondering if anyone else got this kit and also missed these pieces.
Attachments
PauliePucks
3rd Party Accessory Junkie
There is another version which uses the Tesla screen instead of the control panel.Paulie, do you know is there a way to install this without having the touchscreen control on the center console, and still have everything work?
I’m fine controlling it from an app (because I’ll pretty much set it to one color and leave it), and I want the center console to still look OEM.
I want the OEM/finished look of these more expensive laser-engraved kits (as opposed to the tacked-on light pipe ones), but I don’t want a visible control panel.
Satonic is the only company I’ve seen that has it -
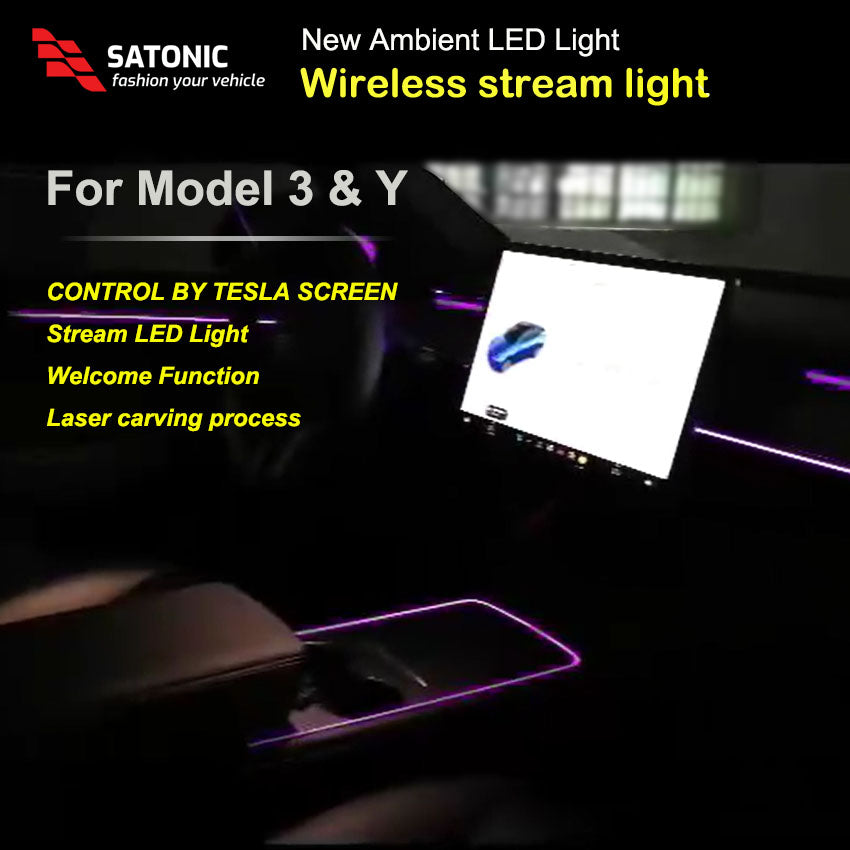
Model Y 3 Neon Lights Ambient Light LED
New Generation Ambient Light for Tesla Model 3 & Y I Produced with radium carving industrial art I Streaming light display I Controlled by Tesla screen I Easy installation, plug-by-plug design
It’s a very bizarre setup - the lighting controls are done by press sequences on the touch screen in the headlights control menu - it’s not a dedicated lighting menu, as the description would make you think.
I.e. - press high beam button twice to activate streamer LEDs press auto headlights to save settings…something like that. Lighting kit is the same it seems.
captainbeast
New Member
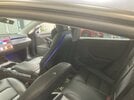
Hello everyone. I have partially completed the install of the Hansshow ambeint light kit. Here is the link to what I bought. 2021+ Model 3/Y Ultra RGB 64-color Ambient Lighting System | Hansshow I have everything installed except for the rear door lights. The wires have to go from the interior of the car through the rubber conduit between the car and the door. The issue is that the Hansshow instructions are horrible. The video goes in a strange order, is are not in english and the subtitles are hard to decipher, and the video / instructions (just screenshots from the video) do not show the pertinent parts of the car in detail. Also, the interior of the door panel from the instructions must be from a different model year than mine (Model 3 Performance 2022),
I am trying to get the wire from where it enters through the rubber conduit, through the panel. There are 2 little access holes that are covered by rubber. I want to use one of these access holes to route the wire through and In this picture I am showing where I have routed the wire through (after removing the rubber cap). My question is.... is this dumb? Is there a better way to do this? Any IDEAS?
By the way, it says 4-6 hours for this install. So far I am at like 24 hours and still have the rear doors to do!
PauliePucks
3rd Party Accessory Junkie
Nice work - check out the video I posted, I did a full install guide on my channel for this kit, maybe we can compare notes and make an even more comprehensive guide for the masses lol the provided instructions for this kit are absolute trash!Hello everyone. I have partially completed the install of the Hansshow ambeint light kit. Here is the link to what I bought. 2021+ Model 3/Y Ultra RGB 64-color Ambient Lighting System | Hansshow I have everything installed except for the rear door lights. The wires have to go from the interior of the car through the rubber conduit between the car and the door. The issue is that the Hansshow instructions are horrible. The video goes in a strange order, is are not in english and the subtitles are hard to decipher, and the video / instructions (just screenshots from the video) do not show the pertinent parts of the car in detail. Also, the interior of the door panel from the instructions must be from a different model year than mine (Model 3 Performance 2022),
I am trying to get the wire from where it enters through the rubber conduit, through the panel. There are 2 little access holes that are covered by rubber. I want to use one of these access holes to route the wire through and In this picture I am showing where I have routed the wire through (after removing the rubber cap). My question is.... is this dumb? Is there a better way to do this? Any IDEAS?
By the way, it says 4-6 hours for this install. So far I am at like 24 hours and still have the rear doors to do!
View attachment 962489
I did not do the rear doors because I have a 2019 so I used those rear door strips on the front.
However, I believe the way you are running the wires is correct, you should be able to replace the rubber cap without issues.
I’m not sure how identical our kits are, but I know for mine, the LED streaming bars for the rear doors used a 3-pin connection (same as the dash panel) and not a 4 pin. I had to run those leads from the main control hub under the center console as they did not plug into the black main arterial harnesses (if that makes sense?) which only have 4 pin connectors.
Feel free to shoot me a DM if you need help!
I recently purchased a similar kit from AliExpress Click Link Here

The main difference is the cupholder looks more OEM with minimal buttons instead of the the touchscreen interface.

However, the kit did NOT come with that 12V tap wire as seen in many other kits... I believe this is it? Click Link Here

I found this alternative on Amazon but I'm not sure if it will be compatible with my specific kit Click Link Here

Someone on Facebook mentioned they used a 12V wire by the passenger footwell but I'd rather not splice into anything, if that would be the case.
I currently have an installer waiting on the AliExpress seller to send clearer instructions.
So the whole situations is stressing me out now haha
The main difference is the cupholder looks more OEM with minimal buttons instead of the the touchscreen interface.
However, the kit did NOT come with that 12V tap wire as seen in many other kits... I believe this is it? Click Link Here
I found this alternative on Amazon but I'm not sure if it will be compatible with my specific kit Click Link Here
Someone on Facebook mentioned they used a 12V wire by the passenger footwell but I'd rather not splice into anything, if that would be the case.
I currently have an installer waiting on the AliExpress seller to send clearer instructions.
So the whole situations is stressing me out now haha

PauliePucks
3rd Party Accessory Junkie
That’s the rear CANBUS connection - what year/model is your car? Some newer Y’s don’t have this connection anymore.Follow up: The seller sent me this photo. It looks to be an adapter hooked up behind the rear air vent panel. Could this be where power is being tapped?
View attachment 968086
Also, not sure why they’re going with this connection for power, it’s going to be difficult to route to your control box because it’s at the rear of the console.
That’s the rear CANBUS connection - what year/model is your car? Some newer Y’s don’t have this connection anymore.
Also, not sure why they’re going with this connection for power, it’s going to be difficult to route to your control box because it’s at the rear of the console.
2021 Model 3
PauliePucks
3rd Party Accessory Junkie
Jay feel free to DM me if you’re still stuck.2021 Model 3
You should be getting power from the 12v plug on the cigarette lighter.
Is this kit the one that uses the Main screen to control, as opposed to the cup holder touchscreen panel? Sorry if you already mentioned this, I didn’t catch it.
Hey. No worries. It has 3 illuminated buttons on a replacement cup holder. No touchscreenJay feel free to DM me if you’re still stuck.
You should be getting power from the 12v plug on the cigarette lighter.
Is this kit the one that uses the Main screen to control, as opposed to the cup holder touchscreen panel? Sorry if you already mentioned this, I didn’t catch it.

I got the car back from the installer and all the lights are working now so I think the CANBUS adapter did the trick.
I noticed a lot of the new Ali Express trim kits have either:
-a cigarette adapter
-a CANBUS adapter
-or want you to splice into passenger footwell.
There doesn't seem to be a standard for these.
I guess it depends on your kit and wires included from the seller.
PauliePucks
3rd Party Accessory Junkie
Yeah there are a few different kits, that’s for sure. Did your kit also have the control boxes for each door?Hey. No worries. It has 3 illuminated buttons on a replacement cup holder. No touchscreen
View attachment 969191
I got the car back from the installer and all the lights are working now so I think the CANBUS adapter did the trick.
I noticed a lot of the new Ali Express trim kits have either:
-a cigarette adapter
-a CANBUS adapter
-or want you to splice into passenger footwell.
There doesn't seem to be a standard for these.
I guess it depends on your kit and wires included from the seller.
PauliePucks
3rd Party Accessory Junkie
Cheers gents - we inspired Elon to include ambient lighting in the m3 highland lol 
Next gen Tesla owners will never know our struggle
Next gen Tesla owners will never know our struggle
Similar threads
- Replies
- 203
- Views
- 8K
- Replies
- 0
- Views
- 326
- Replies
- 14
- Views
- 4K
- Replies
- 14
- Views
- 5K