S3pirion
Member
turned out pretty well. Now onto the doors. @Proppilot let me know if you find anything useful with the doors. I’m probably starting later in the day.


You can install our site as a web app on your iOS device by utilizing the Add to Home Screen feature in Safari. Please see this thread for more details on this.
Note: This feature may not be available in some browsers.
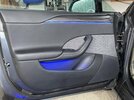
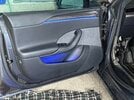
Thanks for this! about to start on the doors here soon.Hi there, just finished the drivers door and did this write up. Took 3 hours start to finish for one door (first one always longer). That looks OUTSTANDING !!!
The file is too large to upload so please grab it from here
RGB trim and door pocket light installation.pdf
That's it for me for the weekend. You have decoded the console for me/us and hopefully I have decoded the door(s) for you/all so the only think left to explore is the footwell lighting. I think the front will be easy and for the rear, I plan to feed four lights (two each side) from the console, under the carpet to the area under the front seats where the existing white lights are. similarly I am going to keep the white ones plugged in but cover them and will likely want/need to design and 3D print some brackets for the footwell lights unless VHB tape does the trick cleanly.
Do you have the controllers actually IN the lower bin where you can see them when you slide it open or in some blind space in the console ? The bin is not a bad idea (accessible) in case you need to swap one out.
Can you please clarify exactly which kits you used? There is a lot in this thread. I bought the ones from Aliexpress already, but willing to use something else if better.This is excellent. This thread became rich very quickly and at this point, contains just about (I think everything) that anyone would need who wanted to endeavour on this project. For anyone interested, it is a LOT of time to do this and no wonder the shops are charging major money but it is really a beautiful upgrade to the vehicle.
I will make a note for the curious. There are RGB acrylic strips and RGB light pipe kits for sale. The light pipes are fibre optic strands with an LED light source at one end. They are larger and the light will diffuse the longer the distance. The RGB acrylic strips are extremely low profile and it is almost impossible to tell the strip is tucked in there between the trim and the panel. FWIW as some have asked how visible the lights are when off.
Can you please clarify exactly which kits you used? There is a lot in this thread. I bought the ones from Aliexpress already, but willing to use something else if better.
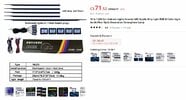
That's exactly what I got. Phew! May I suggest you list all the parts on your pdf?I purchased two of these kits ( 10 in 1 ) - Emitting Color: 10 IN 1
The attached picture says '18 in 1' at the top however you will see the kit I selected (second from the left) is the 10 in 1 kit X 2
It was super easy. I popped the grommet out of the door frame which gave me access to the wire as it came through from the door, fed it into the car and popped the grommet back in. It literally took a few minutes to do. I did not have to remove any retainers at all.That looks great!
What was your method of getting the godforsaken wires through the grommet? Wondering if there is a better way.
Also did you have to remove any of the clip retainers on the door card? Or ones still attached to the clip? Noticing mine is slightly misaligned and i need to fix it.
Thanks, I find an alternative there, as the first item once you click it shows 404 (not found) for me. I'm all set, just need to wait a bit for them to arrive.can you find the kit at this store on Ali ? This is where I got it and I still see it
LYMOYO VIP Store - Amazing products with exclusive discounts on AliExpress
Discover the wide range of from AliExpress Top Seller LYMOYO VIP Store.Enjoy ✓Free Shipping Worldwide! ✓Limited Time Sale ✓Easy Return.lymoyovip.aliexpress.com
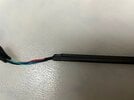
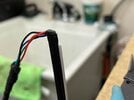
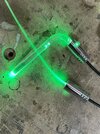
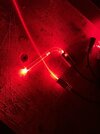
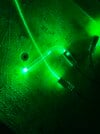
Not a great idea to directly connect LEDs to a battery. LEDs need to be current-limited or they will suffer an early death. The different colors also have different voltages typically between 1.8 and 3.3 volts. So using 3V battery might not even light up the blue LEDs. Controllers use PCM to control the brightness, with current limiting. Best to use a controller, and they are quite low in cost.BTW It seems ali-express took down that kit of lights you linked. I just got my kit (facepalm) I ordered the wrong one and got two tiny led bars and a controller. I used my multimeter to measure how much output each bar gets, and although some of you may already know it (and has likely been stated), the controller switches the 12 v between each of the channels for each output, so if I select red there is ~4 volts going into the red wire of the led bar (sorry again if this is obvious for some of you). That gave me couple of ideas, here is a picture of one of them, grabbed an old battery power case used for el-wire (2xAA) ~ 3v peeled of the wires and connected them to the connector on the led bar, albeit I can only make it red, blue or green depending on which wire I plug, This gave my my second idea, provided that someone would set for one of the basic colors, theoretically it would be possible, if and only if our cars non used but existing ambient lighting connectors for the trim get powered, to connect the strip directly to it. I know this would be super basic, but, if this works doors can be wired in a breeze. Over the weekend I will try to test if the non used connectors for the ambient light get powered and if so how many volts.
I know myself and despite of this working I will go for the full installation, but sharing this in case it leads somewhere.
View attachment 1028173
Yes as stated, the controllers are super cheap. Even the first kit I purchased for the door wells came with a controller with bluetooth connectivity and four RGB strips for under $ 15 dollars Canadian. RGB is RGB and any of them will work.BTW It seems ali-express took down that kit of lights you linked. I just got my kit (facepalm) I ordered the wrong one and got two tiny led bars and a controller. I used my multimeter to measure how much output each bar gets, and although some of you may already know it (and has likely been stated), the controller switches the 12 v between each of the channels for each output, so if I select red there is ~4 volts going into the red wire of the led bar (sorry again if this is obvious for some of you). That gave me couple of ideas, here is a picture of one of them, grabbed an old battery power case used for el-wire (2xAA) ~ 3v peeled of the wires and connected them to the connector on the led bar, albeit I can only make it red, blue or green depending on which wire I plug, This gave my my second idea, provided that someone would set for one of the basic colors, theoretically it would be possible, if and only if our cars non used but existing ambient lighting connectors for the trim get powered, to connect the strip directly to it. I know this would be super basic, but, if this works doors can be wired in a breeze. Over the weekend I will try to test if the non used connectors for the ambient light get powered and if so how many volts.
I know myself and despite of this working I will go for the full installation, but sharing this in case it leads somewhere.
View attachment 1028173