Welcome to Tesla Motors Club
Discuss Tesla's Model S, Model 3, Model X, Model Y, Cybertruck, Roadster and More.
Register

Uncomfortable Front Seat(s) / Thigh Bolster Mod

This site may earn commission on affiliate links.
I read all this with interest. My 2019 M3 standard plus has almost perfect seats for me. But, I've rented 3 M3s and bought my middle son a 2019 M3 and I hated the seats in all of them. The lumbar is all wrong in the seats. Interesting fact.. I have my profile set up and it transfers to the other cars when I use the. ANd its completely and utterly wrong on the other seats. Not a little out of adjust, I mean seriously out of whack. Which makes me wonder how my M3 seats are such a unicorn. I did notice that my lumbar bags do not seem to work ( fine by me) and now I'm wondering if someone modded the seat before I got it ( it was used)...
Not to invalidate what you're saying, but I think mostly people here are complaing about the seat bottom, not the seat back/lumbar area. Obviously there could be issues with that too.

But definitely agree with the difference between model years. I used a 2018 M3 loaner for a while and test drove a 2020 and both had more comfortable seat bottoms than my 2022 M3. Could be they're broken in more, but my guess is they changed the process or it's luck of the draw.
 
Hi George,
Does using the different cushion raise the eye level of the driver? Being 6'6", I feel I'm at the limit of being able to see out of the windshield without leaning to the side or hunching forward.
My issue is the bolsters closest to the backrest are too narrow and push into my sciatic nerve instead of holding the outside of my legs as intended.

Thank You!
Yes, My rebuild raises my head level. If you are 6'6" you don't have much room to work with. I am tall with a tall upper torso. I'm equivalent to perhaps 6'4" or more in seating position. If I were taller, I'd have to use less padding. But I think I could get it done and fit. As it is I actually raised my seat a bit to achieve a more bent knee effect. I could drop the seat some and still achieve the desired results I think. It's all trial and error to achieve the best outcome or the least bad outcome, all things considered. Ideally we'd own a car with more headroom but we don't.

I move the visor to the side to maximize my vision at my higher eye level. I do this every drive.

I replace the entire foam of the Tesla stock seat bottom cushion. Then I add foam blocks. I could possibly add smaller foam blocks but we want to get out of the metal frame as much as possible. It's the metal frame plus thin soft foam from Tesla that's causing the problem.

With sciatica, normally that's a pinched nerve(s) in the lower back. I think L5 or S1. I have a lot of disc issues.
So I also changed the lumbar support. I removed the stock lumbar air bags and replaced it with my own custom foam at the level I wanted. It was a horizontally placed rectangle in place of the stock air lumbar bags. Additionally I bent the headrest back and raised it a bit.

I recall when I first damaged my discs, the lumbar support was crucial for survival. I suspect that if the lumbar isn't precisely fitted for your body build, you won't get the proper spinal curvature. If you get stress from a "C" shape back position, it will trigger sciatica and pain. We MUST keep you from hunching forward!

I also lean the upper back more than ideal but as upright as I can to fit in the far where height is concerned.

It's good now. If you need more help we'd be best talking about it. I can be found by google search.

I also own the Tesla metal seat base for my lab investigations. I don't think it is readily modified. I started to investigate changing the springs. I bought replacement spring metal. But it's very difficult to do. So I settled on foam changes. Springs wouldn't solve your problem nor mine anyway as we are "too tall".

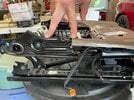
I attached a picture of the seat metal frame. My thought is any attempt to modify would weaken it. My fingers point to what hurts the hips and thighs.
 

Attachments

  • Tesla Seat Metal Frame.jpg
    Tesla Seat Metal Frame.jpg
    578.1 KB · Views: 343
Last edited:
Yes, My rebuild raises my head level. If you are 6'6" you don't have much room to work with. I am tall with a tall upper torso. I'm equivalent to perhaps 6'4" or more in seating position. If I were taller, I'd have to use less padding. But I think I could get it done and fit. As it is I actually raised my seat a bit to achieve a more bent knee effect. I could drop the seat some and still achieve the desired results I think. It's all trial and error to achieve the best outcome or the least bad outcome, all things considered. Ideally we'd own a car with more headroom but we don't.

I move the visor to the side to maximize my vision at my higher eye level. I do this every drive.

I replace the entire foam of the Tesla stock seat bottom cushion. Then I add foam blocks. I could possibly add smaller foam blocks but we want to get out of the metal frame as much as possible. It's the metal frame plus thin soft foam from Tesla that's causing the problem.

With sciatica, normally that's a pinched nerve(s) in the lower back. I think L5 or S1. I have a lot of disc issues.
So I also changed the lumbar support. I removed the stock lumbar air bags and replaced it with my own custom foam at the level I wanted. It was a horizontally placed rectangle in place of the stock air lumbar bags. Additionally I bent the headrest back and raised it a bit.

I recall when I first damaged my discs, the lumbar support was crucial for survival. I suspect that if the lumbar isn't precisely fitted for your body build, you won't get the proper spinal curvature. If you get stress from a "C" shape back position, it will trigger sciatica and pain. We MUST keep you from hunching forward!

I also lean the upper back more than ideal but as upright as I can to fit in the far where height is concerned.

It's good now. If you need more help we'd be best talking about it. I can be found by google search.

I also own the Tesla metal seat base for my lab investigations. I don't think it is readily modified. I started to investigate changing the springs. I bought replacement spring metal. But it's very difficult to do. So I settled on foam changes. Springs wouldn't solve your problem nor mine anyway as we are "too tall".

I attached a picture of the seat metal frame. My thought is any attempt to modify would weaken it. My fingers point to what hurts the hips and thighs.
That's a bummer. My plan was to try to shave down the bolsters to flat in the area closest to the backrest, but based on what you've posted, what I've read, and this tear down video, it looks like the only chance would be to shave the inside of the foam bolster to lessen the padding between the driver's rear and the metal you're pointing to, thereby widening the flat rear-most portion of the seat.
Is there a substantial enough amount of padding there that the inside could be shaved, thereby widening the space between the bolsters for the driver's rear to fit?
I'm kind of grasping at straws, as I can't go up with more padding like your solution and I can't shave it flat because I would be exposing the metal portions of the seat that you're pointing to in the picture you posted.
There isn't much foam. If you cut it down you risk it getting worse. It all comes down to perhaps one inch either way. If your hips are more narrow, you might get away with it. I DEFINITELY WOULD NOT DO THAT. I built a new seat. If you don't want to do that, you can try options as I have. First try simply to insert some kind of foam on top to flatten the seat out. If that doesn't work (wasn't good enough for me), then you can go the next step. I would then try to put some spacer material between the metal springs and the bottom of the stock foam of the seat bottom. Just be careful with the wire for the seat sensor that passes roughly middle. You'll have to either lace that wire through a hole or cut a slot in your spacer material. To add a spacer, it's possible to disconnect the seat bottom from the metal base in the front and the driver's door side. It's not easy but can be done. After reworking seats for a year, I just pull the four bolts holding the entire seat assembly to the floor, and then I can access everything easily.
Another lesson I've learned is that many of us suffering with the seat bolsters also are prone to lower back disc issues. For that it is absolutely necessary to make additional but rather "simple" mods to the upper back of the seat rest in addition to modifying the seat bottom. Reach out to me if you need more help. I'm easy to find. I also have a YouTube channel under my name where I posted many videos on the subject.
Sincerely,
George Borrelli
Crystal River, Florida
 
Last edited:
Pretty happy I found this thread. I took delivery in May of 2021, was fine at first but after a couple of months I started having issues on my right leg. I bought a seat pad which helped at first but it doesnt anymore. I feel something pressing into my right leg and its causing my right leg to eventually go numb. Been dealing with it, but i'm going to try some of your suggestions and I really hope it works. I love my Model Y, but these damn seats had me thinking about trading it in.
 
There isn't much foam. If you cut it down you risk it getting worse. It all comes down to perhaps one inch either way. If your hips are more narrow, you might get away with it. I DEFINITELY WOULD NOT DO THAT. I built a new seat. If you don't want to do that, you can try options as I have. First try simply to insert some kind of foam on top to flatten the seat out. If that doesn't work (wasn't good enough for me), then you can go the next step. I would then try to put some spacer material between the metal springs and the bottom of the stock foam of the seat bottom. Just be careful with the wire for the seat sensor that passes roughly middle. You'll have to either lace that wire through a hole or cut a slot in your spacer material. To add a spacer, it's possible to disconnect the seat bottom from the metal base in the front and the driver's door side. It's not easy but can be done. After reworking seats for a year, I just pull the four bolts holding the entire seat assembly to the floor, and then I can access everything easily.
Another lesson I've learned is that many of us suffering with the seat bolsters also are prone to lower back disc issues. For that it is absolutely necessary to make additional but rather "simple" mods to the upper back of the seat rest in addition to modifying the seat bottom. Reach out to me if you need more help. I'm easy to find. I also have a YouTube channel under my name where I posted many videos on the subject.
Sincerely,
George Borrelli
Crystal River, Florida
Thanks George!
I have been following your YouTube channel, and appreciate all that you have shared on there too!
 
  • Like
Reactions: Georgesb2
I've had this thread bookmarked. I'm at 2 months with my car, 5k+ kms. Many hrs of seat time. My driver's seat comfort quest began a few weeks ago when I learned I wasn't the only one.

I did the center seat bottom riser modfirst, which absolutely helped. I used a piece of high density foam floor tile from the kids' play room floor pad. With this mod alone I went from fiddling with the seat controls multiple times in any ride longer that 20 minutes to finding a spot where I found myself only slightly adjusting forward or rear slightly when needed to change my left leg angle / position.

The left leg was still nagging me. I was getting numb leg after 30-45 minutes driving unless I held my leg in a specific position or constantly adjusted every few minutes. So I decided to give this a go.

I thought this was going to be a pain to do, but I was able to do it without removing the seat from the car.

That said, I was a bit afraid to have to do it again, and rather than removing a bit at a time I fear I may have removed a bit much while struggling to make a clean ish cut. I think I nailed the rear half of the cushion but got a bit aggressive as I got to the front corner. It didn't help that my very first cut was at that front side and I realised it was at the wrong angle and going to remove even more, so when trying to cut again at a lesser angle to remove less some bigger chunks came off than I would've preferred and I had to try and smooth it out. My seat cover was pretty deflated / loose after and I ended up cutting open an old pillow and stuffing in some poly fill to keep the cushion cover nice and full looking while easily compressing when I sat in the seat.

I've definitely picked up some breathing room. The pressure is relieved on the left leg but now I feel a bit loose on that side like the seat is almost flat. I've only taken a couple of short drives with this mod this weekend so now I have to give this some butt-time to adjust to see if I'm better like this or If I've messed up and decide I want to replace the foam and go back to how it was before.

Weekly commutes start again tomorrow. I'm kind of looking forward to seeing how it goes. Will see if it's obviously better on a longer ride or if I think I've made a mistake and need to find a replacement bottom cushion.

1688952094164.png

Fingers crossed.
 
Hi, I have a 2022 model 3 performance, and like some of you guys here I found the driver seat to be uncomfortable. My passenger side is ok because the left bolster doesn't seem to bother me. I also realized that the driver seat cushion has less support and sinks in lower. So after doing a little investigation of the under side of both driver and passenger seats, I found out that the driver side is missing some plastic material. what I did was I bought some thin flexible plastic cutting boards Amazon.com from amazon. There is a cable going through the cushion in the middle of the lower/middle section of the seats. These plastic will clear the cable and fit in the lower section. For the middle section, you have to cut about an inch off the length and width of the material to clear the cable and make it fit. I ended up using 8 pieces for the lower, and 4 pieces for the middle section. This will give the seat cushion much more support and will prevent the seat from sinking in too much. Therefore you won't feel the left bolster as much. Hope this will help some of you guys as much as it has help me.
I'm new to Tesla and this forum (my first post). Plan on modifying my 23 Model 3 Performance in a similar manner and have no qualms about the work but have some questions. Did you pull the seat out which requires harness disconnect and possibly 12v battery disconnect or just loosen the hold down bolts and til the seat? Any other seat removal tips would be much appreciated.
 
You really don't need to be that fancy. A stack of notebook paper (or even an old magazine) works just as well.
I'm new to Tesla and this forum (my first post). Plan on modifying my 23 Model 3 Performance in a similar manner and have no qualms about the work but have some questions. Did you pull the seat out which requires harness disconnect and possibly 12v battery disconnect or just loosen the hold down bolts and til the seat? Any other seat removal tips would be much appreciated.
 
I've had this thread bookmarked. I'm at 2 months with my car, 5k+ kms. Many hrs of seat time. My driver's seat comfort quest began a few weeks ago when I learned I wasn't the only one.

I did the center seat bottom riser modfirst, which absolutely helped. I used a piece of high density foam floor tile from the kids' play room floor pad. With this mod alone I went from fiddling with the seat controls multiple times in any ride longer that 20 minutes to finding a spot where I found myself only slightly adjusting forward or rear slightly when needed to change my left leg angle / position.

The left leg was still nagging me. I was getting numb leg after 30-45 minutes driving unless I held my leg in a specific position or constantly adjusted every few minutes. So I decided to give this a go.

I thought this was going to be a pain to do, but I was able to do it without removing the seat from the car.

That said, I was a bit afraid to have to do it again, and rather than removing a bit at a time I fear I may have removed a bit much while struggling to make a clean ish cut. I think I nailed the rear half of the cushion but got a bit aggressive as I got to the front corner. It didn't help that my very first cut was at that front side and I realised it was at the wrong angle and going to remove even more, so when trying to cut again at a lesser angle to remove less some bigger chunks came off than I would've preferred and I had to try and smooth it out. My seat cover was pretty deflated / loose after and I ended up cutting open an old pillow and stuffing in some poly fill to keep the cushion cover nice and full looking while easily compressing when I sat in the seat.

I've definitely picked up some breathing room. The pressure is relieved on the left leg but now I feel a bit loose on that side like the seat is almost flat. I've only taken a couple of short drives with this mod this weekend so now I have to give this some butt-time to adjust to see if I'm better like this or If I've messed up and decide I want to replace the foam and go back to how it was before.

Weekly commutes start again tomorrow. I'm kind of looking forward to seeing how it goes. Will see if it's obviously better on a longer ride or if I think I've made a mistake and need to find a replacement bottom cushion.

View attachment 954792
Fingers crossed.

I hope that works out.
I found it MUCH easier to remove the seat bottom and work on a bench.
I first tried cutting the wing too. That did not work out for me in the long term.
You can purchase used replacement seat bottoms and start all over again.
I completely replaced the foam entirely. I used a foam from an entirely different car and made changes to it to fit the Tesla faux leather cover.
This made the foam denser thicker and flatter.
Everything fit pretty snugly after I was done all my changes.
The seat no longer hurts.
 
To follow up: I've continued on my quest of trial and error. When I did the bolster I feared that I removed too much, and I did. It fealt as though I lost all side support, which some may like, but when turning corners I felt as though I was sliding off the seat. The issue came from cutting too much off the top of the bolster.

Luckily I had cut clean pieces, and I was able to re-attach the larger top chunk I had cut off with some spray adhesive. The result was a much smaller removal on the inside of the bolster that has given me a bit more space while maintaining some side support.

That said, I really think the main improvement comes from the bottom. I continued my trial and error after the bolster mod: removing the initial small bottom spring pad I made, then making a larger one and even adding another layer of foam.

I'm in a much happier spot now, to the point where I question if I even had to modify the side. I'm driving my daily commute without sore-ness and constant adjustment. I think I could even consider a road trip haha.

The new shape was extended in length and width to cover as much of the bottom of the seat as possible, rather than just the springs. The very bottom (blue) is extremely firm floor play pad I had as a scrap from my kids' play room floor tiles. I was actually happy with just this, but added the top softer "high density foam" layer that I bought off amazon mainly out of curiosity.

The size is wide enough to fit between the seat rails and long enough to get to almost the very front of the springs. The square cutout in the middle is a clearance for the factory seat sensor.

The install requires no tools other than a flashlight. Admittedly the first time was a huge hassle but now That I've done it a few times I can do it in 15 minutes. With this larger size I did disconnect the seatback wire harnesses under the seat to slip it in rather trying to squish around them and stress the cables. Ultimately it was easier.

Here's a couple of photos of what I've landed on as my V3 of bottom pad insert:

1693404966871.png

1693405000583.png

1693405031117.png


And what it looks like installed:
1693405070245.png

1693405106184.png

And with the seat cover fully re-clipped in
1693405149780.png


I have leftover of both materials and am tempted to try sticking more of the soft foam in. Or removing the stiff floor pad foam and doing multiple layers of the softer foam. But I'm also happy with it and don't want to mess with it at the moment.

I don't know if this will be useful to anyone but thought I'd post it in case it helps someone.
 
To follow up: I've continued on my quest of trial and error. When I did the bolster I feared that I removed too much, and I did. It fealt as though I lost all side support, which some may like, but when turning corners I felt as though I was sliding off the seat. The issue came from cutting too much off the top of the bolster.

Luckily I had cut clean pieces, and I was able to re-attach the larger top chunk I had cut off with some spray adhesive. The result was a much smaller removal on the inside of the bolster that has given me a bit more space while maintaining some side support.

That said, I really think the main improvement comes from the bottom. I continued my trial and error after the bolster mod: removing the initial small bottom spring pad I made, then making a larger one and even adding another layer of foam.

I'm in a much happier spot now, to the point where I question if I even had to modify the side. I'm driving my daily commute without sore-ness and constant adjustment. I think I could even consider a road trip haha.

The new shape was extended in length and width to cover as much of the bottom of the seat as possible, rather than just the springs. The very bottom (blue) is extremely firm floor play pad I had as a scrap from my kids' play room floor tiles. I was actually happy with just this, but added the top softer "high density foam" layer that I bought off amazon mainly out of curiosity.

The size is wide enough to fit between the seat rails and long enough to get to almost the very front of the springs. The square cutout in the middle is a clearance for the factory seat sensor.

The install requires no tools other than a flashlight. Admittedly the first time was a huge hassle but now That I've done it a few times I can do it in 15 minutes. With this larger size I did disconnect the seatback wire harnesses under the seat to slip it in rather trying to squish around them and stress the cables. Ultimately it was easier.

Here's a couple of photos of what I've landed on as my V3 of bottom pad insert:

View attachment 969494
View attachment 969495
View attachment 969496

And what it looks like installed:
View attachment 969497
View attachment 969498
And with the seat cover fully re-clipped in
View attachment 969499

I have leftover of both materials and am tempted to try sticking more of the soft foam in. Or removing the stiff floor pad foam and doing multiple layers of the softer foam. But I'm also happy with it and don't want to mess with it at the moment.

I don't know if this will be useful to anyone but thought I'd post it in case it helps someone.
I am really excited to hear about your success as I have been so close to trading in my brand new MY for another car because I have been in so much pain driving this car. Thanks so much for posting this write up with the photos too! I am going to try this exact modification as soon as I get the foam delivered.

A few questions for you:

1. Do you mind sharing all the thickness, width, and depth of each piece of foam you used?
2. How did you access this area? Just removing the front and back seat cover clips? Did you unbolt the seat from the risers?
3. Do you slide the new foam in from the front or back of the seat?
4. You mentioned you are tempted to install more softer foam so what thickness would you recommend someone else try?
 
I'll try to help the best I can, first, here's some photo dimensions I snapped at the time. If I ever take it out again I'll make the center cut a tiny bit deeper for some additional wiggle room for the seat occupancy sensor. It works 100% as is, just a little more room for the pass thru wouldn't hurt I think.
1693575157428.png

1693575206609.png

1693575239030.png

1693575272202.png


1. Do you mind sharing all the thickness, width, and depth of each piece of foam you used?
2. How did you access this area? Just removing the front and back seat cover clips? Did you unbolt the seat from the risers?
3. Do you slide the new foam in from the front or back of the seat?
4. You mentioned you are tempted to install more softer foam so what thickness would you recommend someone else try?
1 - The bottom blue piece is very high density floor foam play mat I originally got from walmart. I started here because it was rigid enough to ad some platform structure over the stock seat "springs" while still having some give. I think it's around 3/8" thick and doesn't compress easily

The top white ish layer is just a "high density foam" I bought off amazon. 1/2" thick. I figured better to have thinner supplies I could layer to build up than to try and cut it down. This foam is significantly softer and easily compressed than the blue foam.

I used 1 floor tile and only a portion of the foam I received.

2 - I accessed from rear passenger footwell. I did not unbolt anything and did not have to undo the front fabric clips to insert the additional bottom foam. That's only necessary if you wish to trim down the bolster foam. I'll try to show with this picture. You can try for access before buying any materials at all to see if it works for you:

1693575961969.png

A - unclip the 2 x upholstry straps from the bottom spring
B - This will reveal the 2 x bigger clips underneath. Undo those, also from the seat springs, and flip both up and out of the way.
C - Orange = seat occupancy sensor. It's clipped onto the bottom of the seat. The wires don't need disconnected, the connection just needs unclipped from the seat frame for some working room. Pink = seatback cables, I assume heat and lumbar. Undoing these and flipping the cables out of the way makes slipping the foam in much easier or they will block about 1/4 of your rear access.

This will all reveal something like this:
1693576256946.png

The metal bars are your seat springs, they clip up and over the exposed rear structural bar and clip in at the front. This is a bit finnacky but you can push the white pieces up and off of the bar, then slightly forward to drop the whole support spring from the rear. This makes a gap between the support spring and the bottom cushion and this is where I worked in the foam. There's a bit of back and forth between front and rear footwell to work the foam in as it can get caught on little bits here and there.

Then reverse. When slipping the white spring clips back into place be very careful of the front clip placement. They need to clip into the front of the seat pan (can see from front footwell) as the back clips are slipped back onto the bar. The front just needs to be lined up right before clipping onto the back bar for it to fall into place correctly. First time is a pain, after that you'll get it.

Re-install spring, re attach wire harnesses, re, clip wide fabric clips, re clip short fabric clip, done.

3 - Rear. The vast majority of it is done from the rear. From the front I unclipped the wire 2 x harnesses, unclipped the occupancy sensor from the seat frame and helped guide the foam in / pulled the foam in with the spring dropped when it was getting caught up pushing from the rear. Don't push blindly too hard. Also from the front make sure that seat occupancy sensor is clear and free / not pinched or routed in a way it will get damaged. Mine is looped forward a bit and dangling straight down when done.

4 - I'm mainly curious if additional foam would offer any further plushness. But I have 2 concerns: 1 - I'm pretty happy with where it's at right now and 2 - I don't know how much vertical foam you can install before you start running into complications re-installing everything. Right now I didn't have to mess around with anything, all fabric clips re-install as they should even though they're a bit more difficult to stretch out during re install.

A massive wall of text, sorry. But I hope it helps.

I actually have enough material left to make about 3 more of these as pictured. I'd offer to make one up and send it but cross border shipping with it's size is likely cost-prohibitive. I wouldn't want to fold up that rigid foam. Also tough to guarantee success, it works for me at the moment but I can't say for certain it will help with the discomfort you're feeling.

I have gone from nearly regretting the car and being afraid to tell my wife I might need to ditch it to once again enjoying it.
 
  • Informative
Reactions: Collutio
I'll try to help the best I can, first, here's some photo dimensions I snapped at the time. If I ever take it out again I'll make the center cut a tiny bit deeper for some additional wiggle room for the seat occupancy sensor. It works 100% as is, just a little more room for the pass thru wouldn't hurt I think.
View attachment 970077
View attachment 970078
View attachment 970079
View attachment 970080


1 - The bottom blue piece is very high density floor foam play mat I originally got from walmart. I started here because it was rigid enough to ad some platform structure over the stock seat "springs" while still having some give. I think it's around 3/8" thick and doesn't compress easily

The top white ish layer is just a "high density foam" I bought off amazon. 1/2" thick. I figured better to have thinner supplies I could layer to build up than to try and cut it down. This foam is significantly softer and easily compressed than the blue foam.

I used 1 floor tile and only a portion of the foam I received.

2 - I accessed from rear passenger footwell. I did not unbolt anything and did not have to undo the front fabric clips to insert the additional bottom foam. That's only necessary if you wish to trim down the bolster foam. I'll try to show with this picture. You can try for access before buying any materials at all to see if it works for you:

View attachment 970083
A - unclip the 2 x upholstry straps from the bottom spring
B - This will reveal the 2 x bigger clips underneath. Undo those, also from the seat springs, and flip both up and out of the way.
C - Orange = seat occupancy sensor. It's clipped onto the bottom of the seat. The wires don't need disconnected, the connection just needs unclipped from the seat frame for some working room. Pink = seatback cables, I assume heat and lumbar. Undoing these and flipping the cables out of the way makes slipping the foam in much easier or they will block about 1/4 of your rear access.

This will all reveal something like this:
View attachment 970085
The metal bars are your seat springs, they clip up and over the exposed rear structural bar and clip in at the front. This is a bit finnacky but you can push the white pieces up and off of the bar, then slightly forward to drop the whole support spring from the rear. This makes a gap between the support spring and the bottom cushion and this is where I worked in the foam. There's a bit of back and forth between front and rear footwell to work the foam in as it can get caught on little bits here and there.

Then reverse. When slipping the white spring clips back into place be very careful of the front clip placement. They need to clip into the front of the seat pan (can see from front footwell) as the back clips are slipped back onto the bar. The front just needs to be lined up right before clipping onto the back bar for it to fall into place correctly. First time is a pain, after that you'll get it.

Re-install spring, re attach wire harnesses, re, clip wide fabric clips, re clip short fabric clip, done.

3 - Rear. The vast majority of it is done from the rear. From the front I unclipped the wire 2 x harnesses, unclipped the occupancy sensor from the seat frame and helped guide the foam in / pulled the foam in with the spring dropped when it was getting caught up pushing from the rear. Don't push blindly too hard. Also from the front make sure that seat occupancy sensor is clear and free / not pinched or routed in a way it will get damaged. Mine is looped forward a bit and dangling straight down when done.

4 - I'm mainly curious if additional foam would offer any further plushness. But I have 2 concerns: 1 - I'm pretty happy with where it's at right now and 2 - I don't know how much vertical foam you can install before you start running into complications re-installing everything. Right now I didn't have to mess around with anything, all fabric clips re-install as they should even though they're a bit more difficult to stretch out during re install.

A massive wall of text, sorry. But I hope it helps.

I actually have enough material left to make about 3 more of these as pictured. I'd offer to make one up and send it but cross border shipping with it's size is likely cost-prohibitive. I wouldn't want to fold up that rigid foam. Also tough to guarantee success, it works for me at the moment but I can't say for certain it will help with the discomfort you're feeling.

I have gone from nearly regretting the car and being afraid to tell my wife I might need to ditch it to once again enjoying it.
Wow! Thanks again for another great thorough write up! My hope is that this seat correction will help me and everyone else suffering from the same pain and regret. I know the feelings all too well. I am going to order the foam today and try to get it installed next week and will post my results. I am curious what is your height an weight? I am 6'3" 200lbs and medium/athletic frame which seems right in line with many other suffering from the same issues we are with these seats. Also, I appreciate the offer to send the materials over the border, but this should be easy enough to source and cut to specific dimensions.
 
That thin insert is a great mitigation if it works long term for sufferers.

However,
Since I got my car in Feb '22, I tried that and numerous other approaches, including this one. NONE were adequate. So I replaced the Tesla bottom seat foam entirely. I have built many of these seats for people in need.

I tried virtually every idea that I could think of.
I was one of the earliest out there making seat changes to Teslas.

Your body build has a lot to do with the problem and solution.
I'm very tall in the upper torso. You might say I'm the equivalent of a 6'3” or so person. I also weight 240 lbs. My hips are larger in width than most people. Although that doesn't “show”, it's true when I seat in many seats, they are too narrow for me. I was in a great deal of pain after one hour in the car. Shorter rides did nor reveal the problem. It got to the point I could not drive my '22 Tesla Model 3 P anymore.

When I measured the width of the metal frame of the Tesla, it's simply too narrow.
(I also bought a used metal frame to do my engineering and testing.)

One only hopes that the New Refreshed Model 3 Highlander has wider metal base. And some day that will migrate to the Model Y as well. I don't know this is a fact, yet...

A recent contact, and a member here, and I had a long discussion about the details of his particular problem. From the conversation I realized that the Model Y actually has LESS headroom than the Model 3! Go figure, I thought the opposite was true. What Tesla did was place the Model Y seat on pedestals. Where the Model 3 is bolted straight on the floor.

My solution works very, very well for the Model 3.

But,
If you have the height challenge and a Model Y, you may be stuck with less than Ideal solutions in the hopes of some pain mitigation. I hope it works for many of you.

Keep this in mind!
If you are already tall, and likely you are if you are reading this, that you definitely MUST modify the upper as well. If you don't, you may develop or exacerbate lower back problems and pain that migrates all the way down the legs!

I know the above is true from my own experience and many that have worked with me.

Here's what I recommend you do:
In addition to whatever you try for the seat bottom. If you are tall, please consider these steps, that I feel to be mandatory!

These all can be done DIY by you.
You don't have to pull the seat out.
You don't have to take the seat apart.
You only have to remove the black plastic backing after you remove the headrest.

1) Remove the factory lumbar support, move it behind the plastic support. This is easy to do. It doesn't modify the car in any permanent way. You don't need to disconnect anything. The dang thing is too low and moves the top of your hip bone forwards a bit, and a bit matters a lot! This movement is counter to good safe back posture. What I discovered is that the air bag style factory lumbar support never totally deflates and always applies some pressure. This is not good for us with long back and lower back potential or realized issues.
2) Replace the factory lumbar support with foam. I cut a rectangular block of dense foam the width of the lower part of the upper seat back, at the level of the new lumbar support. I installed it horizontally to provide lumbar support. I installed it above the top of my hip bone structure. This is very easy to do and doesn't permanently change anything.
3) Install another piece of foam cut in a rectangular block of dense foam, vertically, from the top of the new lumbar foam to the top of the back. This prevents the back from “folding” and stops the side wing discomfort and allows you to sit with good posture. (A number of owners told me they felt discomfort in the upper and the width and wings particularly) But it also allows a good posture after insert.
4) Finally change the headrest. A simple change is to face it backwards. This is easy to do and not a permanent change to the car. I made videos online of how, others have as well. I actually bent my headrest backwards permanently. If the headrest pushes your head downwards, your neck is bent and that ruins the entire back alignment for good posture.


If you don't do the above steps, your problems will likely get worse.

I hope this helps many of you.
Sincerely,
George Borrelli
 
What did you replace it with?
I built a seat myself. It took a year of experimentation and iterations and testing of many different custom changes. But I finalized the design. I bought a spare Tesla seat in good condition from Ebay. I do this so that we can simply swap seats and we can keep the original car seat in case we sell the car or want to go back for any reason. Plus it's quicker to have the second seat right there once we do the work to pull out the first seat bottom. I then bought another seat (trade secret and there might be others that could work to suit) that I knew to be a good foam for long drives and it was fairly close in size and shape. I removed the Tesla faux leather cover from the Tesla foam, threw the Tesla foam in the trash. The Tesla foam is way too thin and way to soft to protect body parts from the metal base, springs, sides and provides zero suspension to protect from road bumps. I then installed the OEM Tesla cover on the replacement foam which is much more robust having denser foam. I moved the seat sensor from the OEM Tesla foam to the next first. I then came up with a way to "sew" the cover to the replacement foam. Additionally I glued dense foam blocks to the bottom of my new seat. Now it is heaven. No pain, and can go for many many hours long drives. It is so plush in that it floats over bumps with plenty of foam to go up and down in. Additionally I modified the upper. This is so we don't get the back in bad posture that might hurt the discs. I bent the headrest back so my head could be "on straight". I pulled out the stock lumbar, which is too low and too wimpy. I moved it out of the way, without disconnecting anything. I installed a block of foam horizontally at my actual lumbar height. I put another block of foam vertically so my back didn't feel so caved in and restricted. I love the seat. I've made many of these. They do raise the seat height some, which isn't that much of a problem for most people in the model 3, but the Y is on platforms and has more height restriction. I don't know about the S / X. I figure the S is likely more like the 3 while the X is more like the Y in regards to height. I did buy a Model X seat as well and rebuilt is as a prototype.
 

@WheresMyKeys

I tried your solution. Sourced some foam material similar to yours. Tried installing it all today.

First steps all went OK, until I got to:

"The metal bars are your seat springs, they clip up and over the exposed rear structural bar and clip in at the front. This is a bit finnacky but you can push the white pieces up and off of the bar, then slightly forward to drop the whole support spring from the rear."


I pushed the white pieces up so it was not clamping the bar anymore. However I never could get the white clamps to go enough forward to have the metal frame drop below the bar. It really needs to drop below the bar, otherwise there is no room to add the new foam.

Do you have any ideas to get the frame to drop? I removing the seat a better option? Where can I find a good instruction to remove the seat? (do I need to disconnect the low voltage battery?/how to handle the seat tensioner, and so on?)

Appreciate your efforts!!