Welcome to Tesla Motors Club
Discuss Tesla's Model S, Model 3, Model X, Model Y, Cybertruck, Roadster and More.
Register

Uncomfortable Front Seat(s) / Thigh Bolster Mod

This site may earn commission on affiliate links.

@WheresMyKeys

I tried your solution. Sourced some foam material similar to yours. Tried installing it all today.

First steps all went OK, until I got to:

"The metal bars are your seat springs, they clip up and over the exposed rear structural bar and clip in at the front. This is a bit finnacky but you can push the white pieces up and off of the bar, then slightly forward to drop the whole support spring from the rear."


I pushed the white pieces up so it was not clamping the bar anymore. However I never could get the white clamps to go enough forward to have the metal frame drop below the bar. It really needs to drop below the bar, otherwise there is no room to add the new foam.

Do you have any ideas to get the frame to drop? I removing the seat a better option? Where can I find a good instruction to remove the seat? (do I need to disconnect the low voltage battery?/how to handle the seat tensioner, and so on?)

Appreciate your efforts!!
I would simply remove the seat cushion.
Or perhaps just loosen it enough to pull it up to a side, exposing the metal springs top.

1) **Remove the four floor bolts.
2) **Rock the seat backwards
3) **From the front seat floor in front of the seat do the next steps underneath the seat.
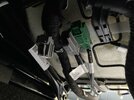
4) *Disconnect the gray cable that is near the back, trace the wire goes up into the seat bottom. Just press a tab, holding both ends of the connector, pull apart. Don't pull wires.
5) *Disconnect the tiny black connector. It is located underneath the metal springs, kind of in the center. That is the person in seat sensor. It usually pulls apart. You may need to unclip it from the white plastic support first to get it to come apart.
6) You might need or want to loosen up the seat controls side panel (black) to give more room to work.
7) With a small torx unscrew the front screw holding the black panel near the front, from underneath. You many need to adjust seat height for access. Be careful not to drop small parts in the holes in the floor.
8) The side of the black panel is attached by a press / snap plastic near the center. It pulls apart. I've broken them, be careful. You may need to squeeze on the inside when you pull the panel loose. Or try to do the next steps without removal.
9) With a skinny screwdriver start at the driver's door end at the front of the seat and begin to leverage pull the long black plastic clip holding the front of the faux leather to the metal base. It is wrapped around the front skinny edge of the seat metal base.
10) Repeat for the side closest to the driver's open door.

*You might be able to bypass disconnecting connectors, if you leave the seat in place and just disconnect the faux leather cover clips from front and door side.

**But It might be very difficult without removing the 4 floor bolts. You can try if you wish. I think the floor bolts are very easy, so why not?

You shouldn't need to do, the long black skinny clip holding the faux leather cover to the metal base, other side near the center console. Once the front clip and door side clips are removed, the seat cover should open like an alligator's jaws. To the limit of the wires (especially the seat sensor little black wire) of course.

This should give enough access to the springs top.


Regarding the metal springs.
They easily lift off the back bar.
But they are press fit in a plastic holder in metal clips in the front. They may be in there pretty good and may be difficult to remove and to put back in. IF they get loose, you will have issues and noises and such with the seat later on.

Sincerely,
George Borrelli
 
Last edited:
I then bought another seat (trade secret and there might be others that could work to suit)
No offense pal, but if you're not willing to share your "trade secret" then why keep bringing up your solution every time someone else posts about what they did?

I see you writing up a lengthy post every time someone else posts about their own idea.

You came up with a brilliant idea and you made it work. Good for you. I just don't get why you keep posting about it if you aren't here to share and help others with your fix.

You want a cookie or something?
 
  • Like
Reactions: MarkoP
It's because he's trying to sell his product, which I get he wants to get paid for his time, but it's not really in the spirit of the community. I reached out as well to try and get pointed in the right direction when I was at peak frustration. I ended up doing some more trial and error myself and, thankfully, found my happy place.
 
Last edited:

@WheresMyKeys

I tried your solution. Sourced some foam material similar to yours. Tried installing it all today.

First steps all went OK, until I got to:

"The metal bars are your seat springs, they clip up and over the exposed rear structural bar and clip in at the front. This is a bit finnacky but you can push the white pieces up and off of the bar, then slightly forward to drop the whole support spring from the rear."


I pushed the white pieces up so it was not clamping the bar anymore. However I never could get the white clamps to go enough forward to have the metal frame drop below the bar. It really needs to drop below the bar, otherwise there is no room to add the new foam.

Do you have any ideas to get the frame to drop? I removing the seat a better option? Where can I find a good instruction to remove the seat? (do I need to disconnect the low voltage battery?/how to handle the seat tensioner, and so on?)

Appreciate your efforts!!
You're so close!

Once you get the hooks pushed up you kind of have to push them towards the front of the seat. They're clipped in at the front as well, but unclip by moving them forward. They may be in there pretty good this being the first time (I've gone through the process a half dozen times by now).

I don't have a good photo of my own but here's a deconstructed seat I found from the web to show you how it's together. I highlighted the front clips. They're nothing more than a metal tab that's bent up from the seat pan to catch the clips at the front of the spring.

1695671924314.png


Like the rear hooks there are 4 of them. You can actually see them from under the front of the seat. If you get the rear hooks popped up you might be able to grab the flat metal from the front side and pull rather than push to unclip them, might be easier, not sure.

Once it's slipped forward a hair the hooks will be able to drop below the bar where you can slip that foam in.

The trickiest part, as mentioned, is making sure the front clips are all re engaged before 100% buttoning everything up. Kind of have to line it up as best as possible from the front side, then go the rear and pull it into place. Then go back to the front to make sure you're good, and if not try again. As mentioned if a clip is left out you can get funny noises.

I hope that helps! Once your're successful the first time you'll be able to repeat much easier if you need to adjust things, try more or less, etc.

I'm still curious about adding in another layer of the soft foam but I haven't felt as though I've needed it so I'm afraid to touch it any more for fear of making it worse.
 
basnor seat cover extender plus zero g pillow.
I have reduced the photo of this twice but it still says to large
at 5k bits WTF
Do you have the link for the pillow? Did you put it under the cover?

Do you have the link for both items? I only see the seat cover for Model Y on the website. Will it fit on 3?
 
Last edited:
I'll try to help the best I can, first, here's some photo dimensions I snapped at the time. If I ever take it out again I'll make the center cut a tiny bit deeper for some additional wiggle room for the seat occupancy sensor. It works 100% as is, just a little more room for the pass thru wouldn't hurt I think.
View attachment 970077
View attachment 970078
View attachment 970079
View attachment 970080


1 - The bottom blue piece is very high density floor foam play mat I originally got from walmart. I started here because it was rigid enough to ad some platform structure over the stock seat "springs" while still having some give. I think it's around 3/8" thick and doesn't compress easily

The top white ish layer is just a "high density foam" I bought off amazon. 1/2" thick. I figured better to have thinner supplies I could layer to build up than to try and cut it down. This foam is significantly softer and easily compressed than the blue foam.

I used 1 floor tile and only a portion of the foam I received.

2 - I accessed from rear passenger footwell. I did not unbolt anything and did not have to undo the front fabric clips to insert the additional bottom foam. That's only necessary if you wish to trim down the bolster foam. I'll try to show with this picture. You can try for access before buying any materials at all to see if it works for you:

View attachment 970083
A - unclip the 2 x upholstry straps from the bottom spring
B - This will reveal the 2 x bigger clips underneath. Undo those, also from the seat springs, and flip both up and out of the way.
C - Orange = seat occupancy sensor. It's clipped onto the bottom of the seat. The wires don't need disconnected, the connection just needs unclipped from the seat frame for some working room. Pink = seatback cables, I assume heat and lumbar. Undoing these and flipping the cables out of the way makes slipping the foam in much easier or they will block about 1/4 of your rear access.

This will all reveal something like this:
View attachment 970085
The metal bars are your seat springs, they clip up and over the exposed rear structural bar and clip in at the front. This is a bit finnacky but you can push the white pieces up and off of the bar, then slightly forward to drop the whole support spring from the rear. This makes a gap between the support spring and the bottom cushion and this is where I worked in the foam. There's a bit of back and forth between front and rear footwell to work the foam in as it can get caught on little bits here and there.

Then reverse. When slipping the white spring clips back into place be very careful of the front clip placement. They need to clip into the front of the seat pan (can see from front footwell) as the back clips are slipped back onto the bar. The front just needs to be lined up right before clipping onto the back bar for it to fall into place correctly. First time is a pain, after that you'll get it.

Re-install spring, re attach wire harnesses, re, clip wide fabric clips, re clip short fabric clip, done.

3 - Rear. The vast majority of it is done from the rear. From the front I unclipped the wire 2 x harnesses, unclipped the occupancy sensor from the seat frame and helped guide the foam in / pulled the foam in with the spring dropped when it was getting caught up pushing from the rear. Don't push blindly too hard. Also from the front make sure that seat occupancy sensor is clear and free / not pinched or routed in a way it will get damaged. Mine is looped forward a bit and dangling straight down when done.

4 - I'm mainly curious if additional foam would offer any further plushness. But I have 2 concerns: 1 - I'm pretty happy with where it's at right now and 2 - I don't know how much vertical foam you can install before you start running into complications re-installing everything. Right now I didn't have to mess around with anything, all fabric clips re-install as they should even though they're a bit more difficult to stretch out during re install.

A massive wall of text, sorry. But I hope it helps.

I actually have enough material left to make about 3 more of these as pictured. I'd offer to make one up and send it but cross border shipping with it's size is likely cost-prohibitive. I wouldn't want to fold up that rigid foam. Also tough to guarantee success, it works for me at the moment but I can't say for certain it will help with the discomfort you're feeling.

I have gone from nearly regretting the car and being afraid to tell my wife I might need to ditch it to once again enjoying it.
How do you remove the lumbar and back control cables? I was able to separate the gray one but not the green one. And how do you separate them from the plastic frame they are attached to?

Thanks!

Looking forward to enjoying this fix!
 

Attachments

  • IMG_0339.jpeg
    IMG_0339.jpeg
    404.4 KB · Views: 20
I believe the green one comes out the same way the gray one did. They're a bit fiddly for sure. You can see the tab you need to push in, in your photo.

The cable ends that remain attached to that clear-white piece slide into their clip that's attaching them. It's either forwards or backwards, I can't recall to be honest. I didn't know this when I did mine and broke one of those clips that hold it in place by pulling it straight down before seeing how they worked. This didn't damage the connection at all just the part where it was supposed to slide onto that piece.

I've zip tied them back up to prevent them from dangling as the one side doesn't stay up on it's own any more.
Thanks! I’ll give it a whirl. Def felt like I was on the verge of breaking them lol
 
Hi, I have a 2019 M3, 84k miles, over 80 miles commute in Bay Area traffic. I have been very happy with the car but lately (last six months) I have been experiencing pain in my right hamstring up to my hips to the point it has become unbearable. I am 5'9' 155 lbs yet the driver seat is giving me problems. I initially felt that either the foam or spring was giving way, but after reading this thread I see there are no springs in the foam it appears the foam itself might be damaged/broken on the right rear side of the driver seat. Being a DIY enthusiast I am eager to try options before I ask Tesla to replace the seat. Tesla wants $1960 to replace the seat.

Any recommendations on how I can replace the foam and not damage the heating elements and sensor wiring/electronics?
The lower seat cushion is a separate standalone part if that's what you're looking to replace. You shouldn't need to replace the whole seat unless the frame is broken. If it isn't a warranty fix I'd be searching for a slightly used second-hand part, personally.

If you've had the seat serviced at all it's worth looking underneath to make sure all the spring support clips are in place on the frame. If they're not you'll be falling deeper into the seat without support.