Welcome to Tesla Motors Club
Discuss Tesla's Model S, Model 3, Model X, Model Y, Cybertruck, Roadster and More.
Register

Wall Connector Installation Report - 60a using EMT - Parts List

This site may earn commission on affiliate links.
I helped a friend install a Wall Connector tonight for his soon-to-arrive Model 3. I thought others might find the pictures and parts list useful! (and I am pretty pleased with how the conduit bending came out - five bends in one stick of EMT!)

Parts list (all purchased at Home Depot locally other than the Wall Connector):
  • Wall Connector, 8.5 foot cord.
  • 10' stick of 3/4 inch EMT conduit - 786692020020
  • 2x EMT "Set screw connector" (aka the conduit ends with threaded fittings for going into the electrical box/Wall Connector) - 051411262723
  • 1" to 3/4 in Rigid reducing bushing ("Rigid" because it is threaded - this part is tiny and you can't see it in any of my pictures) - 051411913328
  • 60a Square D Homeline double pole breaker - 047569062803
  • 3/4 in EMT half saddle clips - 051411261528
  • Decking screws (used to screw the conduit to the wall - they were what I had bouncing around my garage)
  • 16 feet 6 AWG Black, 6 AWG Red, and 10 AWG Green (had way more than needed)
Parts were under $70 (plus the Wall Connector), and I bought an extra stick of EMT just in case I made a mistake, plus I had a lot of extra leftover connectors.

The final product. This is the Wall Connector with the 8.5 foot cord. We mounted it so the cable does not drag on the ground.
9C478913-7A06-499D-B57E-85CA49BF3226.jpeg


What we started with. The panel was extremely clean and very well done. The house is only a few years old.
B0E8844B-B972-4069-B31D-77706F3F3CC3.jpeg


Wired for a range, but it has a gas stove, so fairly limited 240v loads. (A number of multi wire branch circuits though which is what all the 20a handle tied breakers are)
2A951BB8-D315-4BEE-8308-AB489F4487DB.jpeg


This was the starting point prior to cutting the sheetrock.
C4F5D6D4-9FDB-4FD1-B7C9-3EBD67FC9F96.jpeg


I helped on the conduit bending part. YouTube is your friend!
0393B795-CE76-47A4-A927-26800CB6BC44.jpeg


Even got the offset bend in there to enter the bottom of the Wall Connector. Note he used 3/4ths inch EMT conduit but the Wall Connector has a 1” port, so we used a 1” to 3/4 in Rigid (threaded) reducing bushing before the 3/4 in threaded coupler.
BE4F7E81-1094-47EF-934F-8BF89EA9D9C8.jpeg


6 awg conductors. Properly stripped (Tesla has no strip gauge on the device which is dumb and it is not in the manual and they mounted it so you can’t see what you are doing - really stupid). 10 awg ground.
7965E0A2-57C6-4D09-BCA2-EB2B71862FA3.jpeg


Had to (or chose to) re-arrange the entire panel to have it laid out the way he wanted. Left a spot to add a generator back feed breaker with interlock kit in the bottom left.
8838D827-3D88-4D7F-9971-C56D8F32D51E.jpeg


It works! Close to the substation. Good voltage.
7A55747C-FEAC-4E15-A3A5-05EA3B861F26.jpeg


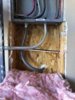
A reminder: Electricians (even really good ones like the ones that did this house) make mistakes. Check out the end of the wire that my friend had melt the insulation off shortly after he bought the house. This wire was not screwed into the breaker at all. Just sitting there barely touching. He found the issue years ago and fixed it by simply tightening down the screw, but while we had the entire panel powered down he cut off the end and stripped it back to where the insulation was still good.

213A999B-6A78-4C24-81A5-60C38B33EB89.jpeg
 
I *might* be wrong, but I think the conduit into the breaker panel requires a plastic bushing to keep the 6awg wires from rubbing against the metal of the emt adapter. You'd have to unhook the wires from the breaker, slide the bushing down to the adapter and screw it on.

Halex 3/4 in. Rigid Plastic Insulating Bushing (4-Pack)-27527 - The Home Depot

I'm not sure how the reducer works into the HPWC but one might be needed there? Couldn't tell from the picture.
 
  • Helpful
Reactions: CyberShy
neat! How did you bend the conduit? Did you buy a conduit bender or use something else?

Yeah, I bought a 3/4 in EMT bender for my Wall Connector install and then a 1/2 in bender at the same time for my generator inlet plug.

I *might* be wrong, but I think the conduit into the breaker panel requires a plastic bushing to keep the 6awg wires from rubbing against the metal of the emt adapter. You'd have to unhook the wires from the breaker, slide the bushing down to the adapter and screw it on.

Halex 3/4 in. Rigid Plastic Insulating Bushing (4-Pack)-27527 - The Home Depot

I'm not sure how the reducer works into the HPWC but one might be needed there? Couldn't tell from the picture.

Great callout! But I don’t think it is required for EMT conduit terminations when running wire smaller than 4 awg. I *did* have to use one for my Wall Connector install as I used Rigid to go through the wall (and that was a really sharp edge).

I actually had a spare bushing pulled out of my box ready to use, but then I determined I did not need it.

The reducing bushing is actually very well rounded too, so no issue there.
 
Out of curiosity, with this short of a run and the willingness to cut the drywall, why not run the wire 100% through the studs and into the back of the HPWC? I mounted mine on a block wall, but debated moving it to a different wall in the garage just to keep from having exposed conduit.
 
  • Like
Reactions: 67King
Out of curiosity, with this short of a run and the willingness to cut the drywall, why not run the wire 100% through the studs and into the back of the HPWC? I mounted mine on a block wall, but debated moving it to a different wall in the garage just to keep from having exposed conduit.

A great question! I was thinking about the same thing last night. Several reasons:
  • I used #6 gauge THHN which can be used at the 75c rating since it is in conduit. If I used Romex (NM cable) I would have had to use #4 since it can only be used at the 60c rating. That is a pain in the butt to deal with the thicker cable.
  • I did not really want to remove a TON of drywall, also, there is a lot of wood in that wall since it supports some big beams in the garage - not sure what I might have run into that I could not drill through.
  • I am not sure if I could have gotten #4 awg to enter the back of the Wall Connector very well without using the rear / top entry bracket thing that comes with it (without that adapter the rear entry is a pain in the butt apparently to bend the wires). I think it is slightly less clean of a look.
  • I would not be worried either way, but part of me likes my EV charging wire in hard pipe conduit. Even if you managed to melt the wire, the damage would likely be contained by the conduit. The conduit is solidly grounded and would trip the breaker if the live conductors came into contact. There is a reason that commercial is not allowed to use romex (but again, I would not worry about safety of romex in a household if installed right - this is a pretty minor point).
  • I personally don't mind the look of exposed conduit in a garage <shrug>. Kind of gives a commercial feel to it.
Lots of ways to accomplish this. ;-) I chose one I was comfortable with!
 
.... So what's the "proper" length? Any chance you measured...

Maybe 3/4ths of an inch? Or a smidge longer?

I made sure by feel that they went in far enough to hit the stops and then I used a flashlight and crammed my head down there to make positively sure no insulation was pinched. My friend then used his torque screwdriver on them to the specifications.
 
(without that adapter the rear entry is a pain in the butt apparently to bend the wires)

Ha. This is funny, but yes, I can confirm it is, even with just #6. #4 would be frustrating for someone like me who rarely does this and does not have all the heavy duty wire tools, I would guess. It was the most annoying part of the install. It was made even worse by the fact that the connecting terminals were fully clamped closed from the factory...it puzzled me why I could not tighten them, for a few minutes.
 
When I get mine I'm planning on doing 80amp breaker and 3awg. You two are scaring me with talks of 6awg being a pain.

It's just the rear entry, low profile, that was the difficulty. It's not like it was impossible, it was just annoying, because you have to somehow accomplish a 90-degree bend and get the wires into the terminals, and there isn't a lot of clearance. With the non-low profile it's no problem I think because that adapter behind the Wall Connector takes care of things (after making the connections to that, it has wires that come out of it with ferrules on the end which just go right in to the final terminals, as I recall). And bottom entry is no problem I think because there is not a bend. (See pictures above for that case.)
 
Nice job!! Looks really clean and professional - the height such that the charging cable doesn't drag is a great touch.

Quick question though - assuming he's going to patch the drywall under the breaker box; how are you planning to transition through the drywall? Kinda surprised you didn't use a pull box - something like this: 3/4 in. Rigid Type LB Threaded Aluminum Conduit Body-58607 - The Home Depot

edited to add: Maybe could've used a short run of liquidtight inside the wall to get the flex you needed, and then a coupler to EMT on the outside? Just a thought.

Just curious what the transition is going to look like - I'd think that'd be hard to patch around... but what do I know?

(p.s. I also have a recessed breaker panel in the garage and HATE it -- wish it were surface mounted! Would rather see a neatly organized set of wires than have to break drywall every time we run a danged circuit ...)
 
Last edited:
  • Love
Reactions: eprosenx
Nice job!! Looks really clean and professional - the height such that the charging cable doesn't drag is a great touch.

Quick question though - assuming he's going to patch the drywall under the breaker box; how are you planning to transition through the drywall? Kinda surprised you didn't use a pull box - something like this: 3/4 in. Rigid Type LB Threaded Aluminum Conduit Body-58607 - The Home Depot

edited to add: Maybe could've used a short run of liquidtight inside the wall to get the flex you needed, and then a coupler to EMT on the outside? Just a thought.

Just curious what the transition is going to look like - I'd think that'd be hard to patch around... but what do I know?

(p.s. I also have a recessed breaker panel in the garage and HATE it -- wish it were surface mounted! Would rather see a neatly organized set of wires than have to break drywall every time we run a danged circuit ...)

Yeah, I have all your exact same precise thoughts.

We are going to pay someone else to patch the drywall. ;-) I think it is all doable pretty easily. Just end up using a lot of sheetrock mud.

I have considered using flex (could also use liquid tight like you mentioned if you like the looks better). It still is not very flexible though at all, 3/4's does not bend very tightly. I had a roll of it with me but chose not to use it.

I agree that I am still in search of a better transition solution out of electrical boxes like this. Nothing has yet really hit the spot for me. I have done two of them this way now (but neither has had sheetrock patched yet. Having one continuous piece of conduit is fantastic from a wiring simplicity and robustness perspective.

I totally agree about wanting a surface mounted panel! I have friends building a house right now and upon my recommendation, that is what they are going to do.
 
  • Love
Reactions: dmurphy
Lots of ways to accomplish this. ;-) I chose one I was comfortable with!

That’s what really matters in all of this for sure. When I did mine, I was split between THHN and a 60A breaker for the increased charge rate or 6/2 Romex and a 50A breaker for the ease of install.

Ultimately, with my breaker panel being on the opposite side of the garage, I decided that I didn’t want to run conduit all the way across the attic, and I wanted something that would be as aesthetically pleasing as possible at the HPWC. I ended up with the 6/2 Romex and 3/4 PVC from the ceiling down to the top entrance, and painted it to match the wall. I really wish there was drywall to fish the wires through to use the low profile mount, but this didn’t turn out too bad.

042430CD-6F4D-4800-B4EF-C329EE03BAC9.jpeg


I love seeing others take the DIY approach, and seeing the reasons for the installation they chose. Props on the nice clean install :)
 
And generator backfeed setup installed as well as long as we were doing work with the sheetrock off. :)

The forum software totally messed up the image order when I uploaded.

The inlet box:
368091B5-3C56-4C7B-B432-80D9FB2BED64.jpeg


Polyurethane Vulkem sealant to keep the Oregon outdoors outside.
C2C89F49-8178-4FB4-B653-43D5403CE5EB.jpeg


Most would just use romex, but I like going hard core. LFMC was way overkill.
A19D9D0B-FADF-41B2-A883-EA0B4F4EAB04.jpeg


Now my friend just needs his own generator (tested it with mine)
35B81610-FE8C-4CD8-8819-CA52B62B0F76.jpeg


Need to peel that stupid sticker off. We maintained 36” clearance to the gas meter as per code. :)
27EA6A52-8C64-45F6-AB3D-89CAF390658F.jpeg


Some assembly required on interlock kits. I prefer the Siemens ones that install under the cover vs on the cover. They work properly even with the panel cover off.
210A30C3-AB78-4967-ACD4-F41F5F37354E.jpeg


Proper interlock!
CA865051-AB89-48CC-B8CE-FBE44795655D.jpeg


Hold down kit and cover with warning not to turn on at same time as main when cover is off.
51465151-2EEA-442F-9BDC-C54077B906AD.jpeg


Ready for inspection!
 

Attachments

  • F6279FC9-1C92-4850-B143-118FD9D3C74B.jpeg
    F6279FC9-1C92-4850-B143-118FD9D3C74B.jpeg
    494 KB · Views: 216
Oh, and in that last post the final picture did not actually get inserted into the post. If you click on the attached file in the last post you can see how we used LFMC. Massive overkill, but I like watertight conduit when exiting the outside wall (though the local inspector I talked to about my install said they were fine with just romex for penetrations like that). Probably $10 extra in parts for the LFMC and couplers. <shrug>

We also caulked the crud out of the hole. What else was I going to do with a whole tube of sealant. ;-)