rainforest
Active Member
During HW3 upgrade, I asked Tesla to change my filter and I got the vinegar smell. Once they changed the filter again, the smell was gone.


You can install our site as a web app on your iOS device by utilizing the Add to Home Screen feature in Safari. Please see this thread for more details on this.
Note: This feature may not be available in some browsers.
So did the DIY filter replacement with OEM Tesla (surprisingly high quality) and cleaned condenser with Klima cleaner from Amazon. So far no smell, but need to wait longer. I made sure to spray the whole can and cover as much of the condenser as possible. Air definitely smells cleaner.
Now time to schedule for my x. Don’t have the patience to tear apart the dash to get to the filter.
can someone tell me where condenser coil in 2018 model x is? ive got the filter out. klima cleaner on hand. ive had service treat for the awful smell and replace the filter. came back in less than 2 months. they initially quoted me 156 then when they showed up at my house they said it was in system wrong and at least double that. it is ridiculous to pay 300 every month to partially treat an odor so offensive the car is unusable
Well I tried this today and so far so good! A lot easier than I thought. Instead of putting the tubing that comes with the Kool it can between the blades as suggested... Just before the evaporator there is a temperature sensor in the piping that can be easily removed to push the solution in. Worked like a charm!
Hopefully this lasts.... The smell is driving me crazy.
I tried it with Klima cleaner on Sunday. Full can. Put tube between blades of fan and push all the way in.
got in car yest and it’s baaack
do you have a picture of the temp sensor you removed?
thanks[/Q
Assuming the evaporator housing is the big rectangle area on the left? If so, you pull the temp sensor out, there is a hole now, and then you push the tubing into the housing and spray?
Yeah that's correct. The sensor just twists and pulls out. I pushed the tube in... You don't have to push much of it in since the evaporator is right there.
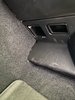
@tnots, I think you are on to something. The holes above the passenger floor well maps to the attached (exploded evaporator view). I think we just need to follow the air way up and spray Kool-it in the chamber towards the right?
I think this is a better approach since it's after the fan blades as posted in the reddit post -- Getting rid of bad air conditioner smell. Model x. : teslamotors
I was about to tear apart my dash today, will try this route first and I ordered 2 cans of Kool-It.


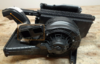
Here are the pictures and instructions after you have taking out the panels, glove box and the AC filter.
You will see the fan underneath the filter chamber. Insert the tube at the further most end of the fan well.
It's easier to insert the Kool-it black tip applicator through the top of the fan blades.
Insert it all the way in, we want the tip to go down towards the left as much as we can.
Apply Kool-it, if you did it right you should start to see the mixture excess dripping. When I applied it through the foot well air-outlet, there was no mixture seen under the car.