Welcome to Tesla Motors Club
Discuss Tesla's Model S, Model 3, Model X, Model Y, Cybertruck, Roadster and More.
Register

HANSSHOW Trunk Liftgate v3 install

This site may earn commission on affiliate links.
Any info on how to reset the control box unit?

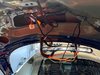
I was attempting to upgrade by FRUNK to v3 (to get screen/open control), but unit seems to have bricked, with both green and red lights staying on solid even after power cycle.

PS: as part of the V3 frunk update, they shipped me a new wire harness and a sd card with the update.bin.
Followed instructions to the T., but still failed.

Thank you soo much, MrTC for the DM on how to reset..

Basically, here are the steps I followed to factory reset it:

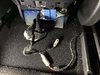
1. Removed the power connector
2. Removed the signal connector wire harness
3. Removed the soft close signal connector harness

Idea is to get rid of any and all power source to the control box.
So, at this point only the wire harness going to the two struts were plugged in.

4. Then as suggested by MrTC, i pressed the 'button' on the control box for a good 30+ seconds.

5. Put a micro-sdcard with the update.bin file on it (fat32 formatted)..
6. Plugged in the signal connector wire harness
7. Plugged in the soft close signal connector harness
8. Plugged the power back in.
9. this time, the Red light blinked /should blink rapidly.
10. once the update is done, the RED light became solid.,
11. Removed the power plug
12. removed the micro sd-card
13. plugged the power back in.


Also, i was upgrading my FRUNK lift from v2 to v3, and they had shipped the update on a micro-sdcard.. Seems like the card was a very low quality card unreadable after a few reads. Luckily, i had copied the update file from the card to my laptop. Most likely why it failed in the first place.

Note : hansshow shipped the update on a microsd card (512MB) which was formatted as FAT. their instructions specifically says to use FAT32. not sure if this makes a major impact or not.., but something to check.

After the update, i had to do a calibration of the frunk raising it fully up manually, and re-configuring the speed/hardness settings!
 
  • Informative
Reactions: apchoo
Did my Hansshow frunk install today. 95F outside, I am losing the will to live after that. Exhausting but satisfying to have it done. It's pretty easy. The one caveat is the foot sensor which doesn't seem to work so I'm going to have to get help from Hansshow.

Trunk is going to require a lot of hours and hopefully a cooler day.
 
  • Like
Reactions: apchoo and Skione65
Did my Hansshow frunk install today. 95F outside, I am losing the will to live after that. Exhausting but satisfying to have it done. It's pretty easy. The one caveat is the foot sensor which doesn't seem to work so I'm going to have to get help from Hansshow.

Trunk is going to require a lot of hours and hopefully a cooler day.

Yeah....Frunk is a cake walk.....the Trunk I wouldn’t wish on my worst enemy....lol. Don’t want yo have to do it again....would like to do the V1-V4 upgrade but still have flashbacks of the V1 Install! Glad you got the Frunk done. One of the best mods along with Auto trunk....LOVE it.

Ski
 
  • Like
Reactions: univ0298
I installed my V4 power tailgate (without foot sensor) over 2 days on the weekend. Overall I took 12-14hrs to complete the install but I took it real slow. Now that I've done it, I could probably do another one in under 6hrs.

Here are my tips from my installation.
  1. Have extra pry tools than just the one orange one Hansshow provides in the kit. I have a set of 4 from my ICE days. They come in handy with trying to extract the white clips that from the trunk lid.
  2. The trunk lid trim is secured with an insane number of clips (okay, 11; 7 greens and 4 whites). You're likely to break at least one green clip (Hansshow gives you 2 spares), and all of my 4 white clips came off from the trim and remained on the lid.
    View attachment 561857 View attachment 561858
    You need to extract the 4 white clips and put them back on the trim before you can attach the trim back onto the lid. It was a real PITA :mad: to extract the white clips.
  3. Removing the tailgate button plug from the wire made it a lot easier to fish the wire (and the tailgate handle+lock motor (bare) wires) thru the rubber tubing. Detaching the rubber tubing from the cable ties using a metal pick as per the Electrified Garage video (I happened to have the same pick) made it a lot easier to thread the fish tape thru the tubing.
    View attachment 561861 View attachment 561862
  4. I followed the Hansshow V4 trunk installation video and run the struct cables down the sides thru the gap between the chassis and bumper and coming into the trunk thru the 2 holes that were covered by blue grommets.
    View attachment 561863
    Note that the left circular hole is smaller than the right larger oblong hole :eek:.
    View attachment 561866
    Each struct has 2 plugs that are different sizes. The smaller hole is just big enough for the just bigger plug to get thru; tape the plugs to the fish tape as follows to be as streamlined as possible.
    View attachment 561870
    In hindsight, it might have been easier with the plugs removed, however, I don't know if they're as easy to remove as the tailgate button plug.
  5. I didn't pull the struct wires taut thru the grommets. I left a bit of slack hoping that'll result in a drip loop to prevent water ingress into the trunk (though there's no way I could visually confirm that). I used silicone to seal the holes in the grommets.
  6. The small gap between the chassis and bumper is made smaller by a piece of rigid plastic. You need to gently nudge the plastic away from the chassis (maybe not so gently) using a pry tool so the plugs that are taped to the fish tape can get thru the gap.
  7. Following the EG video, I connected the battery power (B+) wire to the red terminal beneath the rear seats. I ran just enough wire to reach the terminal; the remaining length of the wire is bunched up and cable-tied next to the control box in the trunk.
  8. I connected the CANBUS cable behind the centre console. The Hansshow video doesn't show how to route the FRONT CAN wire to the centre console. I was able to run it along the right side beneath the door trim, across the base of the B pillar towards the driver's seat (for a RHD Model 3). There's an overlap in the floor carpet (see red arrow below). I lifted the trim to the right of the blue arrow and could see a harness going underneath the driver's seat.
    View attachment 561913
    Using the fish tape I routed the FRONT CAN wire underneath the seat rail. From there I hand-threaded the wire underneath the other rail and connected the plug to one of the CANBUS sockets from the middle console. I tucked the cable beneath the floor carpet.
    View attachment 561908
    All you can see is a bit of cable between the centre console and left rail of the driver seat.
    View attachment 561907
The power tailgate is working well so far :). I highly recommend it to anyone considering getting one. The installation isn't that hard. You just need time and patience.

Great Tips. I'm printing them out and will use when I do my install (my V4 is due in this week). I only have one problem, I'm confused about where to tap in the B+ voltage. I really like connecting beneath the rear seat but I read another post saying that the voltage goes to zero when the 12 volt battery does not need charging. Some folks say connecting directly to the battery is the way to go. Is yours still working OK? Thanks again.
 
  • Like
Reactions: apchoo
Great Tips. I'm printing them out and will use when I do my install (my V4 is due in this week). I only have one problem, I'm confused about where to tap in the B+ voltage. I really like connecting beneath the rear seat but I read another post saying that the voltage goes to zero when the 12 volt battery does not need charging. Some folks say connecting directly to the battery is the way to go. Is yours still working OK? Thanks again.
I've not had any issue with my power trunk thus far. I've opened/closed it when parked in the garage and out and about at shopping centre carparks, etc. Tapping the power from the rear penthouse (I believe that's what it's called) is easier than from the front passenger footwell, but you should do whichever is comfortable to you.
 
Well I will start getting ready (loool) for the install of v3+v4 upgrade kit soon.
I want to go through all videos one last time so I can put together an (hopefully) exhaustive checklist before doing the job.
I intend to combine hatch latch way + rear penthouse connection.
If anyone has already put together such a checklist I'd be happy to use it
 
Surprised the trunk was quickest
Yes, the frunk did not close all the way, I had to enlarge the brackets and mess with the latching mechanism until the hood was perfectly aligned when closed. I took the brackets off of the car before and after work to file the holes by hand. For the trunk, snaking the wires through the loom took a good bit of effort and time. I fashioned a makeshift wire router out of an old coaxial cable and used a lot of chapstick as lube. Running the power cable through the rubber grommet behind the cabin air filter cover was also a huge pain. When all said and done, everything looked stock except the beefy, motorized struts. This was done in early fall of last year. They are rated for 50K extensions/contractions so should last many years to come.
 
Posting this to see if anybody has any ideas here.
Just got the v4 installed. Soft close isn't working and the canbus is tripping out opening/closing on the screen and the app.
I've gone over all the cables and connections and everything looks good. Watched a few install videos over again and I'm not sure what's missing.

Tried to trigger the latch manually but nothing from the latch.

Noticed there was an extra cable on the canbus connector. The hansshow upgrade video shows an extra loose cable that they tucked away.

Anybody have any ideas?
 

Attachments

  • image0.jpeg
    image0.jpeg
    105 KB · Views: 88
  • IMG_3257.JPG
    IMG_3257.JPG
    131.6 KB · Views: 73