


Welcome to Tesla Motors Club
Discuss Tesla's Model S, Model 3, Model X, Model Y, Cybertruck, Roadster and More.
Register
Install the app
How to install the app on iOS
You can install our site as a web app on your iOS device by utilizing the Add to Home Screen feature in Safari. Please see this thread for more details on this.
Note: This feature may not be available in some browsers.
-
Want to remove ads? Register an account and login to see fewer ads, and become a Supporting Member to remove almost all ads.
You are using an out of date browser. It may not display this or other websites correctly.
You should upgrade or use an alternative browser.
You should upgrade or use an alternative browser.
Model 3 DIY Light kits: Review and installation tips, with pics
- Thread starter GreenHokie
- Start date
No, they will not void any warranties becauseMight be a silly q - but does changing the lights, in the cabin or frunk or trunk, somehow jeopardize or void the warranty?
I’m seeing threads that the audio work does seem to be cause 12v battery issues - wondering if its the same with the lights?
1) you are not really adding a significant amount of additional power draw with any of these led lights
2) you are not changing the behavior of your vehicle when you install these lights (your vehicle still turns them on when you enter the vehicle and turns them off when you exit the vehicle).
Definitely zero 12v battery drain issues with the led light kit I installed. The one I have draws 0.6W per head. There are a total of 4 heads in my kit. So, that is a total power draw of 2.4W. I think most of the other kits draw around 3W. So, these are very low power draw numbers on your system, especially when compared to the power draw from those aftermarket speaker/subwoofer systems. For this reason, I actually always leave my ambient light kit on, even when I exit the vehicle. When the vehicle goes to sleep, it automatically shuts off power to the 12v cigarette socket... which means it shuts off power to my light kit. So, zero battery drain. This is at home. When I park away from home (and have Sentry mode on), then the vehicle never goes to sleep, as you may already know. So, when Sentry mode is on, power to the cigarette socket remains on, so my ambient lights stay on during those times. Again, zero concerns due to the extremely low power draw. Of course, I can always choose to manually turn of the ambient lights when I exit the vehicle (through the app or by pressing the button on the cigarette plug). Zero hassle. Zero stress.
Your comfort level may differ from mine...
I'm getting ready to install a light strip across the dash but I've noticed different locations between some of the products.
The one I have depicts an installation across the top of the wood trim and the one in this thread appears to be on a dashboard part above that (closer to the windshield). Then there's the SUMK one that goes even lower near the steering wheel.
What are your thoughts on the various locations for the light strips? Is it purely cosmetic or does one position reflect more/less off the windshield at night?
Hey There. So, if I’m understanding your comments correctly, your particular kit has the dashboard light strip running where I’ve drawn the yellow line in my photo from below. Correct? If so, that is a location I’ve not seen before. At one point, I did consider running/installing a light strip in this area. However, that thought quickly went away, when I realized it is simply not possible to run & properly/completely conceal a light strip along this part of the dashboard.I'm getting ready to install a light strip across the dash but I've noticed different locations between some of the products.
The one I have depicts an installation across the top of the wood trim and the one in this thread appears to be on a dashboard part above that (closer to the windshield). Then there's the SUMK one that goes even lower near the steering wheel.
What are your thoughts on the various locations for the light strips? Is it purely cosmetic or does one position reflect more/less off the windshield at night?
The red line shows where the SUMK kit runs their dashboard lights... and it’s not a good location because you cannot run a single light strip continuously across the entire dashboard. 2 separate strips are required… and to make matters worse, there is no place to conceal the two light emitters that will be connected to each end of the two light strips. So, the wires and emitters are out in the open and in plain view (on each side of the center display on the back side). As mentioned in my earlier post, I did not install/use SUMK’s dashboard light for these reasons.
The green line shows where some of the more custom (& much more expensive) kits have their dashboard light. There is essentially zero gap in this area to insert a light strip. The only way to squeeze a light strip in this area it to completely remove the dashboard, grind away all the tabs on the backside that hold the wood trim in place, pull the wood trim off, insert the light strip, and then re-glue and reassemble everything. Not for the average DIY’er and not worth the trouble IMO... although when done correctly, it can result in the best looking dashboard light IMO.
The blue line shows where most of the inexpensive kits have/run their dashboard light. This is where I will eventually run my dashboard lights… either once SUMK releases a longer 1-piece dashboard light strip or if I can find a longer light strip from another manufacturer which is identical in design/shape to the one from SUMK.
Installing a light strip in this area will definitely result in more reflection off the windshield at night, compared to the other areas discussed above. However, even at the full (100%) brightness setting, I personally never found the reflection distracting or objectionable… mainly because the reflection was never in direct line-of-sight of anything on the road ahead that I needed to see while driving at night. All these light kits allow you to adjust/lower the brightness. So, if you do find the reflection distracting, you can always lower the brightness to a point where most if not all the reflection will disappear.
That is correct.So, if I’m understanding your comments correctly, your particular kit has the dashboard light strip running where I’ve drawn the yellow line in my photo from below. Correct?
I haven't removed the side panel yet, but it seems like the light source could potentially be hidden behind that section. Using the black shrink tubing may also help hide it.
I certainly would not recommend running the light tube along this part of the dashboard. But, if you don’t mind having/seeing a short section of exposed light tube at the two ends, then you should be OK. Yes, applying some black shrink tubing will help make the exposed light tube in this area a little less visible, but it will still be exposed/visible (i.e. not hidden behind trim work).That is correct.
I haven't removed the side panel yet, but it seems like the light source could potentially be hidden behind that section. Using the black shrink tubing may also help hide it.
Another thing to keep in mind is, the flat section of the light tube (which is normally intended to be tucked between and hidden by trim work), will be out in the open and clearly visible. You won’t see it when sitting inside the vehicle, but as soon as you step outside your vehicle and look at your front cabin/dashboard, you’ll see everything. For this reason, I don’t think the end result will look clean/good. Of course, the only way to know for sure if you’ll like or hate it, is to try the install.
I’d be curious what conclusion you will reach after you try it…
As an update, I believe I have found the perfect light strip for my dashboard (to compliment the console light strips that I am currently using from SUMK). This light strip is from a seller on AliExpress. Link provided below. As mentioned in one of my previous posts, I did not use/install SUMK’s dashboard lights because it is a 2-piece design and simply looks bad.

 www.aliexpress.com
Below are some photos of this other/new light strip. It is a little thinner than the one from SUMK and a lot thinner than the light tubes supplied by most other manufacturers/light kits out there. As you can see, the design/shape of this light strip is also much different than the others… and that is a good thing especially for the dashboard.
This light strip consists of two parts: 1) an inner tube which is about 1.5 mm in diameter, and 2) a thin flat acrylic strip
The inner tube is attached to the thin flat strip with a silver colored foil/tape. This tape covers the entire inner tube and most of the thin flat strip, except for the edges. So, when this light strip is install in your trim work, it is not the tube that is lit/seen. Instead, what is lit and seen is only the thin edges of this light strip, which I estimate to be about 1 mm in thickness. The second photo below is taken at an angle which shows the edge of the exposed strip. The benefit of this type of design is it produces a much cleaner and more defined light effect. A very ”refined” look, compared to the typical light tube that is used by everyone else.


In my opinion, this light strip is the perfect type to use for the dashboard. As you can see from the additional photos shown below, they look fantastic when on… and are so thin/discreet that they also look great during the day when off. For me, the larger 3 mm diameter round tubes that are used in all the other light kits, can look a little cheesy at times. By contrast, this one looks sleek under all conditions.
So, in summary, I have the SUMK light strips on my dashboard and the thin acrylic light strips from AliExpress on my dashboard.
Final note: For the dashboard, I have light emitters on both ends/sides of the dashboard, so the light output across the entire dashboard is more uniform/consistent.
ON:

OFF:

ON:

OFF:

ON:

OFF:

CONSOLE LIGHTS ON:

CONSOLE LIGHTS OFF:

6.49US $ 35% OFF|Auto Interior Decorative Atmosphere Lamp Acrylic Optic Fiber Lights Rgb Ambient Light Sound Control With 12v Cigarette Lighter - Decorative Lamps & Strips - AliExpress
Smarter Shopping, Better Living! Aliexpress.com
Below are some photos of this other/new light strip. It is a little thinner than the one from SUMK and a lot thinner than the light tubes supplied by most other manufacturers/light kits out there. As you can see, the design/shape of this light strip is also much different than the others… and that is a good thing especially for the dashboard.
This light strip consists of two parts: 1) an inner tube which is about 1.5 mm in diameter, and 2) a thin flat acrylic strip
The inner tube is attached to the thin flat strip with a silver colored foil/tape. This tape covers the entire inner tube and most of the thin flat strip, except for the edges. So, when this light strip is install in your trim work, it is not the tube that is lit/seen. Instead, what is lit and seen is only the thin edges of this light strip, which I estimate to be about 1 mm in thickness. The second photo below is taken at an angle which shows the edge of the exposed strip. The benefit of this type of design is it produces a much cleaner and more defined light effect. A very ”refined” look, compared to the typical light tube that is used by everyone else.
In my opinion, this light strip is the perfect type to use for the dashboard. As you can see from the additional photos shown below, they look fantastic when on… and are so thin/discreet that they also look great during the day when off. For me, the larger 3 mm diameter round tubes that are used in all the other light kits, can look a little cheesy at times. By contrast, this one looks sleek under all conditions.
So, in summary, I have the SUMK light strips on my dashboard and the thin acrylic light strips from AliExpress on my dashboard.
Final note: For the dashboard, I have light emitters on both ends/sides of the dashboard, so the light output across the entire dashboard is more uniform/consistent.
ON:
OFF:
ON:
OFF:
ON:
OFF:
CONSOLE LIGHTS ON:
CONSOLE LIGHTS OFF:
muddie
Nerd
Good find! I just ordered a strip for my dashboard. I'm happy with the Nestour stuff everywhere else but the dashboard is really visible so this looks perfect for that.
So, in summary, I have the SUMK light strips on mydashboardand the thin acrylic light strips from AliExpress on my dashboard.
Oops. Slight correction to what I previously stated above. I meant to say/type,
“… in summary, I have the SUMK light strips on my console and the thin acrylic light strips from AliExpress on my dashboard.”
Good find! I just ordered a strip for my dashboard. I'm happy with the Nestour stuff everywhere else but the dashboard is really visible so this looks perfect for that.
Of course, make sure you order the one that is 150 cm (59 inches) long, to cover the entire length of the dashboard. You’ll need to cut it down to the appropriate length of your dashboard. I also recommend ordering a quantity of two strips. It took me a couple of attempts to cut/get everything just right. So, not a bad idea to order and have two on hand, since they are so inexpensive. There are also a few tips/tricks to cutting this particular light strip the correct way and repositioning the black rubber sleeve/shrink tube at each end. So, feel free to send me a private message when you receive your light strip(s) and will be happy to share some of the things/techniques I learned when I trimmed & install mine.
muddie
Nerd
Semi related. I just built myself a classic arcade machine as a project over Christmas and ordered a cheap light strip kit from AliExpress and put it all around the edges under the T-Molding. I did up some graphics that were Tron based and thought there is no better way to compliment that than some light strips.
Check it out.


Check it out.
Semi related. I just built myself a classic arcade machine as a project over Christmas and ordered a cheap light strip kit from AliExpress and put it all around the edges under the T-Molding. I did up some graphics that were Tron based and thought there is no better way to compliment that than some light strips.
Check it out. View attachment 760643View attachment 760644
Nice! So, when is game night and what time should I be there?!

muddie
Nerd
Every night is game night! Whenever travel goes back to normal and you feel like traveling to the other side of the world.Nice! So, when is game night and what time should I be there?!
")
George702
Member
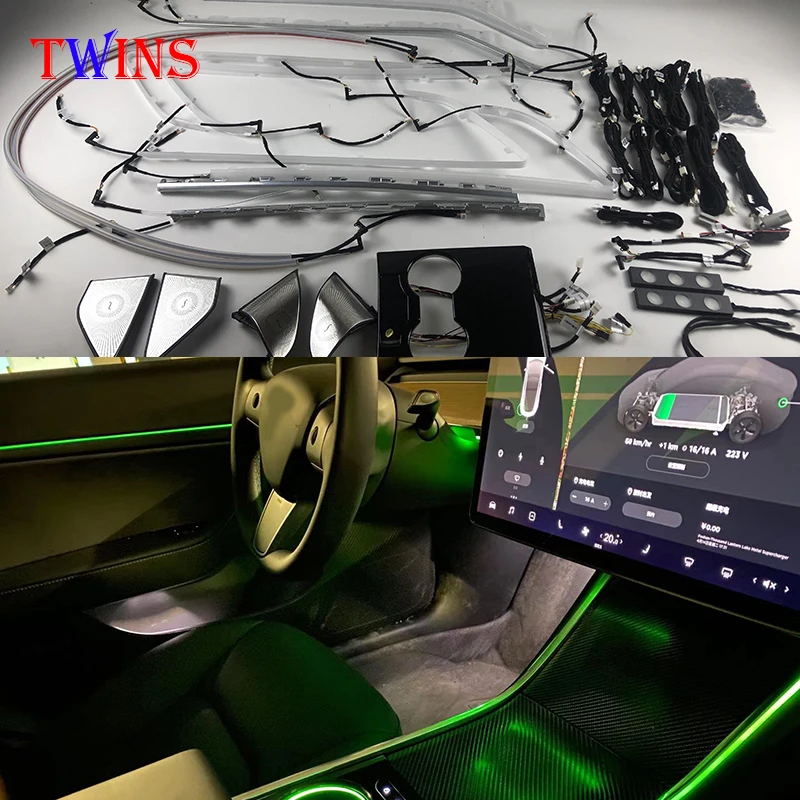
Hello, I was just wondering if you know of anyone on the internet that has done a kit such as this or even any kind of install videos? I've been considering one of the Amazon kits like everyone else, but that kit is intriguing and cleaner. And the little extra touches like for the speaker grill. I just don't know if I'd follow through the purchase without seeing how exactly everything gets wired up first and if everything is truly hidden away.These are the more comprehensive light kits sold all over AliExpress, Ebay, etc… which look fantastic and give a very professional looking result. The downside is they also require a lot more dismantling of your interior cabin to install the supplied trim pieces and precut light strips.
639.0US $ 29% OFF|For Tesla Model3 Model 3 2019 2020 2021 Inter Lamp Touch Control Inter Car Ambient Light 128 Colors Center Pillar Horn Cover - Decorative Lamps & Strips - AliExpress
Smarter Shopping, Better Living! Aliexpress.comwww.aliexpress.com
Here’s an instructional video from Hansshow for their ambient light kit. If you search on something like, ”ambient light kit Tesla model 3” on YouTube, you’ll find other install videos. Unfortunately, I doubt any of these videos will provide an easy to follow, complete step-by-step guide. As is the case with most of these products, you’ll probably need to figure certain things out as you go along…Hello, I was just wondering if you know of anyone on the internet that has done a kit such as this or even any kind of install videos? I've been considering one of the Amazon kits like everyone else, but that kit is intriguing and cleaner. And the little extra touches like for the speaker grill. I just don't know if I'd follow through the purchase without seeing how exactly everything gets wired up first and if everything is truly hidden away.
Good luck!!!
GreatGazoo
Member
I am going to go ahead and commit to both the SUMK kit as well as the aliexpress fiber as well in a few days.As an update, I believe I have found the perfect light strip for my dashboard (to compliment the console light strips that I am currently using from SUMK). This light strip is from a seller on AliExpress. Link provided below. As mentioned in one of my previous posts, I did not use/install SUMK’s dashboard lights because it is a 2-piece design and simply looks bad.
6.49US $ 35% OFF|Auto Interior Decorative Atmosphere Lamp Acrylic Optic Fiber Lights Rgb Ambient Light Sound Control With 12v Cigarette Lighter - Decorative Lamps & Strips - AliExpress
Smarter Shopping, Better Living! Aliexpress.com
Below are some photos of this other/new light strip. It is a little thinner than the one from SUMK and a lot thinner than the light tubes supplied by most other manufacturers/light kits out there. As you can see, the design/shape of this light strip is also much different than the others… and that is a good thing especially for the dashboard.
This light strip consists of two parts: 1) an inner tube which is about 1.5 mm in diameter, and 2) a thin flat acrylic strip
The inner tube is attached to the thin flat strip with a silver colored foil/tape. This tape covers the entire inner tube and most of the thin flat strip, except for the edges. So, when this light strip is install in your trim work, it is not the tube that is lit/seen. Instead, what is lit and seen is only the thin edges of this light strip, which I estimate to be about 1 mm in thickness. The second photo below is taken at an angle which shows the edge of the exposed strip. The benefit of this type of design is it produces a much cleaner and more defined light effect. A very ”refined” look, compared to the typical light tube that is used by everyone else.
View attachment 759583
View attachment 759587
In my opinion, this light strip is the perfect type to use for the dashboard. As you can see from the additional photos shown below, they look fantastic when on… and are so thin/discreet that they also look great during the day when off. For me, the larger 3 mm diameter round tubes that are used in all the other light kits, can look a little cheesy at times. By contrast, this one looks sleek under all conditions.
So, in summary, I have the SUMK light strips on my dashboard and the thin acrylic light strips from AliExpress on my dashboard.
Final note: For the dashboard, I have light emitters on both ends/sides of the dashboard, so the light output across the entire dashboard is more uniform/consistent.
ON:
View attachment 759602
OFF:
View attachment 759603
ON:
View attachment 759605
OFF:
View attachment 759611
ON:
View attachment 759615
OFF:
View attachment 759616
CONSOLE LIGHTS ON:
View attachment 759617
CONSOLE LIGHTS OFF:
View attachment 759618
Unfortunately, the delivery for the aliexpress one is looking like mid to late March, and I couldn't find anything that matches that on other places like Amazon or eBay.
Anything I should be worried about with a 2022 M3?
If you plan on using the SUMK kit for just the console and the AliExpress one for the dashboard, then absolutely no concerns. I believe the refreshed consoles on the 21/22 models have a tighter gap between the trim work, compared to the 20 and older models like mine. Since the light strips from SUMK are thinner than those from most if not all other light tubes/manufacturers, you should actually have an easier time inserting/installing SUMK’s light strip on your particular console (and it will also look a lot better/cleaner once installed IMO).I am going to go ahead and commit to both the SUMK kit as well as the aliexpress fiber as well in a few days.
Unfortunately, the delivery for the aliexpress one is looking like mid to late March, and I couldn't find anything that matches that on other places like Amazon or eBay.
Anything I should be worried about with a 2022 M3?
As for the dashboard light strips from AliExpress, I highly recommend ordering a quantity of 2 or perhaps 3 (of the 150 cm long ones). Good to have an extra 1 or 2 on hand, in case you mess up the first one (while cutting it to the appropriate length to fit your dashboard or just not getting that first attempt/install looking the way you want). Took me a couple of tries to get the dashboard light just right to my liking, but I’m ultra (and I mean ULTRA) picky/meticulous. They are so inexpensive (three 150cm light strips cost less than $16 + tax and free shipping), it would be crazy to order and take a chance with just one, especially when they take so long to get from China.
GreatGazoo
Member
Sounds good, your write up definitely convinced me. I will just run the cables to the dash and wait on the delivery from China. Will definitely buy at least 3 lengths. Do you have any other recommendations? Heat shrinks, adhesives? Thanks in advance.
Also, unrelated, but I'm just going to get an armrest console organizer which can let me hide some of the cable mess as I'm not willing to drill anything just yet. May look into a more stealth installation in future.
Also, unrelated, but I'm just going to get an armrest console organizer which can let me hide some of the cable mess as I'm not willing to drill anything just yet. May look into a more stealth installation in future.
So, just a heads-up on the SUMK kit. Since they have designed their dashboard light strip to be installed at a lower location on the dashboard and with the two ends terminating on each side of the center display, the cable/wiring that they supply for the two emitters that are intended for their dashboard lights are a little shorter than the cables from most other manufacturers/light kits. This means you will need to cut/splice these two cables and extend them by about 2-3 feet. This extra length will be needed so you can run these two cables/emitters from the cigarette plug all the way to each side of the dashboard. I think it is very easy to do, but understand/appreciate that some may not feel comfortable doing this. Keep in mind that each emitter on the SUMK kit outputs only 0.6 watt, so extremely low power draw (in case you are concerned with creating additional resistance/heat by splicing and adding a little length to these cables). In other words, it’s a complete non-issue as far as additional heat and safety are concerned… assuming you do the splicing correctly.Sounds good, your write up definitely convinced me. I will just run the cables to the dash and wait on the delivery from China. Will definitely buy at least 3 lengths. Do you have any other recommendations? Heat shrinks, adhesives? Thanks in advance.
Also, unrelated, but I'm just going to get an armrest console organizer which can let me hide some of the cable mess as I'm not willing to drill anything just yet. May look into a more stealth installation in future.
Other recommendations? As mentioned in my previous posts, get the following:
1) 3M VHB 4905 double-side tape. Select the one that is 4 mm wide. 3M VHB 4905 Double Sided Mounting Tape Transparent Clear Long 10M / 33FT Length | eBay
2) 3M adhesion promoter and foam applicator (photo below). This is absolutely key in getting any light strip to stick and remain that way on the rough underside surface of the dashboard shelf.
BTSD-home Foam Cleaning Swab Sticks Multi-Purpose Cleanroom Foam Q Tips Cleaning Swab for Printers, Electronics and Gun: Amazon.com: Industrial & Scientific
BTSD-home Foam Cleaning Swab Sticks Multi-Purpose Cleanroom Foam Q Tips Cleaning Swab for Printers, Electronics and Gun: Amazon.com: Industrial & Scientific
www.amazon.com
Similar threads
- Replies
- 203
- Views
- 8K
- Replies
- 0
- Views
- 331
- Replies
- 14
- Views
- 4K
- Replies
- 14
- Views
- 5K