Morning folks, the job is done and I will share my comments and findings. Instead of photos, down below is a link to a small video I did showing before and after. LOVE IT !!
First is a shout out to Alpharex both on fast shipping (two days from LA to Toronto) and product quality. The units are beautiful and a very high level of construction and quality. Top notch ! I had one gasket that had rolled during packing at the factory so some 1/4" foam weatherstripping spliced into that area took care of it. I have also read that they are doing the installs in around 2 hours (reported in the threads) and that is what two people and lots of experience look like ! Plan 8 hours. I have chatted with a couple here post install and that is a viable time estimate. Two places where you will spend considerable time. Routing the long extension cables and the light/assembly at the charge port. More below.
The online installation video is OK but you will need to do a lot of figuring out of things such as wire routing and securing everything especially for the 21+ refresh because you need the adapter kit that has longer wiring runs for the brake light connection and has some large resistor boxes that you will need to find a home for and secure in the wiring bundle.
All of my comments are for the 21+ refresh as the videos shown are pre-refresh and most things related to the charge port light location for installation are not the same as our cars.
My order of operations was as follows. Driver side inner. Easy to remove/replace and wire up. Same with passenger side inner. I thought, wow I am at two hours and two out of four are installed. Rocking it. That included disabling the car (more on that) and removing all necessary trim in the hatch and trunk areas. And then as I read on you have to install the interface wires between the top brake light so that plugs in nicely and drops down with the hatch wiring to the right and then across to the left inner lights so pretty easy. You will need LOTS of tie wraps to do a good job dressing the wires.
Then as I read forward (because I did not watch the install end to end prior which I do suggest) you have to install the long extension wires. Well, get ready for a few more hours just to do that. A big time sink. These wires come off of the inner driver and passenger wiring harness and then have to be fished inside the hatch right side frame up to the grommet (observe where the OEM harness enters that goes to the grommet and go in there) up to the grommet (remove the grommet on both ends for access) and they have to fish from the hatch into the roof area. It is TIGHT in the grommet. I ended up cutting off the connectors to make fishing easier and then soldered them back on when done. Again....this is a time consuming job as you fish the two wires up the hatch, through the grommet into the roof area and then back down the passenger side in the hatch area to the outer passenger light where the shorter one plugs in. The other longer one then needs to route over to the out drivers light where it plugs in. In the video, they show routing the longer one across the top of the roofline behind the rubber trim and down the drivers side. I brought them both to the right light assembly and then fished the one over to the driver side in the frame of the car area where the hatch latches. NOTE : I put these wires in split-loom tubing for protection from end to end.
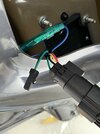
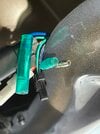
STUMPED : each light has a green wire with a barrel connector on them (two green wires that connect) one of my lights had it plugged together and the other three did not. A welcomed response to a shout out from a member here confirmed that all UNPLUGGED means startup sequence and sequential turn signals work and all of them PLUGGED together means OEM operation. There is also a black two pin connector on the inner lights that mysteriously goes nowhere. I suspect that is for the EU cars that have rear fog lights.
Passenger outer light easy to get at (instructions show three nuts but there are four on the 21+ refresh as one if for the reflector. Removed and replaced fairly easy, plugged everything in, secured the resistor boxes and on to the driver side.
Take a break : refreshing drink and maybe a bite before you get into this.
SAFETY WARNING : the instruction video shows to just power the car off. HIGHLY DO NOT RECOMMEND THAT ONLY !!!! power the car off, disconnect the LV battery and then pull the first responder loop. You will hear the relay drop out and the car is dead. If you only power off and the car powers on while you are working in the charge port area with steel tools like socket sets, you may be seriously injured or worse. It is easy. DO IT.
The instruction video for working in this area is minimal. Reviewing the procedure for removing the charge port on the Tesla online service manual is useful and can make the job faster. If you found an easier less invasive way to do this last driver outer light please share !
I removed the orange safety cover, removed the nuts for the two HV charging tubes ( on the pre-refresh these are actual cables so there is more maneuvering area in there - refresh using bend aluminum tubing ) and pulled the tubes off. I then removed the four bolts holding the charging port in place and with some slight pulling on the power 'cables' was able to rotate the charge port out of the way. This leave access to the three nuts that hold the light AND charging door in place. Out came the old. Swapped the charging door to the new light and in goes the new.......sort of...... put some masking tape on the paint along the lower charge door on the car as positioning this new assembly into place takes FINESSE !!!! It is very tight and the door actuator makes maneuvering the light assembly a challenge. It has to be lined up so that basically all three bolts drop through the frame at the same time. If you put the front one in first, the back two will not be aligned with the holes. Tried this three times and then pulled the new light, removed the charge port door and tested fit just to make sure the three bolt posts were properly in the right place (they were). The forth time was the charm.
Rest was just dressing the cables neatly in place and securing the resistor boxes and then testing.
Ahhh testing. Thank goodness everything just worked the first time. After that much time invested and working in close to 90 degree heat and humidity in my garage, I was not in a troubleshooting mood !!!!
Put all the trim back in place and took the after video.
Hope these tips are helpful and my thanks to those that have gone before me on this project and shared their learnings and tips and worked out the bugs for us 21+ refresh owners !
Tail Lights Before and After.mp4


 alpharexusa.com