Welcome to Tesla Motors Club
Discuss Tesla's Model S, Model 3, Model X, Model Y, Cybertruck, Roadster and More.
Register

New Solar Install

This site may earn commission on affiliate links.
I was thinking about getting one of those hybrid tank water heaters that is essentially a heat pump for water. But this was when I was driving a gas car more and parking a warm car in my garage (where the water heater is). Since ideally it would be able to grab that extra heat and put it into the water. But now that I drive a Tesla mostly, it's just ambient heat in there.
 
I was thinking about getting one of those hybrid tank water heaters that is essentially a heat pump for water. But this was when I was driving a gas car more and parking a warm car in my garage (where the water heater is). Since ideally it would be able to grab that extra heat and put it into the water. But now that I drive a Tesla mostly, it's just ambient heat in there.
If you have surplus solar and your gas tank water heater goes out, then a heat pump water heater is the way to go. It works especially well if it's in the same space as your solar inverters.
 
  • Like
Reactions: LoL Rick and Shygar
Heat pumps are designed to run more or less continuously, so the air that they output isn't as hot as from a forced air gas heater that essentially heats the home in bursts.
Both gas furnaces and heat pumps are available as single stage or multi stage/modulating. Probably the biggest effect is that gas furnaces are often single stage and for mild climates the smallest size available is grossly oversized. Heat pumps are easier to right size.

However, an advantage of a heat pump is that it won't tend to reduce the humidity level in the house to really low levels during the winter, as it's simply recirculating the air in each room.
Any properly installed forced air heating system should just be recirculating air within the house. The reason for low indoor humidity during the winter is infiltration of cold outdoor air. That cold air may have a reasonable relative humidity, but its absolute humidity is very low, so once you heat it to indoor temperatures, it will have a low relative humidity.

Cheers, Wayne
 
The reason for low indoor humidity during the winter is infiltration of cold outdoor air. That cold air may have a reasonable relative humidity, but its absolute humidity is very low, so once you heat it to indoor temperatures, it will have a low relative humidity.

Cheers, Wayne

I think low humidity in the winter is more due to Grahams Law. Indoor humidity will be low if it's warm inside and cold outside even if there's zero air exchange because the water molecules will migrate. It's super creepy. Really noticeable at lower pressures.

If you have a container at high pressure with zero O2 and a lower pressure container with O2 the higher pressure container will get contaminated with O2 if there's a path for flow even if the pressures never equalize...
 
Last edited:
  • Informative
Reactions: NuShrike
Any properly installed forced air heating system should just be recirculating air within the house. The reason for low indoor humidity during the winter is infiltration of cold outdoor air. That cold air may have a reasonable relative humidity, but its absolute humidity is very low, so once you heat it to indoor temperatures, it will have a low relative humidity.
With forced air heaters, you have areas of relatively strong, negative relative air pressure, and it's pretty much inevitable that some air will be sucked in from outside. No house is perfectly sealed (and probably shouldn't be). And also what @nwdiver said.

Heat pump air handlers also use fans to blow heated air, but typically just within individual rooms or spaces. The air pressure differences aren't as great.
 
Heat pump air handlers also use fans to blow heated air, but typically just within individual rooms or spaces. The air pressure differences aren't as great.
You're describing a typical mini split system with a wall mounted air handler. Heat pumps are also available as a central system with an air handler no different than the air handler of a gas furnace.

Cheers, Wayne
 
  • Like
Reactions: abasile
What's the cleaning process, if any? I assume you can walk on them? Do you need some kind of special shoe or is there enough grip on the tiles to not slide off the roof?

They haven't said anything about cleaning, I'll ask. But no, they ask that you never walk on it, and don't let anyone else walk on it either, they want to be present (or do the work themselves I guess) if anyone has to go on the roof. First off they're quite slippery, especially so if wet, but reviewing my time lapse shots (one frame every 3 seconds) you can see if anyone did anything while remaining in one place for several frames that they were generally sliding downwards every frame, and my roof pitch is around 18° which I don't think is particularly steep. But then there's also weight considerations I think...

Based on what I saw and some chatting with the crew, it seems that the "PV Modules" (which are 3 solar tiles) and the "Roofing Modules" (3 non-solar tiles) are quite sturdy and able to be walked on without risk of damage. They're tempered glass, so they're pretty strong and will take blunt hits, but a sharp hit will cause it to spider-web like tempered glass does (they damaged at least two tiles this way during installation dropping a tool on it, and those tiles were visibly lighter than the other tiles due to all of the cracks throughout until they were replaced). But these 3-tile modules cannot be cut (due to the tempering I'm sure), so they can't be used at edges or around flashings. For these places they have two sizes of "Flashing Covers", which are either a single or dual tile (1x1 and 1x2 modules), which can be cut. But since they are cuttable, they're not tempered glass, and they seem to be more fragile. So they broke more of these during installation I think just by handling (and they crack like regular glass, i.e. just a single crack across the glass), and eventually they started marking areas around flashings and edges (including the valley between roof planes) with tape as a reminder to themselves not to step in those areas. So I have not attempted to go on the roof, nor do I plan to.

Secondly, did you go into your roof during a rainy day (like today) and check for any leaks after it was finished? I did this after they installed my panels and didn't find any leaks, but it wasn't something I wanted to find by accident 10 years from now.

So this roof almost installs like two separate roofs. The first thing they did (the first 3 days) was tear-off of the old roofing, completely covering the roof with OSB decking (attached to the original open sheathing the shakes used), and then covering that with an underlayment that serves as a waterproofing layer, before they laid a single glass tile. This underlayment alone is able to be exposed to the elements for 120 days, to give time to install the real roof over top of it (looks like it's typically used with metal roofing). So by the end of the third day the entire roof was covered in this stuff, though at the roof peak the protective sheet covering the sticky side was left on (so that run of underlayment wasn't stuck-down, only tacked with nails in a few spots), because they hadn't cut out the ridge-vent yet. In a weekend rain storm the wind caught the ends and tore/blew this strip back, which is what let the water in. Once they had it all properly sealed there were a few more rainy days, but no more water came in. Now as they nailed the brackets onto the roof they obviously put more nails through the underlayment, though this stuff is supposed to be designed to seal around the nail that goes through it.

Assuming the tiles and flashings did their job, no water should ever hit the underlayment underneath. Even the gaps between side-by-side tiles gets filled with a "Sidelap" piece that should direct water to the next row of tiles under it. But even if water did somehow get below the tile layer, that underlayment should still keep it from getting into the house.

Anyway, it was barely drizzling when I left the house this morning, so there wouldn't have been anything to go looking for in terms of wet spots. I will do one more check up in the attic and garage the next time there's a decent (and hopefully blowing) rain just to be certain.
 
  • Helpful
  • Informative
Reactions: Shygar and abasile
Not being able to walk on the roof at all, even with a harness, would turn tree trimming into a bigger challenge. Unless you don’t have any big trees adjacent to the house.

I’m also a little concerned about the fragility of the edge materials. If a modest tree branch breaks off and hits our composite roof or solar panels, I generally don’t need to worry about it breaking anything.

Having snow slide right off the roof would be nice, though. Today, whenever snow slides off of our solar panels, some of it sticks to the composite roofing below the panels, and acts like a “dam“ which keeps the panels from shedding the remaining snow. I think a solar roof would be better for winter generation if it can withstand heavy snow loads and potential impacts from ice falling off trees.
 
  • Like
Reactions: croman
That would be interesting to see if snow accumulating on this solar roof slides off better because of the glass. I agree, not being able to walk on it would be a concern. I go on my roof periodically to clean the gutters as I find it easier than trying to do it from the ground. Also I guess if you want to make changes to your roof in some way (like a skylight), you are limited on your options.

Overall that's still really cool. I love the idea of a fully integrated roof like that. I don't mind too much seeing solar panels on my roof but our south facing roof is the front of our house, and we're at the end of a street so lots of people can see our panels.
 
No trees anywhere near the house, there used to be a small one at the front corner but the insurance company made me remove it as a fire hazard, and there used to be a large tree in the back yard but it was a Privet which PG&E views as a nuisance tree and they had to continually trim it away from the power lines, so when they offered to remove it for free I let them. The blasted seeds still generate new starts throughout the yard that I'm constantly taking care of. :p So all that's left is a 'street tree' by the curb and 3 dwarf fruit trees in the back yard, not close to the house.

Fortunately snow also isn't something I have to worry about here, in 20 years I saw snow technically hit the valley floor once, but it melted the moment it hit the ground. :) I grew up in PA, so I've had my share of snow and don't miss it one bit, I love Bay Area weather, though I'm definitely ready for this rainy season to be over.

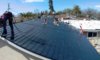
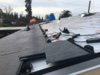
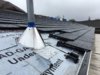
If you notice in the shots, I made one change while the roof was going in. My hall bathroom had a vent that went to the roof, it was an 8" vent with a very loud fan (tied directly to the light switch), the only large vent cap on the back roof. I got this replaced with a Solatube 160 DS, so the 10" sunlight tube replaced the vent, and it has a small ducted vent (with a MUCH quieter motor) that moves just as much air. I worked with the Solatube installer and Tesla to synchronize things, though that didn't go as well as I'd hoped. Tesla told the installer to come out on what turned out to be a rainy day and then didn't show themselves, so the installer wound up only doing the inside part and left the outside parts for Tesla to install, which I'm still working on getting them to finish properly (plus they didn't cover the top of the tube as they continued to work on the roof, so they got debris into it, I'll be dropping the tube today to get it out). And I wish they'd have done another roof penetration for the vent, right now it ends at a gable vent, which isn't a great idea (can let the moist air easily come back into the attic), I need to see if I can seal-off the rest of that gable due to the added ridge vent (once I calculate the total vent area now). I don't plan on any other skylights or such, but I am glad I did the Solatube, and yeah it really couldn't have been done any later, also didn't seem worth having them do the full install on the old roof just to have to re-do it with the new roof, but clearly it should have been installed from the top-down, not the other way around.

I also had my chimney (which I've never used) inspected and repaired just before the roof work started, again knowing that future access was going to get a lot harder, fortunately it just needed a new crown, so that work was pretty minor.
 
  • Like
  • Informative
Reactions: Shygar and abasile
Tesla's online quotes of $11/ft^2 for non-solar tiles and $42/ft^2 for solar tiles, plus $10,100 for a single Powerwall, do include installation according to Tesla's website. It's understandable that they would charge extra for "non standard" work. Your project does seem to have been more involved than "normal".

They may say that, but it sure doesn't seem to be the case, it's clearly just called out as 'Installation' and the first two non-indented lines in System are exactly the figures you quoted above. I don't see anything particularly complicated about my project, and the crew said it would be (and was) straightforward, the only surprise turned out to be the front of the garage, which they had mocked-up in their training area but apparently that was dimensioned perfectly for their tiles, while mine wasn't which made it trickier, so the trainer came out and made some on-the-fly tweaks to their procedures.

Screen Shot 2019-03-23 at 3.10.14 PM.png
 
I know you just got it installed but do you have any info on how it will do with heat? I know my panels perform better in the April-May months than in June-July (even though my total production is more in the summer). I know heat can affect the panels, just like any electronics. But I'm thinking with a traditional solar panel install that it's vented underneath but on a solar roof it's basically pressed up against a hot attic right?
 
This is still vented underneath, the tiles all sit an inch or so above the roof deck, with air intakes at the bottom and the ridge vent at the top. So we'll have to see how effective this air channel is (and I'm also hoping it might lead to a cooler attic), but Tesla certainly gave some consideration to maintaining airflow underneath.
Geek-speak: Simply supported beams at the ends with concentrated midpoint load. No way I'm stepping on those tiles! Great information tho'.
 
This is still vented underneath, the tiles all sit an inch or so above the roof deck, with air intakes at the bottom and the ridge vent at the top. So we'll have to see how effective this air channel is (and I'm also hoping it might lead to a cooler attic), but Tesla certainly gave some consideration to maintaining airflow underneath.
Thanks that actually makes me more excited about it. We've got two cathedral ceiling rooms and I feel like that would just help even more with cooling inside and in the attic. But yea definitely sounds like that's part of the reason why they don't want you to walk on top of them.
 
Geek-speak: Simply supported beams at the ends with concentrated midpoint load. No way I'm stepping on those tiles! Great information tho'.

Yeah, yet a crew of 4-6 people walked all over them for up to 10 days. :) And AFAICT they weren't being particularly careful about where they stood, other than avoiding the flashing tiles. The 3-tile modules themselves were quite sturdy when you held them, between the tempered glass and maybe a thicker backing on them. Each end/seam attaches to a bracket that they sort of hinge on, and rest on the brackets of the row underneath. So each of the 3-tile modules has 4 supports at the top (the ones at each end get shared with the adjacent module) and 3 at the bottom (different due to the row-to-row stagger), ~14" apart (the tile width).

A few more pictures, the crew working (one of my time lapse frames, only spent a few seconds looking for one with multiple people standing on it, found 4 pretty quickly, you can also see the red tape around the flashing they'd already finished), the bracket I mentioned above, and two side shots that show how they overlap, and a bunch of the PV Modules with the brackets and sidelaps attached, ready to go up to the roof.
 

Attachments

  • Screen Shot 2019-03-25 at 9.57.01 PM.jpg
    Screen Shot 2019-03-25 at 9.57.01 PM.jpg
    144.1 KB · Views: 176
  • IMG_4890.jpg
    IMG_4890.jpg
    166.5 KB · Views: 169
  • IMG_4915.jpg
    IMG_4915.jpg
    167.2 KB · Views: 166
  • IMG_5054.jpg
    IMG_5054.jpg
    196.9 KB · Views: 161
  • IMG_4887.jpg
    IMG_4887.jpg
    226.1 KB · Views: 170
Congrats on the install! It's really great to see these moving forward and thanks for the pics and other info.

Did they give you any indication of how many are being done? How many crews there are? All near the bay area or are they starting to branch out a bit?

Do you know if venting under the underlayment is critical? I'd guess possibly so to keep the tiles from overheating? I wonder what they'd do on a house with a hot-roof cathedral ceiling (that typically have closed cell spray foam directly against the underlayment)?

Looking forward to hearing from you on how much it generates.