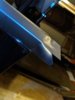
Installed the chrome delete kit yesterday.
I spent considerable time on the first mirror, around 3 hrs. [with a lunch break] getting it perfect. The larger upper piece was especially difficult but I was very pleased with the outcome. The next mirror was 40 minutes, so while my learning curve was initially steep, it started going quicker.
I must of accidentally grabbed the wrong tube as I incorrectly installed the Passenger T2 wrap on the Drivers side. Everything was going great until that piece, then suddenly it was bubbled a lot more than usual (yeah, because it’s cut for the other side, dummy!). Not until I got to the Passengers side did I realize. I ended up just flipping the remaining Driver’s T2 upside down and installing it on the Passenger side. The tabs at the end didn’t fit properly, so a bit of Xacto/heat fixed it all up.
I’m not happy with the turn signal wraps. It was like they didn’t fit at all, and I actually went through both wraps on both sides. The video is frustrating because “line the top up, and boom, everything is perfect”. In reality, the top line on the turn signal is straight, the wrap isn’t. When you fold/wrap around and down, the vinyl doesn’t line up with the edge of the light. I even tried starting from the turn signal interior curve and wrapping out - didn’t work either. A ton of heating, pulling, and swearing, then ultimately the Xacto to make it all work. I may email to have a replacement sent, as I’m not totally happy with the finish.
Otherwise, the kit is very well put together and well thought out. If I have any criticism, it’s that some of the install videos are out of frame/out of focus/lack detail, especially with the initial line up of each piece. It can be frustrating to watch a video that makes it look easy/perfect, meanwhile you’re struggling. Oh well, not a big deal.
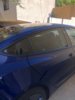
Ultimately, I made it work and the car looks great. Highly recommend if you’re going to do the delete.