Being a developer myself I too am always concerned about security with using a Site created by anyone else. Corey looks legit and good at what he does but even so I decided to use Postman to do this instead as I didn't want to have to write and code or install NPM packages or Python.
Step 1) Download Postman App to your PC of Mac from here:
Download Postman
Step 2) Click import and enter this link:
https://www.getpostman.com/collections/2fc311bd4ce4f5c52f6d
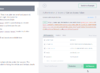
Step 3) Fill in your username and password
Step 4) Click 'Send', Postman will make a request to the API and return a token
Step 5) Copy the token from the API response and use it
You should see there is no special code here and nothing custom it is just a pre-configured Postman request to help with getting a new token.
This is completely safe as you are just making a direct call to the Tesla API from your PC or Mac to get a token and are not using any 3rd party code or sites. Just be careful where you store/save the token.
Hope this helps.