Hello @raffiniert , would you be so kind and share details how you make TWCManager up and running because instalations instructions are not complete (or correct?) as you reported on Github week or two ago. I have experienced same issues (both Standard and Docker installation) as you and now I´m in the point I can´t move forward. Thank you very much for help. If there is anyboby else willing to help and able to check and update instalations instructions in order to provide actual step by step instructions leading to the functional TWCManager, please help. THANK YOU.anyone? Is any information missing?
For me, this is simply unusable as it is.
In short, for the problems:
1. starting / stopping a charge via API does not work. Yes, I am logged in, I even see the vehicles informations on the dashboard. But even after starting or stopping a charge on TWCManager, I needed to go to the Tesla App to manually start/stop, which of course makes solar charging useless.
2. solar charging: it always charges at "minAmpsPerTWC" (6A) no matter if there is enough solar or not. Yes, it is set to "solar surplus".


Welcome to Tesla Motors Club
Discuss Tesla's Model S, Model 3, Model X, Model Y, Cybertruck, Roadster and More.
Register
Install the app
How to install the app on iOS
You can install our site as a web app on your iOS device by utilizing the Add to Home Screen feature in Safari. Please see this thread for more details on this.
Note: This feature may not be available in some browsers.
-
Want to remove ads? Register an account and login to see fewer ads, and become a Supporting Member to remove almost all ads.
You are using an out of date browser. It may not display this or other websites correctly.
You should upgrade or use an alternative browser.
You should upgrade or use an alternative browser.
israndy
Supercharger Hunter
OK, so I broke down and wrote it. It has ALMOST ZERO testing, but probably most of you won't have looked at it until I have a few more days of testing under my beltAnd on the subject, has anyone thought about making this so that it could control your car directly now that it's in the API, for those of us w/o Wall Connectors.
Check it out at:
TesSense - Control your Tesla charging from your Sense Energy Monitor
I have a Sense Energy Monitor that shows me how much solar power I am generating and how much energy my home is using every microsecond. It is nice for logging and realizing I have left the oven on but I would REALLY love if I could have it calculate any free solar and instead of sending it back...
 teslamotorsclub.com
Wonder how hard it would be to modify to work with Tesla Solar
raffiniert
Banned
hey, so I followed the instructions (TWCManager/Software_Manual.md at main · ngardiner/TWCManager) exactly, with the following deviations:Hello @raffiniert , would you be so kind and share details how you make TWCManager up and running because instalations instructions are not complete (or correct?) as you reported on Github week or two ago. I have experienced same issues (both Standard and Docker installation) as you and now I´m in the point I can´t move forward. Thank you very much for help. If there is anyboby else willing to help and able to check and update instalations instructions in order to provide actual step by step instructions leading to the functional TWCManager, please help. THANK YOU.
1. used "Raspberry Pi OS (Legacy)" which is Debian Buster. To do this, use Raspberry Pi Imager tool, "choose OS", "Raspbery Pi OS (other)", "Raspberry Pi OS (Legacy)"
2. my setuptools-version was already up to date after installing the above OS, so I didn't run "pip3 install --upgrade setuptools" <- not sure on this one, please check yourself
Please let us know what errors you run into, so we can try to help further if they persist.
Hey @raffiniert , thank you for prompt response. I started from the scratch with Raspberry Pi OS (Legacy)-Debian Buster instead previously used RASPBERRY PI OS (32-BIT). Have supported hardware (RPi Zero WH, USB-RS 485 CH340C, TWC Gen2 - F position-Slave mode). Followed instructions (detailed instalation report here - TWCManager-Manual installation 02022022 ), but finally again ended with error:hey, so I followed the instructions (TWCManager/Software_Manual.md at main · ngardiner/TWCManager) exactly, with the following deviations:
1. used "Raspberry Pi OS (Legacy)" which is Debian Buster. To do this, use Raspberry Pi Imager tool, "choose OS", "Raspbery Pi OS (other)", "Raspberry Pi OS (Legacy)"
2. my setuptools-version was already up to date after installing the above OS, so I didn't run "pip3 install --upgrade setuptools" <- not sure on this one, please check yourself
Please let us know what errors you run into, so we can try to help further if they persist.
/usr/bin/python: No module named TWCManager
as you reported at No module named TWCManager.__main__ · Issue #403 · ngardiner/TWCManager
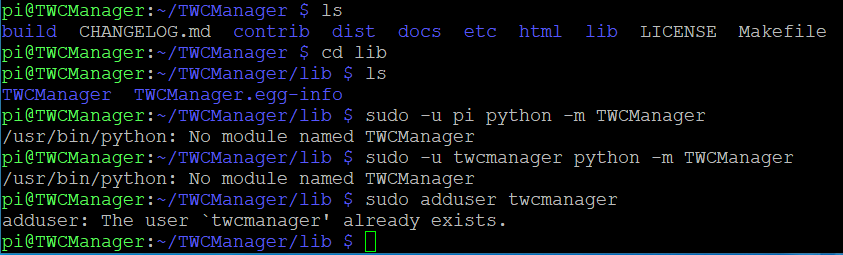
I realised that user twcmanager was created automatically during installation. Do I have to log in as user twcmanager ? How is default password for user twcmanager ? Thank you and have a nice day.
raffiniert
Banned
Hello @raffiniert . Unfortunatelly, it´s not as problem. Installation as per provided instructions simply doesn´t work :-(. I spent a lot of time on such !easy" installation. It´s really sad. It would be very nice, if somebody willing to help, ideally persons leading this project, updated instructions and provided functional step by step guide. I´d like to integrate this project with my actual FVE, GoodWe inverter and BYD batteries into functional system using excessed green energy for charging car.I think you are in the wrong directory. Go one up and try again...
Please help or provide image of your SD card with functional TWCManager. Many THX.
MiRo
If anyone is interested, I just ported part of the TWC manager to JAVA. It's adapted to suit my needs of course.
Basically it regulates the charging current of the TWC so that the power draw from the grid is never bigger than a set value.
Currently it reads the mains power input from a SMA home manager (or SMA energy meter).
It can be installed on any pc (or in my case a raspberry pi zero w).
Project is free and can be found on GitHub - Johanpmeert/TWCtestv3
Regulating the charging of the car does not need any API calls to the car itself. Everything is done through the TWC set as slave.

I haven't been around for a while, good to see many extra features now with TWC Manager.
I am wondering if someone could help me make it run with a Voltronic solar inverter.
I am in a off-grid scenario, and would like to have the TWCManager change the amps to the car depending on the battery voltage it gets from the Voltronic inverter.
I am wondering if someone could help me make it run with a Voltronic solar inverter.
I am in a off-grid scenario, and would like to have the TWCManager change the amps to the car depending on the battery voltage it gets from the Voltronic inverter.
Myfirstone
Member
How can you monitoring the inverter?I haven't been around for a while, good to see many extra features now with TWC Manager.
I am wondering if someone could help me make it run with a Voltronic solar inverter.
I am in a off-grid scenario, and would like to have the TWCManager change the amps to the car depending on the battery voltage it gets from the Voltronic inverter.
With a RS485 cable connected to the Pi and a monitoring software like SolPipLog or SolarAssistant, or direct commands to the inverter for read-outs.How can you monitoring the inverter?
Myfirstone
Member
With a RS485 cable connected to the Pi and a monitoring software like SolPipLog or SolarAssistant, or direct commands to the inverter for read-outs.
I pulled my inverter data from the monitoring server. Can you use that api for the data stream?
andyschroder
Member
I'd like to announce Distributed Charge [beta] Board A0:
Andy Schroder - Distributed Charge: [beta] Board A0, The First Building Block of a Bitcoin Lightning Network Enabled Energy Grid .
Board A0 coupled with a TOFU raspberry pi compute module 4 carrier board provides a super clean installation with a Gen2 Wall Connector. A single CAT5 wire is required to connect to the Gen 2 Wall Connector which provides power, RS-485 connection, AND a magical CAN bus connection to the charge port of the car.
The assembly can also be installed inside the car's trunk to allow bitcoin lightning network payments for energy that is delivered through the Gen2 Wall Connector. The second CAN bus on Board A0 connects to high voltage battery to also monitor the charge current and voltage to verify that the energy that is being paid for to the wall connector over the bitcoin lightning network is actually being delivered.
Board A0 also have some extra relays, analog inputs, and GPIO conveniently available on rugged screw connectors for doing other fun stuff you might have in mind. There are also dedicated pins for UART so that you can do debugging over a USB serial adapter if you don't have an ethernet connection.
I wanted to share a detailed writeup that I've made that shows how to connect Board A0 to the Tesla Wall Connector: Andy Schroder - Distributed Charge: Connecting The Tesla Gen2 Wall Connector To Distributed Charge Board A0 .
I now have some additional information on how Distributed Charge works, which can give you some insight onto how the bitcoin payments are made and how the communication works with the car: Andy Schroder - Distributed Charge: How It Works (EV) .
Also, I now have a clean weatherproof enclosure to house the electronics in and provide a status screen for the user when charging: Andy Schroder - Distributed Charge: 2022.03.31 - Weather Proofing Distributed Charge .
whitex
Well-Known Member
Has anyone figured out the signal level protocol that Tesla wall connector is using to talk to the car though the AC charging connector? I'm looking to disable it so that the wall connector can charge other, non-Tesla EV's as well.
By default a wall connector will charge any J-1772 EV. (Though depending on the version you have there may be a dip switch to disable it.) It does try to use the Tesla protocol first, which may make it take longer before it falls back to J-1772.Has anyone figured out the signal level protocol that Tesla wall connector is using to talk to the car though the AC charging connector? I'm looking to disable it so that the wall connector can charge other, non-Tesla EV's as well.
brkaus
Well-Known Member
I have a j1772 adapter to charge my leaf. I left the WC2 in Tesla mode. The adapter says to wait 10-15 seconds after attaching it to the cable before plugging it into the car.Has anyone figured out the signal level protocol that Tesla wall connector is using to talk to the car though the AC charging connector? I'm looking to disable it so that the wall connector can charge other, non-Tesla EV's as well.
If I don’t wait at least a few seconds the car will not start charging.
No idea what’s in the adapter.
davewill
Active Member
I've heard before that the adapters have circuitry to help the fallback happen quicker or more gracefully. It sounds like yours may actually spoof the WC into thinking it's talking to a Tesla. It would be interesting to see if it acts any differently if you flip the switch in the WC for general J1772 operation.I have a j1772 adapter to charge my leaf. I left the WC2 in Tesla mode. The adapter says to wait 10-15 seconds after attaching it to the cable before plugging it into the car.
If I don’t wait at least a few seconds the car will not start charging.
No idea what’s in the adapter.
brkaus
Well-Known Member
I don't think it's acting as a man-in-the-middle from what I have read but who knows.I've heard before that the adapters have circuitry to help the fallback happen quicker or more gracefully. It sounds like yours may actually spoof the WC into thinking it's talking to a Tesla. It would be interesting to see if it acts any differently if you flip the switch in the WC for general J1772 operation.
whitex
Well-Known Member
Which dip switch disables the Tesla protocol it in a Gen2 HPWC?By default a wall connector will charge any J-1772 EV. (Though depending on the version you have there may be a dip switch to disable it.) It does try to use the Tesla protocol first, which may make it take longer before it falls back to J-1772.
whitex
Well-Known Member
What is in the adapter (such as TeslaTap) is a simple circuit which brings the pilot signal from 12V to 9V, which tells the WC that an EV is connected, that's all. That in turn causes the WC to try talking Tesla protocol and then time out (hence the 10-15 seconds recommended wait after plugging it in), allowing you to charge via J1772. Once the actual car is connected, it can further bring down the pilot voltage to indicate other states (e.g. 6V means charging)I have a j1772 adapter to charge my leaf. I left the WC2 in Tesla mode. The adapter says to wait 10-15 seconds after attaching it to the cable before plugging it into the car.
If I don’t wait at least a few seconds the car will not start charging.
No idea what’s in the adapter.
While the above is a simple and straightforward solution (probably a zener diode), it doesn't work so well if you keep the adapter always plugged-in with a load sharing configuration, since the WC thinks there is always a car connected to it. What I'm trying to figure out is a less simple solution, which would fake the Tesla protocol telling WC that a generic Tesla has connected, every time I connect a vehicle via J1772. Even better if I could tell the WC to just stop talking Tesla protocol completely on one of the load sharing HWPC's (in my configuration I am sharing 80A between 2 HPWC's, one Tesla and one non-Tesla car, both of which can take up to 80A each, and occasionally a 48A Tesla and a 32A Tesla)..
whitex
Well-Known Member
If the adapter tells you to wait 10+ seconds after plugging it in, it's just fooling the WC into thinking an EV has connected (but not charging) so that the WC times out its Tesla protocol. It's a very simple circuit (one zener diode, perhaps 2 combined to get the 9V spec), You can buy just this circuit at TeslaTap if you prefer not to make one yourself:I've heard before that the adapters have circuitry to help the fallback happen quicker or more gracefully. It sounds like yours may actually spoof the WC into thinking it's talking to a Tesla. It would be interesting to see if it acts any differently if you flip the switch in the WC for general J1772 operation.
or
Similar threads
- Article
- Replies
- 10
- Views
- 2K
- Replies
- 2
- Views
- 1K
- Replies
- 23
- Views
- 3K