MobileClimate
Member
This is on a 105F ambient full cook with r-1234y which has a higher pressure than r134a. Don’t you have a 2016 with r134a?


You can install our site as a web app on your iOS device by utilizing the Add to Home Screen feature in Safari. Please see this thread for more details on this.
Note: This feature may not be available in some browsers.
Did you make sure to put in service mode when evacuating the system ? the chiller solnoid for the battery needs to be open ..if not there would be air in the system and which would cause high discharge temp and would cause intermittent operation of the system and sensors
I charged mine without service mode n system was open for 3 month.Did you make sure to put in service mode when evacuating the system ? the chiller solnoid for the battery needs to be open ..if not there would be air in the system and which would cause high discharge temp and would cause intermittent operation of the system and sensors
This can be done without toolbox just go to service modeI charged mine without service mode n system was open for 3 month.
Zero issues, been driving for a year already.
U can live by the book its ur choiceIt says right in the service manual
This can be done without toolbox just go to service mode
HVAC system service mode
The vehicle uses two separate circuits, one circuit for the evaporator situated in the HVAC assembly for the cabin environment, and an additional circuit for the battery heat exchanger.
Both of these circuits have solenoid valves controlled by the thermal controller module. During A/C evacuation and recharge it is important to open these solenoids manually (service mode). This will ensure that all refrigerant is removed and replaced from both circuits during evacuating and recharge of the system.
Warning: HVAC service mode must be initiated using Toolbox before any evacuation and recharge procedures are performed. Refer to Service Manual procedure 18200102.
With the vehicle in service mode, the refrigerant can be recovered or recharged. The HVAC system will stay in service mode until the mode is exited using Toolbox or the laptop is disconnected from the vehicle.
Warning: It is important that the key remains in the vehicle during evacuation or recharge. If it is removed, service mode will be disabled, thus closing the solenoids, which means that there is a risk that the HVAC lines may not be fully evacuated or filled during recharge.
")
Many things in official service manual are unnecessarily or can be bypassed or done differently from my experience...
Yeah, that procedure to replace the compressor for one - I didn't remove the coolant bottle, the air suspension reservoir, OR the coolant itself.
Only removed the wheel liner from the passenger side to finally figure out where the "forward junction box" is - because it isn't listed on any procedure of where the damn thing is located!
But I was able to pull the three bolts from the compressor and then just rotate it slightly in two directions and pull it out from under the coolant tank.
What needs a procedure (or a new design!) is that stupid desiccant bag and cap. They didn't put ANY lube on it when it was installed, so the plastic cap somehow ended up glued to the aluminum tube. I had to use a TORCH to melt it and get it moving before finally driving a screw through it to get it out. I wiped some aluminum anti-seize on the rings before I installed the new cap with the new bag and snap ring.
If brute force isn't working... You aren't using enough.
Yes the compressor came with oil in it. Thanks I’ll give that all a try but when I had been charging I only opened the low side with the high side knob closed.
Assuming that’s the way I’m supposed to do it , how does the high side pressure reading climb if that valve is closed?
u need to be careful with amounts... if you only got one can into a system that needs 3.
Brain is right - go with the amounts from the sticker under the frunk lid. I have a 7 pass X, which has the dual systems (it's actually just an additional refrigerant loop from the discharge side with a second evaporator in the rear body) so if you have a 5 pass, then it won't take as much.I gave it another shot and fans and ac at full blast I was able to get it to suck in an additional (320g) can of refrigerant after a LOT of shaking, positioning, begging and cursing it took a long time too about 15 minutes. However 3rd can it only took a tiny bit no matter what I did I can definitely feel the difference now the air is much colder (aprox 45F on a thermometer in the vent). The manifold gauge now reads about 70 at the low side and almost 100 on the high side.
I bought one of these to see if it does anything different to force the refrigerant in, but no luck after holding the trigger for over 10 minutes its built in gauge keeps showing "low" and doesn't budge which means its likely not able to put any in. I wonder what it is that I'm doing wrong.
Right I have a 6 seater it should take 920-1000grams which would’ve been 3 cans of 320grams. I only got 2 cans in so far.u need to be careful with amounts
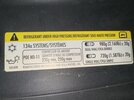
i believe 5 seater X only has front AC n uses much less, follow ur sticker under hood...
Sticker says 980 gramWhat does the sticker say for your car's refrigerant charge amount?