Welcome to Tesla Motors Club
Discuss Tesla's Model S, Model 3, Model X, Model Y, Cybertruck, Roadster and More.
Register

Air Compressor Replacement + Air Line & Air Shocks inspection DIY

This site may earn commission on affiliate links.
Thought I'd post this as it may be helpful for others. Especially if you can DIY and don't want to pay Tesla many £1000's to fix these air compressor/suspension-related issues.

I started to hear my air compressor turning on a lot more than it used to and it was getting a lot noisier than it used to be. At the same time, I started getting 'Air Compressor Disabled, Car Cannot Raise' messages, these increased as the temperature dropped to 0c and below.

The other issue I noticed was that the front left suspension was losing pressure and making the car sag on that front side. Clearly, this air shock or the lines to it were leaking and in turn making the compressor run a huge amount more than it was designed for.

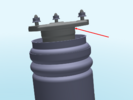
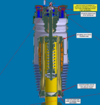
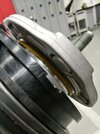
To test the lines and suspension I got some leak detection spray and covered all the lines, connections, pumps and tank with it to see if anything was leaking. It wasn't. On to the shocks and the suspect shock created a nice foam party :) 
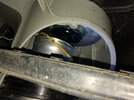
The other front one is fine as were both the back ones.

Good one:

IMG_3005.jpg


Bad one:

IMG_3008.jpg


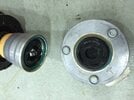
Next thing to tackle was the Air Compressor itself. I would have loved to rebuild this but I can't find the parts, unfortunately. I found that this pump is used in the Audi Q5, Lamborghini Huracan, Porshe Panamera and probably others. It's made by Wabco with the motor by Lucas. I took it all apart and it was full of rust and most probably the press-fit piston ring shot. I have pics of this dismantled if anyone wants me to post them. I ordered a 3rd party part for £300. It has arrived and I fitted it today. It works well and is super quiet! The replacement air shock won't be with me for another 10 days so it will have to handle being used a little bit more than usual for a few days.

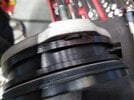
While changing the compressor I found another issue. One of the lines from the pump had been rubbed away by its surroundings. It's probably 0.1mm away from a pinhole! I'll order a new piece of line for this and move it away from the rubbing parts near it.

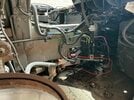
Compressor location (after I removed it) and 2nd pic circled where the black line had been rubbing against the electrical connector:

IMG_3027.jpg


IMG_3028.jpg


IMG_3030.jpg


You need a few hours to troubleshoot, take things apart, and remove and reinstall the air compressor but it's an easy job. You do have to jack up the car (put it in jack mode) and remove the FR wheel so for anyone attempting this, make sure you use the right safety measures, Jack stands etc.
 

Attachments

  • IMG_3027.jpg
    IMG_3027.jpg
    560.2 KB · Views: 780
Broken damper or air spring top mount


Description
Firmware Details
Steps To Test
Steps To Fix
Effects
Causes
DESCRIPTION
There is a broken damper or air spring top mount.

This issue might cause noise from front or rear of the vehicle. The vehicle body might also be dropped on one side.
FIRMWARE DETAILS
None
STEPS TO TEST
Confirm whether a noise is present:
Example of what noise will sound like on the road:

If a noise is present, this might be the issue.
Visually inspect the air spring module:
Location of the affected area on the air spring module:

Disassemble the air spring module according to the appropriate Service Manual procedure:
Model S:
Air Spring Module - Front - LH (Remove and Replace) Correction code 31105002
Air Spring Module - Rear - LH (Remove and Replace) Correction code 31106002
Model X:
Air Spring Module - Front - LH (Remove and Replace) Correction code 31105002
Air Spring Module - Front - RH (Remove and Replace) Correction code 31105102
Air Spring Module - Rear - LH (Remove and Replace) Correction code 31106002
Air Spring Module - Rear - RH (Remove and Replace) Correction code 31106102
Inspect the top of the air spring module.
Confirm that the damage is located at the top of the module:
Example of separated module:

Example of separation caused by cracked module:


If damage to the damper or air spring top mount are confirmed, then this is the issue.
STEPS TO FIX
Document possible cause of damage:
Unseated C-clip on the top of the air spring.
Misalignment in the wheel area.
Tire damage.
Wheel deformation.
Impact with other suspension components and/or the High Voltage pack.
Take pictures of any signs of damage or deformation on any component.
Replace the damaged air spring module according to the appropriate Service Manual procedure:
Model S:
Air Spring Module - Front - LH (Remove and Replace) - Correction Code 31105002
Air Spring Module - Rear - LH (Remove and Replace) - Correction Code 31106002
Model X:
Air Spring Module - Front - LH (Remove and Replace) - Correction Code 31105002
Air Spring Module - Front - RH (Remove and Replace) - Correction Code 31105102
Air Spring Module - Rear - LH (Remove and Replace) - Correction Code 31106002
Air Spring Module - Rear - RH (Remove and Replace) - Correction Code 31106102
FILTER CAUSES AND EFFECTS:
Select model to filter by
EFFECTS
#8108- Air spring module is leaking
(No Model Qualifiers)
#6075500- NVH from rear chassis and suspension while driving
(No Model Qualifiers)
#6116900- Popping noise from the front chassis / suspension system while driving
(No Model Qualifiers)
#6117000- Rattling noise from the front chassis / suspension system while driving
(No Model Qualifiers)
#6126500- Rattling noise from the rear chassis / suspension system while driving
(No Model Qualifiers)
POSSIBLE CAUSES
None
QUALIFIERS
Tesla
Model S
Model X
CATEGORIES
Suspension
Noise, Vibration, and Harshness
Tesla Air Suspension
 

Attachments

  • db952478-551b-422a-91a3-63d5dbe044e6.png
    db952478-551b-422a-91a3-63d5dbe044e6.png
    384.2 KB · Views: 31
  • 7eab4bc0-f46d-415d-be7a-c42ae7d9bb1d.jpg
    7eab4bc0-f46d-415d-be7a-c42ae7d9bb1d.jpg
    414 KB · Views: 21
  • 9a1b204a-1a6e-4a10-8b50-53cf8eb23875.jpg
    9a1b204a-1a6e-4a10-8b50-53cf8eb23875.jpg
    362.7 KB · Views: 17
  • Helpful
Reactions: hydro
Leak between air spring cap and damper top mount


Description
Firmware Details
Steps To Test
Steps To Fix
Effects
Causes
DESCRIPTION
There is a leak between the air spring cap and the damper top mount. The air spring cap and the damper top mount are sealed by an O-ring or X-ring. The top mount might be unseated or the sealing ring might not be properly seated.


NOTE
The air spring cap and the damper top mount might separate if the vehicle is put on a lift.

FIRMWARE DETAILS
None
STEPS TO TEST
Visually inspect the air spring cap and damper top mount for damage:


Use leak detection solution to confirm an air leak between the air spring cap and the damper top mount.

If bubbles begin to form, then this is the issue.
STEPS TO FIX
Confirm whether the sealing ring is damaged or not.
If the sealing ring is not damaged, lubricate and reseat it.
Confirm rotational alignment between the air spring cap and the damper top mount is correct.
The stud locations should line up to the reliefs in the air spring cap.
If the sealing ring is damaged or has shape memory, replace the air spring module according to the appropriate Service Manual procedure:
Model S:
Adaptive Air Spring Module - Front - LH (Remove and Replace) - Correction code 31105012
Air Spring Module - Front - LH (Remove and Replace) - Correction code 31105002
Air Spring Module - Rear - LH (Remove and Replace) - Correction Code 31106002
Model X:
Adaptive Air Spring Module - Front - LH (Remove and Replace) - Correction code 31105012
Adaptive Air Spring Module - Rear - LH (Remove and Replace) - Correction code 31106012
Air Spring Module - Front - LH (Remove and Replace) - Correction code 31105002
Air Spring Module - Front - RH (Remove and Replace) - Correction code 31105102
Air Spring Module - Rear - LH (Remove and Replace) - Correction code 31106002
Air Spring Module - Rear - RH (Remove and Replace) - Correction code 31106102
Confirm the leak is no longer present.
FILTER CAUSES AND EFFECTS:
Select model to filter by
EFFECTS
#8108- Air spring module is leaking
(No Model Qualifiers)
#41471- TAS air compressor internally frozen due to moisture / water present in system
(No Model Qualifiers)
POSSIBLE CAUSES
 

Attachments

  • e67245c7-6d66-48fe-bb6e-c18d17ada801.png
    e67245c7-6d66-48fe-bb6e-c18d17ada801.png
    198.1 KB · Views: 17
  • 86350249-20ba-43dc-914c-78997c87ca99.jpg
    86350249-20ba-43dc-914c-78997c87ca99.jpg
    81.5 KB · Views: 17
Air spring module leaks when ride height set to "Very High"


Description
Firmware Details
Steps To Test
Steps To Fix
Effects
Causes
DESCRIPTION

NOTE
For more information on fluids or other service chemicals, see Fluids and Capacities in the relevant Service Manual:

Model S Fluids and Capacities
Model X Fluids and Capacities

The air spring module leaks when the ride height of the vehicle is set to "Very High."

If there is an air leak with the air suspension strut top cap, see Article #34309.

For other possible air leak issues in the air suspension system, see Article #9933.
FIRMWARE DETAILS
None
STEPS TO TEST
Confirm if one or more of the following might be present on the vehicle:
Alerts on the vehicle or in the logs:
TAS_a121_maxDutyFL
TAS_a122_maxDutyFR
TAS_a123_maxDutyRL
TAS_a124_maxDutyRR
TAS_a125_maxDutyReservoir
TAS_a127_maxDutyBoost
TAS_a128_maxDutyCompressor
A corner or an axle is unable to maintain ride height level at "Very High."
Compressor might run too long while trying to set the vehicle to "Very High" ride height in comparison to a system with no leaks.
Move vehicle to a flat area.
Set suspension ride height to "Very High."
Wait three minutes.
Confirm signals TAS_levelingItem and/or TAS_levelingState are still active after three minutes.
Confirm a difference in height between the front left (FL) and front right (FR) or the rear left (RL) and rear right (RR) of the vehicle
If the difference between the front left (FL) and front right (FR) is more than or equal to 7mm, then there might be an issue with the front damper.
If the difference between the rear left (RL) and rear right (RR) is more than or equal to 7mm, then there might be an issue with the rear damper:
Spray leak detector solution on the air strut head of the air spring module.
Pressurize the air spring module to 2bar or 30PSI.

NOTE
Some bubbles might escape during and shortly after pressurization due to the area above the seal is being compressed.

Wait one minute and clear any bubbles that formed initially.
Monitor for another five minutes.
Confirm bubbles are present.

NOTE
Use a borescope to help to see better in narrow spaces.


If bubbles are present, then this is the issue.
STEPS TO FIX

NOTE
Perform additional steps when pressurizing the system to purge the accumulated moisture from the dryer using nitrogen.


Document a photo with the area of the leak made apparent:

Confirm replacement part does not leak.
Replace the one or more air struts according to the appropriate Service Manual procedure:
Model S
Air Spring Module - Front - LH (Remove and Replace) - Correction code 31105002
Air Spring Module - Rear - LH (Remove and Replace) - Correction code 31106002
Model X
Air Spring Module - Front - LH (Remove and Replace) - Correction code 31105002
Air Spring Module - Front - RH (Remove and Replace) - Correction code 31105102
Air Spring Module - Rear - LH (Remove and Replace) - Correction code 31106002
Air Spring Module - Rear - RH (Remove and Replace) - Correction code 31106102
Confirm leak is no longer present.
FILTER CAUSES AND EFFECTS:
Select model to filter by
EFFECTS
#8108- Air spring module is leaking
(No Model Qualifiers)
#24559- TAS_a121_maxDutyFL
(No Model Qualifiers)
#24560- TAS_a122_maxDutyFR
(No Model Qualifiers)
#24561- TAS_a123_maxDutyRL
(No Model Qualifiers)
#24562- TAS_a124_maxDutyRR
(No Model Qualifiers)
#24563- TAS_a125_maxDutyReservoir
(No Model Qualifiers)
#24565- TAS_a127_maxDutyBoost
(No Model Qualifiers)
#24566- TAS_a128_maxDutyCompressor
(No Model Qualifiers)
 

Attachments

  • 3b4d303a-27ef-409c-9d07-cc5dde1192b5.jpg
    3b4d303a-27ef-409c-9d07-cc5dde1192b5.jpg
    338.5 KB · Views: 19
Yeah, I figured good luck trying to get Tesla to do that. I’m just gonna probably end up replacing my springs here within a year. There’s also an article about the rear bushings being worn out causing the tire wear in the rear ..they say it’s the toe not the camber causing tire wear
 
i was really surprised that this is not held in place by anything besides o-ring
u have to be careful handling the air spring, if this comes off u have to tuck in the seal all around or it will leak..

View attachment 1016560
My bushings in the rear are worn out on a 2020 mx that’s what there saying is causing the rear tire wear is the bushing is causing the toe to move around in the back wearing the inside tires to wear out not camber
 
Anyone has bought new air struts from Tesla, what do they cost? And the compressor?

Also any idea what's the difference between these two:

1707562955464.png


My MX is older than Oct/2016.

There are replacements available really cheap from China, any experience from these?

Reason I'm asking, I have earlier mentioned that my compressor sometimes freezes if it's cold, and gives the on screen error. Car stays pretty much upright for several days, but then the right side starts to sink so there probably is a leak somewhere.

Now I think the compressor died completely. It is damn cold again though, but now I couldn't revive it with a heat gun like before. :) Or perhaps the relay is bust, haven't checked it yet.

To me it looks like both front and rear right are leaking, although visually only right rear looks "slammed".. This picture is taken after compressor has been disabled for 5 days already. It's really stupid that it disables leveling right away when compressor fails. There's 13.1 bar at the reservoir, no chance it could use some of that to raise car back to driving height again so it would be easier to take to service..

1707563893255.png
 
expensive 😅
1707583986871.png


i would NOT trust a Chinesium part that holds my whole car weight...
I bought an OEM used one from eBay n its been successfully doing its job last 20k mi

i installed -00-G on my Sept 2016 X, it works just fine
1707585012002.png


Not sure what the difference is but from searching all numbers on eBay, seems maybe -25- is the Performance shock...
Possibly just harsher shock in it..

and yeah i don't get the logic in suspension ecu, if u have pressure in reserve then it should be used till it runs out...
 
@brainhouston thanks!

Can you check the compressor price too? It's part number 1027911-00-H or 1044911-00-D

I'm from Europe but US price probably gives a good hint. :)

I probably start by replacing just the compressor, to get the car back up.

I found a german store selling struts and compressors. They even have remanufactured Tesla struts for about 600€ each.
 
Anyone has bought new air struts from Tesla, what do they cost? And the compressor?

Also any idea what's the difference between these two:

View attachment 1017124

My MX is older than Oct/2016.

There are replacements available really cheap from China, any experience from these?

Reason I'm asking, I have earlier mentioned that my compressor sometimes freezes if it's cold, and gives the on screen error. Car stays pretty much upright for several days, but then the right side starts to sink so there probably is a leak somewhere.

Now I think the compressor died completely. It is damn cold again though, but now I couldn't revive it with a heat gun like before. :) Or perhaps the relay is bust, haven't checked it yet.

To me it looks like both front and rear right are leaking, although visually only right rear looks "slammed".. This picture is taken after compressor has been disabled for 5 days already. It's really stupid that it disables leveling right away when compressor fails. There's 13.1 bar at the reservoir, no chance it could use some of that to raise car back to driving height again so it would be easier to take to service..

View attachment 1017125

Third-party air compressor is missing temperature sensor ground pin​

Description

Firmware Details
Steps To Test
Steps To Fix


Effects
Causes

DESCRIPTION​

The user reports the air suspension telltale light is illuminating. Air suspension still operates as expected. This is due to a third-party air compressor being installed on the vehicle that is missing the temperature sensor ground pin.

FIRMWARE DETAILS​

None

STEPS TO TEST​

  1. Confirm Diagnostic Trouble Code (DTC) EAS_559E15 is present on the vehicle.
  2. Determine whether the air compressor is from a third-party.
  3. Determine whether connector X190 pin 12 is present. See the following:
    e4b514ed-81f7-43b4-8544-5003c4f1b6f7.png

If the air compressor is a third-party part and pin 12 at connector X190 is not present, then this is the issue.

STEPS TO FIX​

  1. Replace the air compressor with the original part according to Service Manual procedure: Compressor - Air Suspension (Remove and Replace) - Correction Code 31102002 Correction Code 31102302.
  2. Confirm the DTC is no longer present on the vehicle.

FILTER CAUSES AND EFFECTS:​

Select model to filter by

EFFECTS​

POSSIBLE CAUSES​

None

QUALIFIERS​

  • Tesla
  • Model S

CATEGORIES​

Temp sensor is for older model s EAS
 
  • Helpful
Reactions: brainhouston

Air spring retains pressure due to condition affecting pressure relief valve​


Description

Firmware Details
Steps To Test
Steps To Fix


Effects
Causes

DESCRIPTION​

The Pressure Retention Valve (PRV) is installed into the strut where the air line enters, allowing the strut to maintain a small amount of air pressure if the line is ruptured.

If the PRV is not working correctly, it can prevent an air spring from releasing pressure. Pressure within the air suspension strut cannot be released to allow the Electronic Air Suspension (EAS) to lower to the desired / commanded level.

FIRMWARE DETAILS​

None

STEPS TO TEST​

  1. Adjust suspension heights up and down.
  2. Confirm that the PRV is not allowing pressure to drop on the affected corner of the vehicle.
  • When adjusting heights, a single corner will remain higher than the target, and the other wheel on that axle may be significantly lower than the target.

If the corner in question is significantly higher than the target due to a PRV not operating as designed, then this is the issue.

STEPS TO FIX​

  1. If available, replace the Pressure Release Valve on the affected component.
  2. Otherwise, replace the air spring according to Service Manual procedure:
 
  • Informative
Reactions: hydro
Yesterday I realized I can register my company at epc.tesla.com and get pricing information and order parts directly from there. Registration already went through. This is amazing! :) Now I can see prices just like @brainhouston above.

The compressor is only €224.39 without tax in Europe. It's a Wabco part. This is damn good price, everyone else is selling it for double the price. Even chinese copies are ~200€ ...

But, the description says:
"When replacing air compressor please also replace compressor control relay 1080796-00-A (This is not applicable on E fuse equipped vehicles)"

I can't find the relay. It doesn't allow to add it directly to the cart with that part number. Doh.

Edit: the relay is very generic 12V 70A relay with common pinout, available from any auto parts store. I'll order just the compressor and see if it comes with a relay included, if not, I'll buy it separately from a local store..
 
Last edited:
Air suspension ECU unable to power air compressor


84e6c031-bbd7-48fb-9e0d-dd95e65e4536.jpg


Description
Firmware Details
Steps To Test
Steps To Fix
Effects
Causes
DESCRIPTION
The air suspension Electronic Control Unit (ECU) is unable to power the air compressor.
FIRMWARE DETAILS
None
STEPS TO TEST
Confirm one of more of the following alerts are present on the vehicle or in the logs:
TAS_a136_openCircuitCompressor
TAS_a213_yellowWarningLamp
Confirm the vehicle has relay K112 with fuse F154.
Measure 12V+ on the compressor at X088, Pin 1.
Visually inspect fuse of F154.
Visually inspect relay.
Measure on fuse box connector (Air Compressor Relay Coil +):

Measure wiring from fuse box to Tesla Air Suspension (TAS) ECU, power, and ground.

If the air suspension ECU fails to power the air compressor, then this is the issue.
STEPS TO FIX
If an open loop is present or wiring is damaged, determine whether the issue that has been identified is able to be repaired or if the harness requires replacement by following the instructions in the appropriate Service Document:
Model X: Electrical Harness Repair Guidelines
Confirm the air suspension ECU now powers the air compressor.
FILTER CAUSES AND EFFECTS:
Select model to filter by
EFFECTS
#24574- TAS_a136_openCircuitCompressor
(No Model Qualifiers)
#24582- TAS_a144_shortCircuitCompressor
(No Model Qualifiers)
#26128- TAS_a213_yellowWarningLamp
(No Model Qualifiers)
POSSIBLE CAUSES
None
 
  • Informative
Reactions: Gtech
awesome read. I dont need mine done but i am curious for when it does. how difficult was this job on a scale of 1-10?

It's very simple. Only took about an hour. I took some short cuts, though.

Tesla service manuals seem to be completely open now! They required registration earlier but that doesn't seem to be the case. The procedure is outlined here (for Model X):


Some personal notes.. The instruction tell to remove the frunk tub. I have no idea why, that is not needed! You don't even have to open the frunk if you don't want to.

Just put car in jack mode, remove front right wheel and the inner fender. Tesla instructions tell you to deflate the reservoir from Service menu or from Toolbox, but I didn't do that. I just loosened the air line so it started hissing and waited a few minutes without removing it completely.

Then, remove and install the compressor as in Tesla's instructions.

I didn't have the nitrogen bottle that you are supposed to have for filling. However at least in current software, when car is standing still, compressor is NOT used to fill the reservoir. It only runs very briefly to get car back up to driving height. When car was up, I watched the pressures from Service mode and reservoir was still at 0.5bar, so it had been filled at all.

Reservoir is filled when car is driven above certain speed. I drove about 1km and stopped. Compressor stops when car speed lowers below the threshold. I again checked service mode and the reservoir pressure was now 3.3bar. I read TMC for 5-10 minutes and drove another few kilometer stint, and pressure was now 7bar. Again waited 5-10min before driving more.

I'm pretty sure it's completely safe to fill the reservoir like that. I don't think the compressor can overheat if you have long enough breaks. Obviously would be better with the nitrogen bottle but...