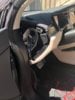
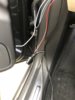
I didn't need to use a cable-tie to get the cable from the cabin to the flex tubing. I managed to do it by just disconnecting the flex tubing from the frame and fishing the dashcam wire through.
Once fished through to the frame, it will take some effort/time to fish it through the flex tubing, due to the connector plug, but it should be possible. There are a lot of wires going through the flex tubing, and it's entirely possible that Tesla added additional wires after 2016?
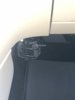
Anyway, once it's through the flex tubing, you don't have to remove the hard plastic trim in the rear hatch if you use the cable-tie method. This is the step where the cable-tie comes in handy so that you can (blindly) find a gap under the hard plastic trim to fish the cable through. Then you can re-connect the flex tubing to the body frame.
It took me a long time to figure all this out when I installed it almost 2 years ago, so I didn't end up capturing it all on video. Here is a partial video of that part of the install:


I’ll be just using wire nuts and connect to the pigtail. No cutting of any wires. Gonna just bring it into service and see if they can explain why I’m not seeing 12V