


Really wanted to pick up the Dream Case, but didn't want to shell out over $1K for it so decided to try to build my own. There were a few helpful threads of other's builds, but none quite what I personally wanted so I kind of tackled the project to the best of my ability myself. Obviously, I am not a carpenter  Hopefully this helps someone else out though!


Goals for the project:
The Dreamcase, which was my ideal setup, would cost about $1,265CAD + import taxes. The thing that put me off the most (other than the price) is the fact that they did not do anything to get rid of that angled slope of the folded down rear seats. While they evened out the 3" drop from the trunk floor, I really didn't want to have my upper body slanted in any way while sleeping. I also wanted to have access to some things underneath the bed platform, since it feels like wasted space if not.
The total cost of my build turned out to be fairly expensive too, because I wanted it to look good and feel good when I sleep lol. Broken down below:
Lumbar/Hardware | Home Depot (Total $201)
This is all extra, not needed, but I just wanted it to look better lol
Box Frame
Bed Platform
Mattress (Linked Above)
I initially started by planning everything on Sketchup (super useful free 3d modelling tool) to design something that I thought would work. The basic concept looks like this:

After getting all the lumbar and hardware from Home Depot (they'll cut it to size for you too), I started the build.

I started off by making the box bases, just to realize I messed up measuring (measure once.. cut twice... right?) lol. The bottom of the trunk floor actually has a little bump that goes up. I ended up cutting the upper box a bit shorter in width, and had to cut some 45 degree angles on the top edge of the bottom box to fit.
Pro tip: If you want to keep the trunk liner in when camping like I do, you can actually take it out and pre-fit your build on there so you don't have to carry the boxes in/out of the car a buncha times.


I then painted the wood black with some primer + base spray paint, to make it look less 'unfinished' even though you won't necessarily see these once the bed goes on top. Surprisingly, the paint holds up quite well to some abuse. I laid it on way too thick, so I had to wait for a week for this to fully cure. Learn from my mistakes, spray the layers on thin lol. It should have taken just 2 days to fully cure at most.

Test fit looking good, minus all the wood crumbs stuck on my carpet here..

I then took the 3 pieces of plywood, wrapped it in some leather-ish vinyl I got from a local fabric store, and attached it all via piano hinges. The head part of this, I put the piano hinges on the bottom side so I wouldn't feel it while sleeping. The bottom board, I attached the piano hinges facing up so I could fold it up to reach my storage underneath the bed platform. In reality, I didn't feel the piano hinges either way, so these could be mounted whichever way you want.


I cut an 6" piece of 1/2" plywood for the top board just to give it some more rigidity, so myself or my S/O wouldn't bend the board with our heads if we were to roll around with weight up there. The board goes over the rear passenger footwell and rests on top of the center console (I have a thick microfiber cloth here to prevent scratching up the center console). I'm probably going to add some foam here to really help prevent that, even though it's been good so far.


Weight test, solid no matter where you sit

The platform was cut based on the measurements of this trifold mattress, so it's a perfect fit

I'm 5'11, and I have just enough space (few inches below my feet, probably?) to lie straight. Since the space at my hip lines up perfectly with where the rear door starts, the space above my hip actually measures to be around the size of a queen bed. I'm still working on filling the hole up top with another piece of plywood base + foam + wrap, but haven't quite gotten to it yet. So far, I've just stuffed a rolled up piece of high density foam there to rest my arms on for now.


My original idea of storing it doesn't seem very secure, as the box frame stacked might just fly around. So I left the box frame on the bottom, folded up the platform on top, then stuck the mattress (in its case) here. The parcel shelf would just fit on top of this, but I had to carry a bunch of other things on top so I just left it off. Definitely takes up a fair amount of space, but I'll take the trade to have a good night's rest.

I was too excited and only took a quick video for an IG story on how it folds up. If you're interested, you can find it all the way near the very end of this highlight album here.
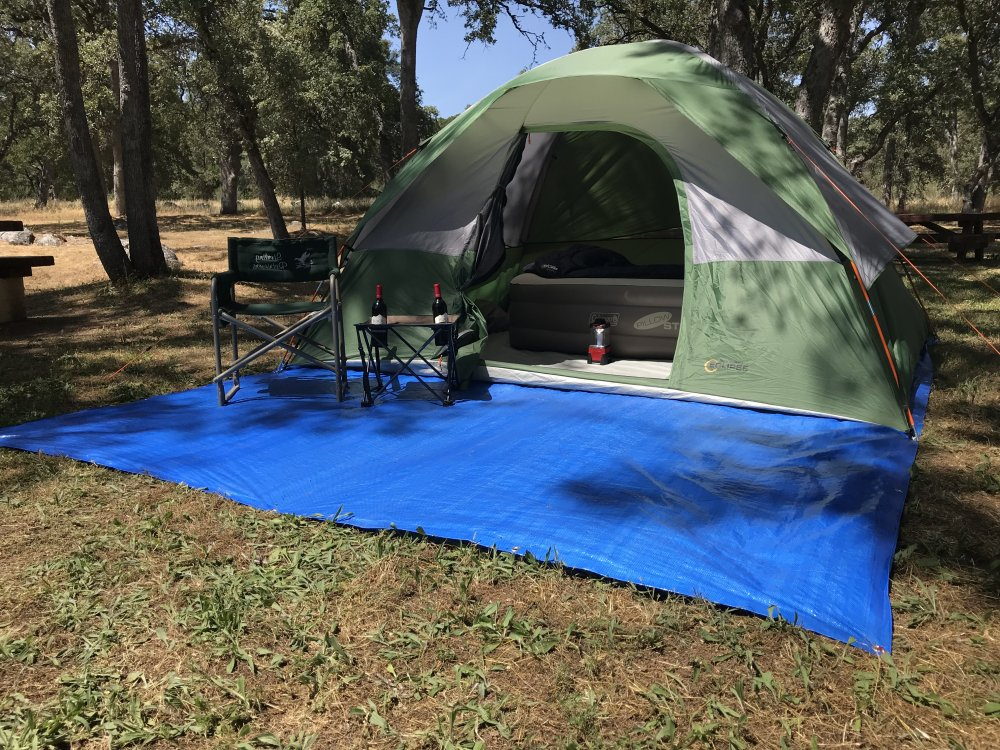
My gf wanted a place to change too, and it would be nice to be able to get out of bed and not be directly outside. So I purchased this car tent off Amazon. (We test set it up before my new wheels arrived, hence stock wheels here lol)


Took it to our first camp trip a few weeks ago and worked great. Sleeping inside was honestly a bit tight because both myself and my gf are side sleepers and we like to kick our knees up, but it worked.
Camp mode took about ~9% battery with sentry mode off, putting it at 18 degrees celsius on fan speed 1 (feet venting only). It wasn't too loud inside but had a tiny bit of fan noise. We set up right beside our friends' tents, and they complained about how it sounded like a distant neighbour vacuuming every 30 seconds intermittently. I felt the vibrations kick on/off throughout the night, but ended up getting used to it. An emergency google at the time shows that it's apparently quite normal, so this is definitely something to note.

Not as fancy as a dream case, but it definitely works! I haven't tried the mattress on the dream case and my back is quite sensitive, but this mattress worked wonders. Having
Hopefully this helps someone else out though!Goals for the project:
- Maximize headroom
- Even out the 3" drop from folded rear seats + trunk floor, and the slant of the folded rear seats (this slant is quite big)
- Packable in the trunk with the rear seats up, so I can carry passengers if needed
- COMFY SLEEPING (my back is terrible, but I like camping)
- Some kind of storage for the bottom frame, to not waste space
The Dreamcase, which was my ideal setup, would cost about $1,265CAD + import taxes. The thing that put me off the most (other than the price) is the fact that they did not do anything to get rid of that angled slope of the folded down rear seats. While they evened out the 3" drop from the trunk floor, I really didn't want to have my upper body slanted in any way while sleeping. I also wanted to have access to some things underneath the bed platform, since it feels like wasted space if not.
The total cost of my build turned out to be fairly expensive too, because I wanted it to look good and feel good when I sleep lol. Broken down below:
Lumbar/Hardware | Home Depot (Total $201)
- Box Base Frame — (2) 1/2-inch x 4 ft. x 8 ft. Standard Spruce Plywood Board
- Box Base Frame — (24) 6x3 wood screws for the frame | (20) 6x3 wood screws for the floor (overkill, lol)
- Bed Platform — (2) 36" Piano/Continuous Hinges
- Bed Platform — (3) 1/2-inch x 4 ft. x 8 ft. Standard Spruce Plywood Board
This is all extra, not needed, but I just wanted it to look better lol
- (3) Flat black spray paint (you can probably get away with 2 cans tbh)
- Vinyl fabric (kind of like leather, at your local hardware store)
- Spray adhesive (for the vinyl to plywood)
- Tri-fold 4" memory foam mattress
- Mattress case
- Storage bag (for pillows, duvet, bed sheet)
- Duvet/blanket
- Duvet cover
- Bed sheet ("bamboo", but probably not really. Still feels very soft though)
Box Frame
- Built in 2 pieces so I can take the bottom piece out to access my sub-trunk storage, if needed
- Has floors to account for the height difference (1/2") since I needed a 4.5" raised floor at the trunk to be level with the highest point of the rear seats folded down
- The floors also allow me to take out the entire box frame if needed, and still keep whatever things I have inside of it
- 1x4 wood planks, to save weight compared to 2x4, with a center divider to act as support so every part of my bed platform will be well supported
Bed Platform
- Solid piece of plywood, because I really like a fully supported bed that's flat
- Tri-fold, just to match the way my mattress folds, and so I can fold one end up to reach my storage while the bed is still fully setup
- Tri-fold with hinges for storage purposes, because who likes to fumble around with multiple pieces of plywood when you can just move it as one piece
Mattress (Linked Above)
- 4" thick so it's thick enough for side sleeping, but not too thick so I don't lose too much headroom
- This just perfectly fits in the wheel well of the Model S, so it's a no-brainer
- Twin at the bottom, but with extensions half-way up where your upper body meets the rear seat area, measures out to be about a queen size
I initially started by planning everything on Sketchup (super useful free 3d modelling tool) to design something that I thought would work. The basic concept looks like this:
After getting all the lumbar and hardware from Home Depot (they'll cut it to size for you too), I started the build.
I started off by making the box bases, just to realize I messed up measuring (measure once.. cut twice... right?) lol. The bottom of the trunk floor actually has a little bump that goes up. I ended up cutting the upper box a bit shorter in width, and had to cut some 45 degree angles on the top edge of the bottom box to fit.
Pro tip: If you want to keep the trunk liner in when camping like I do, you can actually take it out and pre-fit your build on there so you don't have to carry the boxes in/out of the car a buncha times.
I then painted the wood black with some primer + base spray paint, to make it look less 'unfinished' even though you won't necessarily see these once the bed goes on top. Surprisingly, the paint holds up quite well to some abuse. I laid it on way too thick, so I had to wait for a week for this to fully cure. Learn from my mistakes, spray the layers on thin lol. It should have taken just 2 days to fully cure at most.
Test fit looking good, minus all the wood crumbs stuck on my carpet here..
I then took the 3 pieces of plywood, wrapped it in some leather-ish vinyl I got from a local fabric store, and attached it all via piano hinges. The head part of this, I put the piano hinges on the bottom side so I wouldn't feel it while sleeping. The bottom board, I attached the piano hinges facing up so I could fold it up to reach my storage underneath the bed platform. In reality, I didn't feel the piano hinges either way, so these could be mounted whichever way you want.
I cut an 6" piece of 1/2" plywood for the top board just to give it some more rigidity, so myself or my S/O wouldn't bend the board with our heads if we were to roll around with weight up there. The board goes over the rear passenger footwell and rests on top of the center console (I have a thick microfiber cloth here to prevent scratching up the center console). I'm probably going to add some foam here to really help prevent that, even though it's been good so far.
Weight test, solid no matter where you sit
The platform was cut based on the measurements of this trifold mattress, so it's a perfect fit
I'm 5'11, and I have just enough space (few inches below my feet, probably?) to lie straight. Since the space at my hip lines up perfectly with where the rear door starts, the space above my hip actually measures to be around the size of a queen bed. I'm still working on filling the hole up top with another piece of plywood base + foam + wrap, but haven't quite gotten to it yet. So far, I've just stuffed a rolled up piece of high density foam there to rest my arms on for now.
My original idea of storing it doesn't seem very secure, as the box frame stacked might just fly around. So I left the box frame on the bottom, folded up the platform on top, then stuck the mattress (in its case) here. The parcel shelf would just fit on top of this, but I had to carry a bunch of other things on top so I just left it off. Definitely takes up a fair amount of space, but I'll take the trade to have a good night's rest.
I was too excited and only took a quick video for an IG story on how it folds up. If you're interested, you can find it all the way near the very end of this highlight album here.
My gf wanted a place to change too, and it would be nice to be able to get out of bed and not be directly outside. So I purchased this car tent off Amazon. (We test set it up before my new wheels arrived, hence stock wheels here lol)
Took it to our first camp trip a few weeks ago and worked great. Sleeping inside was honestly a bit tight because both myself and my gf are side sleepers and we like to kick our knees up, but it worked.
Camp mode took about ~9% battery with sentry mode off, putting it at 18 degrees celsius on fan speed 1 (feet venting only). It wasn't too loud inside but had a tiny bit of fan noise. We set up right beside our friends' tents, and they complained about how it sounded like a distant neighbour vacuuming every 30 seconds intermittently. I felt the vibrations kick on/off throughout the night, but ended up getting used to it. An emergency google at the time shows that it's apparently quite normal, so this is definitely something to note.
Not as fancy as a dream case, but it definitely works! I haven't tried the mattress on the dream case and my back is quite sensitive, but this mattress worked wonders. Having

 I probably will, next track day! This time around my friend is towing it with 3 other motorcycles in his Tacoma. A company did reach out to me on Instagram though and they've sponsored a hidden hitch with a removable receiver that supposedly can tow up to 2,000lbs, so I'll be looking into towing myself down next time whenever that arrives. Am a bit weary though since it doesn't seem like the S has an official tow rating..