


Welcome to Tesla Motors Club
Discuss Tesla's Model S, Model 3, Model X, Model Y, Cybertruck, Roadster and More.
Register
Install the app
How to install the app on iOS
You can install our site as a web app on your iOS device by utilizing the Add to Home Screen feature in Safari. Please see this thread for more details on this.
Note: This feature may not be available in some browsers.
-
Want to remove ads? Register an account and login to see fewer ads, and become a Supporting Member to remove almost all ads.
You are using an out of date browser. It may not display this or other websites correctly.
You should upgrade or use an alternative browser.
You should upgrade or use an alternative browser.
Has Any P3D+ Owners Gotten Carbon Fiber Spoiler?
- Thread starter Zoglog
- Start date
TANGO SUKKA
Member
Updated spoiler is also having issues sticking. I have a ceramic coating on the car so not sure if that has something to do with it. Detailing guys said it shouldn't matter.
Imgur (gif image of issue)https://imgur.com/TVcwCXV
Imgur (gif image of issue)https://imgur.com/TVcwCXV
CrazyCoconut
Member
One of my detailers said it shouldn't matter as long as it's been a while and the surface is prepped with isopropyl alcohol, the other says you should polish the coating off before installing a spoiler. I'm going to be safe and polish that lip before I take mine in for spoiler install.Updated spoiler is also having issues sticking. I have a ceramic coating on the car so not sure if that has something to do with it. Detailing guys said it shouldn't matter.
Imgur (gif image of issue)
DDotJ
Member
That's what mine was doing. Tesla Mobile Service came out and reinstalled my spoiler and it doesn't do that anymore.Updated spoiler is also having issues sticking. I have a ceramic coating on the car so not sure if that has something to do with it. Detailing guys said it shouldn't matter.
Imgur (gif image of issue)
TANGO SUKKA
Member
reinstalled the same one or a new one?That's what mine was doing. Tesla Mobile Service came out and reinstalled my spoiler and it doesn't do that anymore.
DDotJ
Member
JG T3SLA
Member
Round two looks a lot better. The badge was even off centered a bit and second mobile service guy corrected it.


Impactwrench
Member
18_Mdl_P3D
Member
I took delivery of my P3D+ on Oct 29th and I still haven't gotten it. I sent in messages with no reply. This is one my few complaints about Tesla. I guessing when i get my first scheduled service it will be installed...but i'm guessing. If anyone has gotten their, what did you do to get it?Just wondering if anyone has gotten their spoiler on delivery or afterwards yet?
Came back in my head after seeing it at the autoshow a couple of weeks ago
TANGO SUKKA
Member
mine looked like that yesterday but today one side is coming off. look at the imgur gif in my above postRound two looks a lot better. The badge was even off centered a bit and second mobile service guy corrected it.
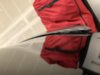
View attachment 381648 View attachment 381649 View attachment 381650 View attachment 381651
JG T3SLA
Member
mine looked like that yesterday but today one side is coming off. look at the imgur gif in my above post
Thanks for the heads up. I’ll definitely watch it. Car will be in parking garage for a few days until Saturday so hopefully tape settles.
Round two looks a lot better. The badge was even off centered a bit and second mobile service guy corrected it.
View attachment 381648 View attachment 381649 View attachment 381650 View attachment 381651
Is there a gap between the top of your spoiler and the trunk lid on any point along the spoiler?
It's so hard to tell in the photos.
JG T3SLA
Member
Is there a gap between the top of your spoiler and the trunk lid on any point along the spoiler?
It's so hard to tell in the photos.
Nice and flush along the whole length. Will be watching to see if it starts to pull up. All good so far.
Nice and flush along the whole length. Will be watching to see if it starts to pull up. All good so far.
cool thanks. Good to know it's possible
TANGO SUKKA
Member
Daniel F
Member
mines coming off bad now =\
Yikes! Not even sure if I want them to try and fix mine tomorrow as scheduled after seeing this. At this rate one of these things is going to come flying off on a freeway.
TANGO SUKKA
Member
That's my concern... especially with all the rain right now.Yikes! Not even sure if I want them to try and fix mine tomorrow as scheduled after seeing this. At this rate one of these things is going to come flying off on a freeway.
Lifeinabox
Member
Install the roof rack as well and you can initiate the new James Bond mode randomly.Yikes! Not even sure if I want them to try and fix mine tomorrow as scheduled after seeing this. At this rate one of these things is going to come flying off on a freeway.
Daniel F
Member
My repair looks much better than the original: Imgur
Process for repairing:
1. Sprayed the old spoiler with goo gone to loosen up the adhesive. Let it set for about 10 minutes (he had to do some charge port work while he was here so did that while letting the goo gone stick)
2. Used a tool to slowly peel off the old spoiler while continuing to spray more goo gone.
3. We both cleaned up the little bit of remaining adhesive residue.
4. I machine polished the surface with both Menzerna Intensive Polish and Menzerna Final Polish to make sure we had a perfectly clean and wax/sealant free surface for applying the new spoiler.
5. Tech taped on the templates and then put tape on key spots on the spoiler (both ends and the middle) to line it up.
6. Positioned the spoiler and we both checked out the fit to make sure it was ok. He mentioned that they have gotten spoilers that didn't sit right (like my previous spoiler)
7. When we were happy with the positioning and fit he taped down the spoiler (to act as a guide for final install) and cut the tape.
8. Pulled spoiler off, removed backing tape, positioned it using tape as guides and then we pushed on separate sides of the spoiler to get it to adhere firmly.
He's asked that I apply heat every 2 hours or so today and repress to ensure firm adhesion. Also, won't be driving the car for 24 hours to allow it to fully cure. Overall it looks great now and is nice and flush on both sides. Will report back here if it happens to pop up.
Also, no idea how you do this with 1 person as having each of us tackle one side seemed to make a huge difference.
Similar threads
- Replies
- 22
- Views
- 3K
- Replies
- 1
- Views
- 538
- Replies
- 15
- Views
- 728
- Replies
- 16
- Views
- 1K