Welcome to Tesla Motors Club
Discuss Tesla's Model S, Model 3, Model X, Model Y, Cybertruck, Roadster and More.
Register

Liftgate adjustment DIY info on 2023 refresh

This site may earn commission on affiliate links.
My liftgate was badly misaligned from the factory in every possible direction, and my Service Center refused to fix the issue, along with most other build quality issues with my car. I am going to have to accept that this $100K car just does not come with a bumper to bumper factory warranty.

So I decided to fix the liftgate myself, as I have done with most of the build issues, and I am happy to share what I learned, which is a lot. Since most people on this forum don't seem like the type that would take on such a daunting task, I won't go to the effort to make a big DIY, but I'll share some bullet points and be happy to answer any questions that come up.

Here are key bullet points:

- The factory service manual that you can download from Tesla has not been updated completely for the refresh model, but it's still somewhat useful to review
- The hinge bolts into the liftgate control the height, the hinge bolts into the body control left/right alignment and forward and backward.
- The manual shows removing the back glass to be able to access the bolts for the hinge. The headliner near the back of the car needs to be pulled down to access those nuts.
- I was able to loosen and tighten the bolts without removing the glass by using a torx socket held by a small vice grip to grab the exposed portion of the bolts. Only a 1/2 turn is enough to loosen the bolts to adjust that part of the hinge.
- I was able to remove a minimum of the interior to be able to pull down the headliner enough to get a power ratchet to loosen and tighten those nuts. You need to remove the side seat bolsters, the side panels, and the panel around the seat belt. There are 10mm bolts holding the headliner in along with the normal push pins.
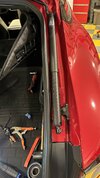
- Most important: You must remove the struts on the left and right to have any hope to adjust the hinges. Those struts put too much force on the liftgate to be able to force the hinges into place. Fine hinge adjustment becomes easy when the struts are removed.
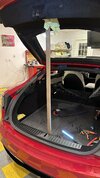
- I used a sturdy wooden stick, cut to size, to hold up the liftgate while doing the work. I put a microfiber towel on top of the stick to protect the decklid I did it all by myself, so it can be done with one person even though it's really a 3 person job.
- Unless you take the glass off and really remove the headliner, the adjustment process is iterative where you move the hinges and check and then adjust again. This job would have been incredibly simple to get right in the factory with the back glass off and before the interior is added. Amazing disregard for quality that they don't bother to make sure the liftgate is correct at that stage.
- Start with getting the height correct before doing the left and right and forward and backward adjustments. The left and right height also slightly affects the forward and backward adjustment.
- In my case, there is no way to get the liftgate to fit 100% correctly m because of the poor build quality of the body and the liftgate itself. Clearly some of their robots need to be fired. But if that is the case with your car, there are compromises that can be made to make it fit well enough where no one will notice.
- While adjusting the forward and backward of the hinge, be very careful that the back glass and the pano glass do not hit each other and you end up with both broken.
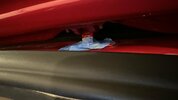
- I needed to also adjust the latch striker position to fine tune the fit, which is very easy to do. Take care to check the clearance around the bottom of the liftgate and the bumper. In my case, lining up perfectly with the fenders caused interference with the bumper and body near the taillights.

No doubt it's an intimidating task for a DIY'er, which is clearly why my lazy Service Center squirmed out of standing behind their product. The job is definitely one of those that most will tell you to leave to a professional, but if you are handy and super meticulous and careful, you can do it too. I am sure if I took it to a body shop, they would insist to remove the back glass and more of the interior, and it would become a very large bill with probably more problems created than fixed.


8508700496_6928a3822b_b.jpg

"Tesla Model S" by cdorobek is licensed under CC BY 2.0.
Admin note: Image added for Blog Feed thumbnail
 
Last edited:
Owned plenty of American brands. Never seen such poor assembly and QC. And definitely never seen a refusal to fix obvious build issues by systematically pretending everything is ok and then hiding from the customer behind an app. That last part is just so disgusting for a $15K car, and these are $100K cars.
So true. I got a Model Y recently and requested some adjustment on the alignment on a few gaps. I was told they were in spec. Anyhow, they went ahead to adjust the lift door and passenger doors. It looks even worse now. They fixed the small gaps, while left behind much wider gaps on the other side. When I was washing my Cadillac 2014 and Buick 2015 yesterday, I noticed how much better the assembly was than the Tesla. Sure, I enjoy the driving experience with the Model Y, but isn't it fair to have an expectation for a similar quality as other cars at the similar price point? I am sure that I will be looking for other options a few years down the road when there are more EV options available from the conventional car makers.
 
  • Like
Reactions: TLLMRRJ
I don't think the hatch on a Model S ever fit 100% perfectly. At least not the two I had bought used in 2017 (a 2014) and 2019 (a 2015). And now the tooling is 10+ years old.

I suppose they're going by "if it doesn't make paint-on-paint contact and doesn't leak much, it's good to go." (Neither my 2014 nor my 2015 made paint-on-paint contact, and neither leaked. But the original owner/lessee may have had them fixed back when Tesla did customer service.)

That makes me feel better that many/all have the same problem.

It makes sense that it's only getting worse as the tooling gets older.

And yes, they are basically removing cosmetic issues from the warranty, and no, that's not ok.
 
Call me paranoid, but a few years ago I was convinced to blur my license plate out on images of my cars posted online. This was due to a rash of targeted theft of high end cars so it may not be applicable in your case, but particularly if you’ve got your home address as your DMV contact I’d think twice.

Good job. Unfortunately I think we’ll need to wait for Tesla’s order book to thin and margins to come down before they start caring about both quality and customer treatment in a more systemic way. Personally these issues are just one of the reasons I can’t justify an S, but as long as there are those that can Tesla’s unlikely to change. And of course I’m just as guilty seeing as I’m in the market for a Y.

I might start parking the car on the street in front of my house and leaving the key card on the ground next to the car. That’s how I feel about Tesla service right now.
 
I might start parking the car on the street in front of my house and leaving the key card on the ground next to the car. That’s how I feel about Tesla service right now.
Wish there was a sad face response option. Sorry to hear about the Tesla service; letting the customer service experience decline just because they're selling well now is definitely not a good long-term strategy for them...nor a way to foster brand loyalty.
 
  • Like
Reactions: TLLMRRJ
So true. I got a Model Y recently and requested some adjustment on the alignment on a few gaps. I was told they were in spec. Anyhow, they went ahead to adjust the lift door and passenger doors. It looks even worse now. They fixed the small gaps, while left behind much wider gaps on the other side. When I was washing my Cadillac 2014 and Buick 2015 yesterday, I noticed how much better the assembly was than the Tesla. Sure, I enjoy the driving experience with the Model Y, but isn't it fair to have an expectation for a similar quality as other cars at the similar price point? I am sure that I will be looking for other options a few years down the road when there are more EV options available from the conventional car makers.
I was at a Mercedes dealership yesterday doing a test drive and told the sale rep there I was working with that I was considering a Tesla and he looked at me immediately and said "DO NOT buy a Tesla. I've had 2 model Ys and i've gotten rid of both of them. Two of the guys who work here have Teslas and they are both looking at getting rid of theirs." When I asked him what the problem was with his most recent Y he said that the dash just started coming off. Some sort of paneling on the dash was coming off which was the last straw after he said he spent the 6 months of ownership creating service tickets at least once a month.

I think him saying that was the last straw for me. I've test driven Teslas and have been carefully considering my options, but I just can't ignore this. I mean people who absolutely love their Tesla will admit the customer service and build quality is spotty. I usually tend to lean towards "People on the internet tend to complain more than people who are just enjoying their car and likely online thoughts tend to lean more towards negativity" but after the Mercedes sales rep told me about it I just couldn't ignore it anymore. I wasn't even at the dealership to test drive a Mercedes but a Ford Mustang Mach-E.

I'm really upset about all this because for months now I convinced myself a Tesla is what I want, but I just can't ignore anymore everything I hear and experience from people first-hand now too. I am sure people who have them like them, but I mean even here... dude buys a $100k Tesla and the service center refuses to work on it. I mean I can't imagine a single other manufacturer of a car costing over $100k to simply refuse to fix a problem. How is this okay? People are right and I see it that the desire to own a Tesla for whatever reason will get people to overlook things that maybe they shouldn't be overlooking. I have hounded forums for months and months and I see an enormous amount of posts of people who talk about what they've done to improve their Teslas... things that you'd think would have been done by the factory... things like sound-dampening, fixing creaking noises, flexible floor problems in the rear seat foot area, panel gaps being the most common complaint, and so many others i've been following.

In the back of my mind I think "The posts I am reading online and what I am hearing in-person are such a small amount of instances compared to the amount of cars that are sold by Tesla that they can't ALL have problems out of the factory." I just don't know what to think, but the internet absolutely does NOT help to garner any sort of reassurance of buying a Tesla.
 
My liftgate was badly misaligned from the factory in every possible direction, and my Service Center refused to fix the issue, along with most other build quality issues with my car. I am going to have to accept that this $100K car just does not come with a bumper to bumper factory warranty.

So I decided to fix the liftgate myself, as I have done with most of the build issues, and I am happy to share what I learned, which is a lot. Since most people on this forum don't seem like the type that would take on such a daunting task, I won't go to the effort to make a big DIY, but I'll share some bullet points and be happy to answer any questions that come up.

Here are key bullet points:

- The factory service manual that you can download from Tesla has not been updated completely for the refresh model, but it's still somewhat useful to review
- The hinge bolts into the liftgate control the height, the hinge bolts into the body control left/right alignment and forward and backward.
- The manual shows removing the back glass to be able to access the bolts for the hinge. The headliner near the back of the car needs to be pulled down to access those nuts.
- I was able to loosen and tighten the bolts without removing the glass by using a torx socket held by a small vice grip to grab the exposed portion of the bolts. Only a 1/2 turn is enough to loosen the bolts to adjust that part of the hinge.
- I was able to remove a minimum of the interior to be able to pull down the headliner enough to get a power ratchet to loosen and tighten those nuts. You need to remove the side seat bolsters, the side panels, and the panel around the seat belt. There are 10mm bolts holding the headliner in along with the normal push pins.
- Most important: You must remove the struts on the left and right to have any hope to adjust the hinges. Those struts put too much force on the liftgate to be able to force the hinges into place. Fine hinge adjustment becomes easy when the struts are removed.
- I used a sturdy wooden stick, cut to size, to hold up the liftgate while doing the work. I put a microfiber towel on top of the stick to protect the decklid I did it all by myself, so it can be done with one person even though it's really a 3 person job.
- Unless you take the glass off and really remove the headliner, the adjustment process is iterative where you move the hinges and check and then adjust again. This job would have been incredibly simple to get right in the factory with the back glass off and before the interior is added. Amazing disregard for quality that they don't bother to make sure the liftgate is correct at that stage.
- Start with getting the height correct before doing the left and right and forward and backward adjustments. The left and right height also slightly affects the forward and backward adjustment.
- In my case, there is no way to get the liftgate to fit 100% correctly m because of the poor build quality of the body and the liftgate itself. Clearly some of their robots need to be fired. But if that is the case with your car, there are compromises that can be made to make it fit well enough where no one will notice.
- While adjusting the forward and backward of the hinge, be very careful that the back glass and the pano glass do not hit each other and you end up with both broken.
- I needed to also adjust the latch striker position to fine tune the fit, which is very easy to do. Take care to check the clearance around the bottom of the liftgate and the bumper. In my case, lining up perfectly with the fenders caused interference with the bumper and body near the taillights.

No doubt it's an intimidating task for a DIY'er, which is clearly why my lazy Service Center squirmed out of standing behind their product. The job is definitely one of those that most will tell you to leave to a professional, but if you are handy and super meticulous and careful, you can do it too. I am sure if I took it to a body shop, they would insist to remove the back glass and more of the interior, and it would become a very large bill with probably more problems created than fixed.


View attachment 916229
"Tesla Model S" by cdorobek is licensed under CC BY 2.0.
Admin note: Image added for Blog Feed thumbnail
This right here is amazing advice! I started to adjust the up/down of my liftgate and it was a real pain to get the other directions, since it was still under warranty, I let the SC take care of it, and guess what, even they couldn't get it right with the hinges, they had to REPLACE my hinges! Which added like 3 more days to my service since they had to send them out for paint! LOL, It's still not a great alignment, but its much better and not hitting the tail light now.
 
  • Like
  • Helpful
Reactions: bobusn and TLLMRRJ
I was at a Mercedes dealership yesterday doing a test drive and told the sale rep there I was working with that I was considering a Tesla and he looked at me immediately and said "DO NOT buy a Tesla. I've had 2 model Ys and i've gotten rid of both of them. Two of the guys who work here have Teslas and they are both looking at getting rid of theirs." When I asked him what the problem was with his most recent Y he said that the dash just started coming off. Some sort of paneling on the dash was coming off which was the last straw after he said he spent the 6 months of ownership creating service tickets at least once a month.

I think him saying that was the last straw for me. I've test driven Teslas and have been carefully considering my options, but I just can't ignore this. I mean people who absolutely love their Tesla will admit the customer service and build quality is spotty. I usually tend to lean towards "People on the internet tend to complain more than people who are just enjoying their car and likely online thoughts tend to lean more towards negativity" but after the Mercedes sales rep told me about it I just couldn't ignore it anymore. I wasn't even at the dealership to test drive a Mercedes but a Ford Mustang Mach-E.

I'm really upset about all this because for months now I convinced myself a Tesla is what I want, but I just can't ignore anymore everything I hear and experience from people first-hand now too. I am sure people who have them like them, but I mean even here... dude buys a $100k Tesla and the service center refuses to work on it. I mean I can't imagine a single other manufacturer of a car costing over $100k to simply refuse to fix a problem. How is this okay? People are right and I see it that the desire to own a Tesla for whatever reason will get people to overlook things that maybe they shouldn't be overlooking. I have hounded forums for months and months and I see an enormous amount of posts of people who talk about what they've done to improve their Teslas... things that you'd think would have been done by the factory... things like sound-dampening, fixing creaking noises, flexible floor problems in the rear seat foot area, panel gaps being the most common complaint, and so many others i've been following.

In the back of my mind I think "The posts I am reading online and what I am hearing in-person are such a small amount of instances compared to the amount of cars that are sold by Tesla that they can't ALL have problems out of the factory." I just don't know what to think, but the internet absolutely does NOT help to garner any sort of reassurance of buying a Tesla.
I’d keep in mind that you’re taking advice from car salesmen speaking about a rival brand that’s been eating the German’s lunch over the last few years. I’d suggest they are more than a little biased. That said build quality is an area the Germans are still way ahead.

As a Model 3 LR owner with 80k miles on my car I consistently root for Tesla’s competition because I dearly want an alternative. I want to buy a car with build quality. One that prioritizes driving experience and dynamics over raw speed. On that doesn’t need the touch screen to open the glovebox. I don’t think that’s too much to ask. Unfortunately I don’t want to give up the seamless supercharger experience or efficiency or reliability (yep) I’ve experienced, and I don’t think other manufactures can match those yet. Sure my early 3’s panel gaps suck (I never bothered to adjust them) but in 80k miles I’ve changed tires, the 12V battery and topped up windshield wiper fluid. That’s it- I haven’t even done brakes, air filter, fluid or wiper blades. And I’ve saved something approaching 20k in gas costs. So yea, build quality be damned I’m looking to add a Y (though I’m also really hoping the Kia EV9 reveal tomorrow goes well).
 
  • Like
Reactions: Yelobird and bobusn
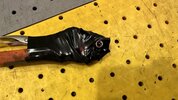
Here's a pic of the tool I used to grab the end of the hatch bolts. It's a torx socket in a vice grip with electric tape wrapped around it to prevent paint damage.

If the socket doesn't work, you can just grab the tip with the vice grips to turn the screws.
 

Attachments

  • 2023-03-05 20.32.17.jpg
    2023-03-05 20.32.17.jpg
    390.9 KB · Views: 411
  • 2023-03-05 20.32.20.jpg
    2023-03-05 20.32.20.jpg
    324.4 KB · Views: 132
  • 2023-03-05 20.33.00.jpg
    2023-03-05 20.33.00.jpg
    143.7 KB · Views: 124
  • 2023-03-05 20.33.06.jpg
    2023-03-05 20.33.06.jpg
    340.7 KB · Views: 140
My liftgate was badly misaligned from the factory in every possible direction, and my Service Center refused to fix the issue, along with most other build quality issues with my car. I am going to have to accept that this $100K car just does not come with a bumper to bumper factory warranty.

So I decided to fix the liftgate myself, as I have done with most of the build issues, and I am happy to share what I learned, which is a lot. Since most people on this forum don't seem like the type that would take on such a daunting task, I won't go to the effort to make a big DIY, but I'll share some bullet points and be happy to answer any questions that come up.

Here are key bullet points:

- The factory service manual that you can download from Tesla has not been updated completely for the refresh model, but it's still somewhat useful to review
- The hinge bolts into the liftgate control the height, the hinge bolts into the body control left/right alignment and forward and backward.
- The manual shows removing the back glass to be able to access the bolts for the hinge. The headliner near the back of the car needs to be pulled down to access those nuts.
- I was able to loosen and tighten the bolts without removing the glass by using a torx socket held by a small vice grip to grab the exposed portion of the bolts. Only a 1/2 turn is enough to loosen the bolts to adjust that part of the hinge.
- I was able to remove a minimum of the interior to be able to pull down the headliner enough to get a power ratchet to loosen and tighten those nuts. You need to remove the side seat bolsters, the side panels, and the panel around the seat belt. There are 10mm bolts holding the headliner in along with the normal push pins.
- Most important: You must remove the struts on the left and right to have any hope to adjust the hinges. Those struts put too much force on the liftgate to be able to force the hinges into place. Fine hinge adjustment becomes easy when the struts are removed.
- I used a sturdy wooden stick, cut to size, to hold up the liftgate while doing the work. I put a microfiber towel on top of the stick to protect the decklid I did it all by myself, so it can be done with one person even though it's really a 3 person job.
- Unless you take the glass off and really remove the headliner, the adjustment process is iterative where you move the hinges and check and then adjust again. This job would have been incredibly simple to get right in the factory with the back glass off and before the interior is added. Amazing disregard for quality that they don't bother to make sure the liftgate is correct at that stage.
- Start with getting the height correct before doing the left and right and forward and backward adjustments. The left and right height also slightly affects the forward and backward adjustment.
- In my case, there is no way to get the liftgate to fit 100% correctly m because of the poor build quality of the body and the liftgate itself. Clearly some of their robots need to be fired. But if that is the case with your car, there are compromises that can be made to make it fit well enough where no one will notice.
- While adjusting the forward and backward of the hinge, be very careful that the back glass and the pano glass do not hit each other and you end up with both broken.
- I needed to also adjust the latch striker position to fine tune the fit, which is very easy to do. Take care to check the clearance around the bottom of the liftgate and the bumper. In my case, lining up perfectly with the fenders caused interference with the bumper and body near the taillights.

No doubt it's an intimidating task for a DIY'er, which is clearly why my lazy Service Center squirmed out of standing behind their product. The job is definitely one of those that most will tell you to leave to a professional, but if you are handy and super meticulous and careful, you can do it too. I am sure if I took it to a body shop, they would insist to remove the back glass and more of the interior, and it would become a very large bill with probably more problems created than fixed.


View attachment 916229
"Tesla Model S" by cdorobek is licensed under CC BY 2.0.
Admin note: Image added for Blog Feed thumbnail
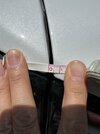
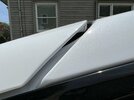
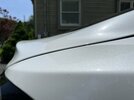
I took delivery of my new 2023 S LR last week and have the same ill fitted hinge as you. Every other panel on the car was fine except for the hatch! In my case, it is the Right side that has the much larger gap vs tight fitting Left. The right side of the hatch is also sitting about 1-1.5mm higher vs the right rear quarter panel. So it looks a little like I tried to close the hatch on an oversized suitcase that is just a hair too big.

Now I did make an appointment with my local SC to have it looked at. But am curious if I can do some minor adjustments to the exposed Torx bolts like you without taking down the headliner. First, what size Torx socket did you use? Second, am I correct in reading that the Torx socket will ONLY permit me to adjust the height of the rear hatch and NO forward/backward/L/R adjustments which would require dropping the headliner to access different bolts?

I am pretty handy and would like to at least get my hatch on the right to at least sit flush with the rear quarter panel. And if I can simply turn the Torx socket a few turns and get it down, then I am pretty satisfied but will likely need them to move the hatch back over to the right to equalize the gaps to be more even. Thank you for your incredible write up!

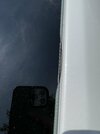
On top of that, the black adhesive that holds the rear glass to the hatch oozed out past the border of the glass and I also requested the SC to see what cane be done. I'm afraid they might have to remove and reinstall the glass. I'm worried they might case scratches in the process. It would have been invisible on a dark color car but is so noticeable on a white car. Maybe that will allow them to more easily adjust the hatch when the glass is out...
 

Attachments

  • IMG_7637.JPG
    IMG_7637.JPG
    461.2 KB · Views: 92
  • IMG_7638.JPG
    IMG_7638.JPG
    487.3 KB · Views: 88
  • IMG_7656.JPG
    IMG_7656.JPG
    370.8 KB · Views: 91
  • IMG_7646.JPG
    IMG_7646.JPG
    268.2 KB · Views: 92
  • IMG_7659.JPG
    IMG_7659.JPG
    299.3 KB · Views: 92
I took delivery of my new 2023 S LR last week and have the same ill fitted hinge as you. Every other panel on the car was fine except for the hatch! In my case, it is the Right side that has the much larger gap vs tight fitting Left. The right side of the hatch is also sitting about 1-1.5mm higher vs the right rear quarter panel. So it looks a little like I tried to close the hatch on an oversized suitcase that is just a hair too big.

Now I did make an appointment with my local SC to have it looked at. But am curious if I can do some minor adjustments to the exposed Torx bolts like you without taking down the headliner. First, what size Torx socket did you use? Second, am I correct in reading that the Torx socket will ONLY permit me to adjust the height of the rear hatch and NO forward/backward/L/R adjustments which would require dropping the headliner to access different bolts?

I am pretty handy and would like to at least get my hatch on the right to at least sit flush with the rear quarter panel. And if I can simply turn the Torx socket a few turns and get it down, then I am pretty satisfied but will likely need them to move the hatch back over to the right to equalize the gaps to be more even. Thank you for your incredible write up!

On top of that, the black adhesive that holds the rear glass to the hatch oozed out past the border of the glass and I also requested the SC to see what cane be done. I'm afraid they might have to remove and reinstall the glass. I'm worried they might case scratches in the process. It would have been invisible on a dark color car but is so noticeable on a white car. Maybe that will allow them to more easily adjust the hatch when the glass is out...

Yes, yours is badly aligned on the right, and maybe even be worse than mine was. That gape is hideous, especially on white!

Yes, you can only adjust the height of the decklid by loosening the bolts with the Torx socket. I don't remember the size of the socket, but it's very small and metric. You'll almost certainly buy them in a set, so it will be super easy for you to match up.

You definitely need an adjustment to the latch striker too, which is the easiest part. Your decklid is way too high in the back too,

You may or may not need to adjust the hinges from under the headliner, which is by far the hardest to do. You have to look at the overall fit and shape to see if you can move the right side more forward without causing other problems. I would just start with the height adjustment and see how it looks. Not all Model S's can have a perfect hatch fit, depending on how they welded the rear quarters and how well they stamped the trunk lid. Mine can only ever be a compromise in fit without major body work, but it's pretty darn good now.

The glue pressed out on the glass is unfortunate, and very sloppy manufacturing, but you may be able to carefully cutaway the excess and carve it enough to look ok. The glue is like a silicone, which cuts cleanly with a razor blade or Xacto knife.

It will be interesting to see what the SC tells you. Even with your glaring problems, my SC would tell me to pound sand.
 
Last edited:
  • Like
Reactions: dsc888
Yes, yours is badly aligned on the right, and maybe even be worse than mine was. That gape is hideous, especially on white!

Yes, you can only adjust the height of the decklid by loosening the bolts with the Torx socket. I don't remember the size of the socket, but it's very small and metric. You'll almost certainly buy them in a set, so it will be super easy for you to match up.

You definitely need an adjustment to the latch striker too, which is the easiest part. Your decklid is way too high in the back too,

You may or may not need to adjust the hinges from under the headliner, which is by far the hardest to do. You have to look at the overall fit and shape to see if you can move the right side more forward without causing other problems. I would just start with the height adjustment and see how it looks. Not all Model S's can have a perfect hatch fit, depending on how they welded the rear quarters and how well they stamped the trunk lid. Mine can only ever be a compromise in fit without major body work, but it's pretty darn good now.

The glue pressed out on the glass is unfortunate, and very sloppy manufacturing, but you may be able to carefully cutaway the excess and carve it enough to look ok. The glue is like a silicone, which cuts cleanly with a razor blade or Xacto knife.

It will be interesting to see what the SC tells you. Even with your glaring problems, my SC would tell me to pound sand.
Thank you so much for the detailed reply! I really appreciate your clear explanation and how to go about troubleshooting these issues. It just stinks that we have to put up with so much with such an expensive car. I guess we're paying for the tech and not so much the quality.

It's interesting that you mentioned the actual fit of the body having such a big factor in how the rear hatch fits. I would think that each hatch is stamped from the same mold and welded together in a jig that keeps tolerances tight. And I wonder how it is that the body of the car can have so much variation to begin with. I always thought car bodies were built to tolerance of maybe a millimeter or so.

It's good to know that the back glass adhesive and be cut out carefully. I just don't want to get into the paint if I use a knife. I will wait to see what the SC says before I proceed with any repairs. I'm guessing that they may need to send my car off to a bodyshop to take things apart to realign the hatch back to acceptable specs. I just hate to be without my car and do worry that they will introduce other issues.
 
  • Like
Reactions: TLLMRRJ
And what is this on your new car? It looks like a paint touch up.

View attachment 947559
Oh, that's actually just dirt. I was able to remove it with some water after afterwards. The paint on my car was immaculate on the day of delivery which is not what I could say vs my 2021 Model 3. I shined a flashlight to look for polishing swirls and dust nubs under the paint and found none! But in return I got a misaligned hatch...

Also, I have one further question. I actually ordered the Torx socket as you had suggested to do the liftgate height adjustment. Do you simply rotate the bolts in the correct direction either lifting or lowering it and then stopping once you get to a satisfactory height? And do you have to disconnect the air struts for the height adjustment? I would think perhaps not based on it being just a height adjustment. It appears that all I need to do is to lower the raised right side latch working on just those two bolts.

And finally, how do you access the striker? Do you pop off the metal scuff guard with the spring loaded trap door? Thanks so much again!

You will absolutely need to remove the struts from each side to make any adjustments to the hinges. Don't be fooled into thinking you can do the job without removing the struts. The decklid is heavy, so have a stick to hold it up or a second person while you move around the hinge after it's loosened.

The bolts themselves do not control up and down of the decklid. The bolts simply hold the hinge against the decklid, so you will loosen the bolts just enough so the hinge can slide up and down for the adjustment. It is trial and error. It's surprisingly little that you have to unscrew the bolts to get the hinge to slide on the hatch and surprisingly little torque applied to the bolts to hold the hinge in place.

I recommend removing the striker before starting the hinge adjustment so you can easily open and close the decklid without worrying about it latching shut. Put tape around the perimeter to mark its location before removing so you have a reference position to put it back. I didn't remove the striker myself, which made the job harder, so make sure the nuts on the back of it are captive before completely removing the striker bolts. You don't want to create more work searching for the nuts if they aren't captive.

Yes, the panel covering the striker just pops up and forward to be removed. The panel is very easy to remove.

I also recommend having a vice grip wrench to grab the bolt ends if the torx strips the splines. The splines are pretty soft metal, so Tesla did not use the best quality bolts on the hatch. One of my 4 stripped. It's just not a big deal if the splines strip and you have to grab and turn them with a wrench by the tip (not the threads).
 
Last edited:
  • Like
Reactions: dsc888
You will absolutely need to remove the struts from each end to make any adjustments to the hinges. Don't be fooled into thinking you can do the job without removing the struts. The decklid is heavy, so have a stick to hold it up or a second person while you move around the hinge after it's loosened.

The bolts themselves do not control up and down of the decklid. The bolts simply hold the hinge against the decklid, so you will loosen the bolts just enough so the hinge can slide up and down for the adjustment. It is trial and error. It's surprisingly little that you have to unscrew the bolts to get the hinge to slide on the hatch and surprisingly little torque applied to the bolts to hold the hinge in place.

I recommend removing the striker before starting the hinge adjustment so you can easily open and close the decklid without worrying about it latching shut. Put tape around the perimeter to mark its location before removing so you have a reference position to put it back. I didn't remove the striker myself, which made the job harder, so make sure the nuts on the back of it are captive before completely removing the striker bolts. You don't want to create more work searching for the nuts if they aren't captive.

Yes, the panel covering the striker just pops up and forward to be removed. The panel is very easy to remove.

I also recommend having a vice grip wrench to grab the bold ends if the torx strips the splines. The splines are pretty soft metal, so Tesla did not use the best quality bolts on the hatch. One of my 4 stripped. It's just not a big deal if the splines strip and you have to grab and turn them with a wrench by the tip (not the threads).
Thank you so much, again! Your advice is incredibly helpful. I will take my time and do everything correctly so that I don't get myself into a situation that I will regret. I wouldn't have even attempted this had I not read your post and I am usually pretty handy around cars and basic vehicle repair.

As an aside, I signed up for the repair manuals online for free from Tesla as you had suggested in one of your comments. They do seem to help although I wish the pictures were a little bit clearer. It's nice that they at least publish them for free. I remember paying $90 for the one that Acura published for my 2004 TL. But that was money well spent having save me hundreds of dollars by doing the repair work myself.
 
  • Like
Reactions: TLLMRRJ
You will absolutely need to remove the struts from each side to make any adjustments to the hinges. Don't be fooled into thinking you can do the job without removing the struts. The decklid is heavy, so have a stick to hold it up or a second person while you move around the hinge after it's loosened.

The bolts themselves do not control up and down of the decklid. The bolts simply hold the hinge against the decklid, so you will loosen the bolts just enough so the hinge can slide up and down for the adjustment. It is trial and error. It's surprisingly little that you have to unscrew the bolts to get the hinge to slide on the hatch and surprisingly little torque applied to the bolts to hold the hinge in place.

I recommend removing the striker before starting the hinge adjustment so you can easily open and close the decklid without worrying about it latching shut. Put tape around the perimeter to mark its location before removing so you have a reference position to put it back. I didn't remove the striker myself, which made the job harder, so make sure the nuts on the back of it are captive before completely removing the striker bolts. You don't want to create more work searching for the nuts if they aren't captive.

Yes, the panel covering the striker just pops up and forward to be removed. The panel is very easy to remove.

I also recommend having a vice grip wrench to grab the bolt ends if the torx strips the splines. The splines are pretty soft metal, so Tesla did not use the best quality bolts on the hatch. One of my 4 stripped. It's just not a big deal if the splines strip and you have to grab and turn them with a wrench by the tip (not the threads).
Thank you again for all the advice. In adjusting the hinge against the decklid for height fixes, I understand your solid guidance to only loosen the bolts a half-turn. My question is: you noted that the hinge slides up and down for the height adjustment - can you please clarify how that happens? Does the hinge effectively slide laterally along the underside of the decklid in a sort of sloped fashion such that a slight movement along the slope upward (toward the front of the car) or downward (toward the back of the car) translates to a raising or lowering of the decklid itself? I apologize that I am confused regarding how the hinge can be moved up or down after the bolt is loosened, because once the bolt is tightened again, my limited understanding would suggest that the hinge would just sit tight and flush against the decklid again. Thanks in advance!
 
First, make sure the struts are disconnected, or you won't be making any adjustments to those hinges.

Once the struts are removed, prop up the deck lid (or have someone hold it up, mark the current location of the hinges with a marker, loosen the bolts a half turn or so, and use your hands with your fingers on the decklid and the hinge to make a slight adjustment in the correct direction, then retighten the hinge, and put the decklid back down to check alignment. Reiterate the process until you get the adjust right.