MikeChicago
Member
There is always an unlimited supply of USA Grade A+ Hypocrisy
You mean Grade A + Organic hypocrisy. Not the non-organic, half-baked, wanna-be-hypocrisy those pesky Brits are cranking out

Agh... I did it again.


You can install our site as a web app on your iOS device by utilizing the Add to Home Screen feature in Safari. Please see this thread for more details on this.
Note: This feature may not be available in some browsers.
There is always an unlimited supply of USA Grade A+ Hypocrisy
I would guess they probably do, Hepa filters filter much smaller particles so logic says as dirt and grime gets in they will clog up quicker and restrict airflow, hence the prefilter, the trim top for the intake and the bonnet seal to reduce the crud getting in there, annual change as they are pretty cheap anyway.I thought the consensus was HEPA ones reduced the airflow?
My filter change a few weeks ago was the first change since the car was new, Its a March 2020 - but only covered just under 10K miles, I wasn't having any odour issues and was simply because i ordered the bonnet seal, the air intake grille with a pre- filter and decided to just do the entire air intake system.Are people changing filters because it’s recommended or because they were causing odours in the car? I had mine changed after 2 years but they weren’t causing a smell… another 2+ years have passed and no problems so I was thinking of leaving them meantime.
So even though I don't have this problem it interests me.The smells are reported to be from the filters getting damp, the air intake is completely open, just inside the bulkhead is the fan, those who have their fans on high and travel through very wet weather or those that swill their car down with a bucket of water or wash the car using lots of water - It runs down the screen on to the plastic that covers the air intake - the high suction of the fan pulls water droplets in and throws the water onto the filters. There is a video on youtube where a model 3 owner mounted a camera inside the air intake and filmed the water being drawn in.
If the fan is turned off then a louver closes and seals of the air intake, During normal rain being swiped down the screen by the wipers with the fan on low or medium no water gets drawn in.
This was the reason i fitted the prefilter, the air box cover and the weatherstrip across the underside of the bonnet.
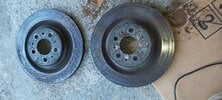
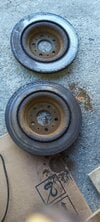
Those discs aren't worth saving IMO but I'd be interested to see how they look after skimming and how much they have to take off.Another maintainence tip.
I think I've found the reason for my rear brakes/discs not working properly and ending up rusting.
I took off the caliper and hangers today to have the discs skimmed on Saturday.
I was watching a YouTube video a couple of days ago in preparation (I wasn't signed in and can't find it again, sorry) I noticed the presenter paid specific attention to the small spring clips either end of the brake pads.
Having the carrier off and being able to analyze how they interacted with the pads made me realise that although I had been greasing the pad lugs, there was another bit which needed greasing which was restricting the movement of the pads.
I've pictured one of the small clips which fit at the ends of the pads.
The end nearest has a rectangular box section which fits on to the brake carrier.
The pad lugs slide along these and are held off the disc by a small spring arm you can see sticking up from the left.
What I discovered from the video was that it is essential that when reassembled that the pads can slide freely and get pushed back from the disc by the small spring. Mine weren't. They were sticky and not moving, this despite me cleaning and regreasing them.
The answer to the problem lies in the small spring with the 2 round holes on the far side of the clip in the photo.
The pads slide on this point of contact and it's just beyond the area I had been greasing on the pad lugs. This small contact point was providing enough resistance, even when greased, to stop the pads moving freely. The answer was to bend the spring in situ, very slightly, no need for a lot of pressure, so that it wasn't restricting the pads from moving, allowing them to move with only the pressure from the spring arm.
Of course I won't be able to prove this for about 6 months until I see how clean, or not, my rear discs stay but I think this just might be the answer.
Make it loose and the pads may rattle. The pads will be forced back by naturally by the slight runout of the rotor, and forced onto the disc but the piston which easily has enough force to overcome that slight friction.What I discovered from the video was that it is essential that when reassembled that the pads can slide freely and get pushed back from the disc by the small spring. Mine weren't. They were sticky and not moving, this despite me cleaning and regreasing them.
The answer to the problem lies in the small spring with the 2 round holes on the far side of the clip in the photo.
The pads slide on this point of contact and it's just beyond the area I had been greasing on the pad lugs. This small contact point was providing enough resistance, even when greased, to stop the pads moving freely.
Theyre not loose, just not stuck. As the guy explained in the video when they're properly lubricated they should be able to move back from the disc just by the power of the spring arm. With the caliper removed, he said you should be able to squeeze the pads onto the disc, let go and they should retract about 2mm.Make it loose and the pads may rattle. The pads will be forced back by naturally by the slight runout of the rotor, and forced onto the disc but the piston which easily has enough force to overcome that slight friction.
I imagine if that's the case it would get dirty and stop retracting very quickly. Typically disc brake pads don't self retract (the piston may slightly which allows the pads to move back with rotor runout) - 99% of all vehicle's brakes work this way. Your rotors certainly don't look the way they do because the pads aren't retracting and are constantly rubbing against them - it is lack of contact that has allowed them to corrode.Theyre not loose, just not stuck. As the guy explained in the video when they're properly lubricated they should be able to move back from the disc just by the power of the spring arm. With the caliper removed, he said you should be able to squeeze the pads onto the disc, let go and they should retract about 2mm.
Yes I agree about the lack of contact.. but my pads were contacting the disc and not retracting properly hence the limited points of contact to the disc as proved by the witness marks on the disc. I'm presuming that irregular contact got exacerbated and led to the rust forming and not being removed. Well see what happens in 6 months or so, but hopefully that has solved the partial.contact on the discs.I imagine if that's the case it would get dirty and stop retracting very quickly. Typically disc brake pads don't self retract (the piston may slightly which allows the pads to move back with rotor runout) - 99% of all vehicle's brakes work this way. Your rotors certainly don't look the way they do because the pads aren't retracting and are constantly rubbing against them - it is lack of contact that has allowed them to corrode.
It's really not the springs that caused your problem. If the discs weren't being swept fully as you say by seeing witness marks, it's because they weren't bedded properly in the first place. I've seen this countless times.Yes I agree about the lack of contact.. but my pads were contacting the disc and not retracting properly hence the limited points of contact to the disc as proved by the witness marks on the disc. I'm presuming that irregular contact got exacerbated and led to the rust forming and not being removed. Well see what happens in 6 months or so, but hopefully that has solved the partial.contact on the discs.
Yep, New pads in tomorrow evening if it doesn't get too cold.. already -4 here at 2330 tonight.It's really not the springs that caused your problem. If the discs weren't being swept fully as you say by seeing witness marks, it's because they weren't bedded properly in the first place. I've seen this countless times.
I'd like to see the state of the pads from face on and side on and I hope you're putting new pads in after the discs are skimmed?