Despite this being my 3rd Model S, my family still found they sometimes had to open and re-close the doors if they didn’t close them just right. I’ve also had passengers who have never ridden an S and it was embarrassing that such a high end car needed a reopen-and-close action! The nail in the coffin for me was this summer a guest kept closing the door so gently it didn’t latch and she said she’s used to her Bently’s soft closing doors! Egads, I could not let that stand, which led me to finding this kit (I recall looking for a solution with my first S about this 5 years ago).
I did think I was nuts doing this to my 1 week old car, but it solves one of the biggest annoyances I’ve had with these cars since my first S.
I completed my installation yesterday and it works very well. I’ll try and post some videos when it stops raining here but i’m very happy with the end result - the doors finally seem appropriately high end and they close without effort. I’m now just feather closing them as I leave the car each day and it’s so satisfying!
Some issues I ran into, and some installation notes: (my car is a late August 2019 build long range S).
Front doors:
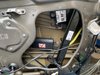
- my build didn’t have that bracket inside the front door to screw the new actuator bracket to (this was pictured on another post in this thread). I hope the adhesive works well enough. Pictured below is the first door I did (passenger front). There is a reinforcing brace and there is space between it and the exterior door metal, so on the driver door, I did zip tie around the new actuator bracket as some additional hold. I’ll likely go back and do this on the passenger front door.
- in removing the door trim panel, there’s a tiny yellow/black cable that I didn’t know how to detach on my first attempt so I worked around it after wasting far too long trying to figure out how to release it. It turns out you just pull very firmly on the connector (hold each black end) and it detaches — this happened by accident when I walked away and my trim panel slipped down and yanked itself free.
- after installing my drivers door actuator, it closed well but was quite sticky on trying to open the door (I had to yank really hard). To fix this, I loosened then moved down by 1 mm or so the latch in the door jamb (the metal U that the front door latches to). Door opens perfectly and is still properly aligned when I look at the exterior chrome trim.
- when the new latching mechanism is installed and tightened you’ll notice it pushes out one blue clip that holds the weather seal. I removed that tiny clip and the rubber sits flush again but it is missing this attachment. I’m not worried about it.
Rear doors:
- One of the rear door closers didn’t work properly: while it would pull the door closed, it didn’t detect the pull on the rear door handle - I spoke via email and text with the guys at TelsaOffer and they immediately shipped out a replacement (again arrived in 4 days!) and the new one works perfectly. I know I paid a premium from them than some AliExpress vendors but the support and quick shipping made me feel better about it.
- I found the rear installation
much harder to do than the front one: the trim panels are tight and it’s harder to push the actuator unit into the body cavity through that tiny hole - especially on the driver’s side —in my car that side had a metal ledge inside that the passenger side didn’t, but after a bit of work, it got in there and mounted well enough with the adhesive to not rattle around.
- when the new actuator is in place, the cable exiting from it does protrude ever so lightly from the body hole such that it’s hard to put the Tesla factory black cap back on to cover the hole. It does go on but I used some of the enclosed tape to ensure it doesn’t pop off.
- I was loathe to cut the insulating foam sheet in the back like the guy did in the tutorial video but trust me - you really should cut it - I did in the end and it was much easier. If you don’t, you’re working with much less slack due to the manual door opening cable and it makes it much harder to reattach it to the new mechanism. The tiny screws would be easily lost if you struggle to put them in and they would likely fall into some irretrievable crevice in the exposed innards.
- Double check the emergency release mechanism works for the rear actuator after installing the cable onto the new unit. This is critical for safety in case of emergency. Reminder that the emergency door release for the rear passengers is under the seats where your heel would be. Once you attach the cable to the actuator, reach down and pull the cable to ensure it works properly before installing it in the door jamb.
- before installing the actuators, be sure the black plastic latching claw sits as far back as possible when in the open position. You’ll notice the foam wrapped actuator cable has a bit of play - if it’s not fully seated (there’s a collar at the actuator that can lock it down), that little claw doesn’t fully retract. If it’s not fully retracted, when you try closing the door, it bangs against that claw and won’t close at all. It’s a very easy fix to tighten the collar (mine may have loosened when I was examining the unit or when I was rotating it around to try to jam into the rear passenger hole).
General note:
- my bolt that held the front door latch stripped when I was trying to take out the factory lock mechanism - that factory thread-lock is really tight and the metal is soft.
Does anyone know where to get replacement bolts or what their spec is? I guess I could ask at Tesla service but I’m reluctant to raise their eyebrows for this clearly non-warranty thing! After I live with my installation I’m applying some blue thread lock in mine to avoid loosening over time, but that stuff does release easier than whatever Tesla uses.
I’ve already seen the actuators do their jobs as people get in and out of the car. Definitely one of my more satisfying mods and I encourage others to get it!