


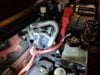
I decided to dive right in after only 3 days of ownership and install a blackvue on the model 3. Unlike other posts, I wired the magic power pro directly to the 12v battery for constant power. The whole process was fairly easy considering it was the first time I've ever seen inside a Model 3.
Be warned: there is a fair amount of teardown required to gain access to the 12V battery. However, if you are at all mechanically inclined, you should have no problem doing your own install. Most everything that needs to be removed is the frunk and a panel in the cabin in the passenger footwell area.
It sounds like the biggest fear people have is working with the 12v and the final run of cables for the rear dashcam due to the side-curtain airbags.
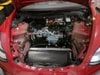
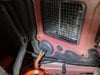
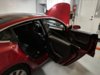
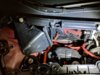
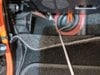
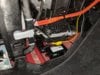
Tesla made gaining access from the frunk area to the cabin pretty easy. As others have posted, there is a rubber "bung" plug in the footwell of the passenger seat. All you need to do is fold back a small portion of the carpet and you will see what I am talking about. The plug can be pulled into the cabin area very easily and pushed back towards the frunk to re-seal the port. On the inside of the frunk there is an air intake vent that is located on the left side of the frunk. This blocks the path to the bung were you the two power lines enter the cabin. You will need to remove the air vent first to gain access to this. The vent is comprised of two parts. the top execution and lower part. The lower part is connected by 4 plastic nuts and boy, are they easy to lose. Be careful unscrewing these as they are prone to falling into the mechanical area of the car and require a snake to retrieve them (I found this out the hard way). Once the vent is out of the way you can pull your cable to the 12V battery and on the other end through the bung and into the cabin (I poked a small hole in the bung to allow my dashcam cable through). Now, on the inside of the cabin there is a pretty spacious area under the center console were I put the power magic pro. I had one laying around that was bundled with a previous Dashcam that I never used. This made it easy and so that I didn't have to cut the cigarette plug off the Blackvue power cable. Instead I just plugged right in to the power magic pro. Boom! Done. The cigarette plug on the Blackvue has a fuse inside it and that plugs into a female cigarette plug adapter on the power magic pro. I then ran the power to the camera around the passenger footwell behind the carpet and up the right passenger door trim up to the headliner and over to the center of the rearview mirror. All you have to do is stuff some cable in the headliner. No prying off trim necessary.
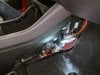
Now onto the rear camera cabling. I ran this in reverse from the dashcam (now mounted on the windshield glass) to the rear window. I went along the headliner to the passenger A pillar. You do not need to remove the trim to do this. Simply pull back the rubber seal and stuff the cable. I jumped the gap by the seat belt and then removed the trim piece in the rear passenger A pillar. This is where you want to move slowly as the curtain airbag is located right there. There are 4 plastic clips that secure the trim to cover the airbag and 2 bungie cables to keep the trim dangling in the event of the airbag deploying. DO NOT rip this trim piece off entirely. I let if hang as I ran the cable behind the housing. FYI, this also happens to be the location of the AM/FM Radio receiver. At this point you're pretty much done. Choose your rear camera mounting height (I think I choose 4 defroster lines from the bottom).
That's pretty much the entire install process!
I believe Tesla made a bunch of improvements in the model 3 that make for a much easier installation once you know where all the challenges are. Even the trim tabs and buttons are easier to remove than my Model S as the location of the tabs and trim seems to be simpler and more thoughtful. The total installation took about 3 hours, but I went slow so I didn't break any clips or scratch any trim. Now that I've done it before it would probably take roughly 1.5 hours.
P.S. I will add more photos of the finished process in a few days as Tesla has the car in for service.
Be warned: there is a fair amount of teardown required to gain access to the 12V battery. However, if you are at all mechanically inclined, you should have no problem doing your own install. Most everything that needs to be removed is the frunk and a panel in the cabin in the passenger footwell area.
It sounds like the biggest fear people have is working with the 12v and the final run of cables for the rear dashcam due to the side-curtain airbags.
Tesla made gaining access from the frunk area to the cabin pretty easy. As others have posted, there is a rubber "bung" plug in the footwell of the passenger seat. All you need to do is fold back a small portion of the carpet and you will see what I am talking about. The plug can be pulled into the cabin area very easily and pushed back towards the frunk to re-seal the port. On the inside of the frunk there is an air intake vent that is located on the left side of the frunk. This blocks the path to the bung were you the two power lines enter the cabin. You will need to remove the air vent first to gain access to this. The vent is comprised of two parts. the top execution and lower part. The lower part is connected by 4 plastic nuts and boy, are they easy to lose. Be careful unscrewing these as they are prone to falling into the mechanical area of the car and require a snake to retrieve them (I found this out the hard way). Once the vent is out of the way you can pull your cable to the 12V battery and on the other end through the bung and into the cabin (I poked a small hole in the bung to allow my dashcam cable through). Now, on the inside of the cabin there is a pretty spacious area under the center console were I put the power magic pro. I had one laying around that was bundled with a previous Dashcam that I never used. This made it easy and so that I didn't have to cut the cigarette plug off the Blackvue power cable. Instead I just plugged right in to the power magic pro. Boom! Done. The cigarette plug on the Blackvue has a fuse inside it and that plugs into a female cigarette plug adapter on the power magic pro. I then ran the power to the camera around the passenger footwell behind the carpet and up the right passenger door trim up to the headliner and over to the center of the rearview mirror. All you have to do is stuff some cable in the headliner. No prying off trim necessary.
Now onto the rear camera cabling. I ran this in reverse from the dashcam (now mounted on the windshield glass) to the rear window. I went along the headliner to the passenger A pillar. You do not need to remove the trim to do this. Simply pull back the rubber seal and stuff the cable. I jumped the gap by the seat belt and then removed the trim piece in the rear passenger A pillar. This is where you want to move slowly as the curtain airbag is located right there. There are 4 plastic clips that secure the trim to cover the airbag and 2 bungie cables to keep the trim dangling in the event of the airbag deploying. DO NOT rip this trim piece off entirely. I let if hang as I ran the cable behind the housing. FYI, this also happens to be the location of the AM/FM Radio receiver. At this point you're pretty much done. Choose your rear camera mounting height (I think I choose 4 defroster lines from the bottom).
That's pretty much the entire install process!
I believe Tesla made a bunch of improvements in the model 3 that make for a much easier installation once you know where all the challenges are. Even the trim tabs and buttons are easier to remove than my Model S as the location of the tabs and trim seems to be simpler and more thoughtful. The total installation took about 3 hours, but I went slow so I didn't break any clips or scratch any trim. Now that I've done it before it would probably take roughly 1.5 hours.
P.S. I will add more photos of the finished process in a few days as Tesla has the car in for service.
Attachments
-
 IMG_20180127_194510.jpg446.1 KB · Views: 723
 -
 IMG_20180127_193242.jpg402.5 KB · Views: 616
 -
 IMG_20180127_193540.jpg506.4 KB · Views: 611
 -
 IMG_20180127_193546.jpg452.5 KB · Views: 604
 -
 IMG_20180127_221113.jpg377.3 KB · Views: 598
 -
 IMG_20180127_193019.jpg460.9 KB · Views: 582
 -
 IMG_20180127_204322.jpg600.2 KB · Views: 603
 -
 IMG_20180127_212421.jpg689.2 KB · Views: 585
 -
 IMG_20180127_214735.jpg639.3 KB · Views: 606
 -
 IMG_20180127_220348.jpg532.5 KB · Views: 603
Last edited:
