


Welcome to Tesla Motors Club
Discuss Tesla's Model S, Model 3, Model X, Model Y, Cybertruck, Roadster and More.
Register
Install the app
How to install the app on iOS
You can install our site as a web app on your iOS device by utilizing the Add to Home Screen feature in Safari. Please see this thread for more details on this.
Note: This feature may not be available in some browsers.
-
Want to remove ads? Register an account and login to see fewer ads, and become a Supporting Member to remove almost all ads.
You are using an out of date browser. It may not display this or other websites correctly.
You should upgrade or use an alternative browser.
You should upgrade or use an alternative browser.
The elusive thin-walled 13mm socket
- Thread starter tlr1000
- Start date
Occhis
Member
Just ran across this post. Looking at your site, I didn’t see any mention that the 13mm socket is included with the purchase of coil over set. Is this still the case?Unobtanium 13mm unicorn sockets are included for free with our suspension kits, or $35 + $4 shipping in the US for everyone else. Free pickup in Fremont CA (across the street from the Tesla factory). This will save you, or your install shop, way more than the cost of the socket to get the front suspension out without removing the upper carrier.
We didn't make the sockets to make money,we made it to help our customers and the Tesla community get the front knocked out quickly and easily. Enjoy everyone! No one's getting rich off a thin wall 13mm socket.
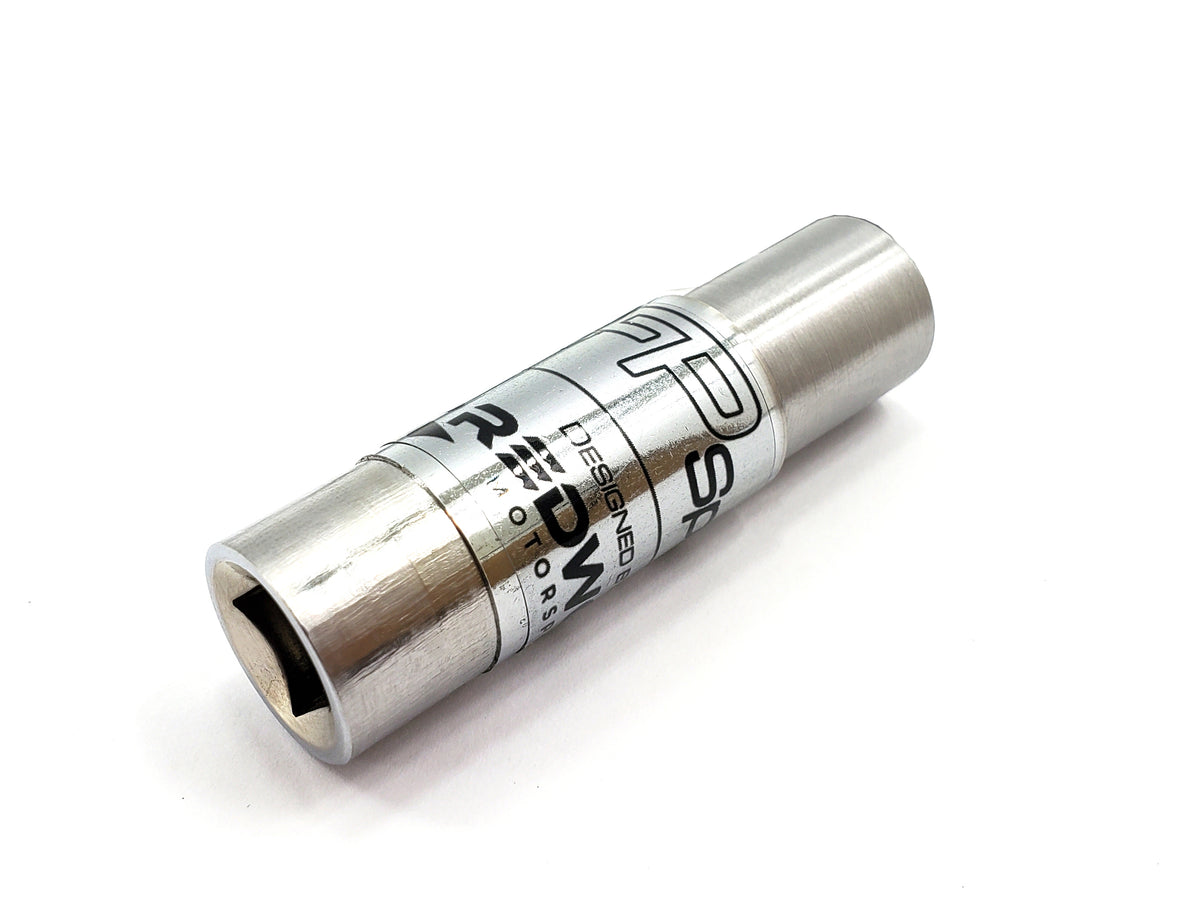
13mm Unobtanium Unicorn Thin-Wall-Socket
A special tool designed by RedwoodMotorsports to help you remove your suspension's top hat bolt.redwoodmotorsports.com
Are the Grand touring coil overs for Model 3 AWD presently in stock?
Gauss Guzzler
Safety Score = 42
Honestly I don't see anything wrong with this method. Once the shock is out you can chase the hole with a step drill to make it nice and round with a clean chamfered edge then spray some primer on a Q-tip and dab it on the raw edge to seal it up. It's all just primered anyway and then at least you wouldn't need an alignment if you had to take the shocks back out for any reason.Just grind the hole bigger, problem solved.
Speaking of alignments, are standard shops using those 4 large bolts to try to adjust camber/caster or is that more of a "custom" parameter that makes their whities wedge up?

If you want them to do it you'll have to request it and let them know where to find them. Normally the frunk trim wouldn't be removed for an alignment.Speaking of alignments, are standard shops using those 4 large bolts to try to adjust camber/caster or is that more of a "custom" parameter that makes their whities wedge up?
gearchruncher
Well-Known Member
at least you wouldn't need an alignment if you had to take the shocks back out for any reason.
Speaking of alignments, are standard shops using those 4 large bolts to try to adjust camber/caster or is that more of a "custom" parameter that makes their whities wedge up?
If you use the top plates to adjust caster/camber at all, you won't be able to get to those bolts unless you drill out the holes a lot, as they shift pretty far out of alignment. If you leave them centered, then it's pretty easy to visually re-center them even if you take the top carriers out and put them back.
TacoSteve
Closed
I'm just amazed that nobody has a grinder. All I did was grind down a cheap socket by sticking it in a drill and using a grinding wheel. Its like a makeshift lathe. I think it took 10 minutes to grind it down.I just made my own by turning down a normal socket on the lathe.
gearchruncher
Well-Known Member
I'm with @techlogik - What is the theoretical advantage of taking out these hard to get to nuts? I just took the whole carrier out when I did my coilovers and FUCAs. Is it that much easier the other way? Taking out the carrier was pretty darn easy.
TacoSteve
Closed
If the intention was to change camber settings yes, but in my case I needed to change the spring out and did not want to mess with the camber. And id argue that this is a preference, I really don't think it is faster either way. Just depends on the the job goals.Pros just remove the entire upper control carriage with the 4 bolts and take it all out. Waste of time just doing the thin wall. Plus you can mark or tweak the camber while at it.
TacoSteve
Closed
Once you have a grinded down socket, they are no longer hard to get to and if you didn't want to mess with alignment you wouldn't want to remove the whole carrier.I'm with @techlogik - What is the theoretical advantage of taking out these hard to get to nuts? I just took the whole carrier out when I did my coilovers and FUCAs. Is it that much easier the other way? Taking out the carrier was pretty darn easy.
gearchruncher
Well-Known Member
Only if your camber/caster hasn't been adjusted.Once you have a grinded down socket, they are no longer hard to get to
The irony here is that if you use the upper carrier to adjust camber/caster as designed, you can't use the thin walled socket at all.
If you don't adjust camber/caster, you can use the socket, but then you don't need it because getting back to the right setting is trivial because it's just centering the bolts visually (or with a socket!)
TacoSteve
Closed
My situation probably isn't the norm anyway. I adjust camber/caster through an adjustable upper control arm. No reason for me to adjust the carrier. I probably should have mentioned that.Only if your camber/caster hasn't been adjusted.
The irony here is that if you use the upper carrier to adjust camber/caster as designed, you can't use the thin walled socket at all.
If you don't adjust camber/caster, you can use the socket, but then you don't need it because getting back to the right setting is trivial because it's just centering the bolts visually (or with a socket!)
Ken87
New Member
What is the hesitancy to just remove it the first time and drill the holes out slightly for the next time? I'm having coilovers put in this weekend with a few other parts, so will just remove the entire upper control carriage, but while it is out, I was thinking of just drilling the holes out for ease.
DOOLMTR
Member
gearchruncher
Well-Known Member
I still wonder if I undertstand-way faster but man, F those 4 bolts!
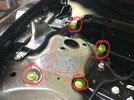
Are we talking about the four bolts that hold the FUCA mount to the uinbody? The 13/15mm that are easy to get to right from the frunk?
Occhis
Member
DOOLMTR
Member
Yup those ones. I had my car lifted up a good amount and had a hard time holding the whole assembly up with one hand from the top to get the bolts started.I still wonder if I undertstand-
Are we talking about the four bolts that hold the FUCA mount to the uinbody? The 13/15mm that are easy to get to right from the frunk?
Occhis
Member
When my coilovers arrive I plan to leave the FUCA in place and just remove the three 13mm nuts. I was wondering how difficult it is to start the nuts back onto the studs through those small holes during installation. Is this an issue, or is there a tip that would help make it easier?
TacoSteve
Closed
You'll just want to hold the Coilovers about 1/4" down from the fully seated position. Otherwise you might wedge the nuts into the frame, making it impossible to thread them onto the Tophat studs. You'll know right away what I am talking about as soon as you try to reinstall the new coilovers, its pretty self explanatory. I put the bolt through the lower mount first so that I can hold the position with my knee against the wheel hub.When my coilovers arrive I plan to leave the FUCA in place and just remove the three 13mm nuts. I was wondering how difficult it is to start the nuts back onto the studs through those small holes during installation. Is this an issue, or is there a tip that would help make it easier?
Alphonse
Member
Use a jack to lift the assembly into place - using body parts for this job gets unpleasant really quickly.When my coilovers arrive I plan to leave the FUCA in place and just remove the three 13mm nuts. I was wondering how difficult it is to start the nuts back onto the studs through those small holes during installation. Is this an issue, or is there a tip that would help make it easier?
Similar threads
- Replies
- 17
- Views
- 5K
- Replies
- 0
- Views
- 939
- Replies
- 3
- Views
- 2K
- Replies
- 14
- Views
- 6K
- Replies
- 19
- Views
- 1K