


Welcome to Tesla Motors Club
Discuss Tesla's Model S, Model 3, Model X, Model Y, Cybertruck, Roadster and More.
Register
Install the app
How to install the app on iOS
You can install our site as a web app on your iOS device by utilizing the Add to Home Screen feature in Safari. Please see this thread for more details on this.
Note: This feature may not be available in some browsers.
-
Want to remove ads? Register an account and login to see fewer ads, and become a Supporting Member to remove almost all ads.
You are using an out of date browser. It may not display this or other websites correctly.
You should upgrade or use an alternative browser.
You should upgrade or use an alternative browser.
I noticed that they sell a pretty pricey cover for the hole in the undertray - is that included in the hitch receiver product?
Nope, I bought it separately.
JCLeonard
Member
I noticed that they sell a pretty pricey cover for the hole in the undertray - is that included in the hitch receiver product?
Seems like a pretty simple piece. I imagine someone fashion an adequate cover in a couple beer inspired evenings. We'll give it a go when the car and hitch arrive.
Stellavator
Member
I too really want a hitch for bike carrying. This would be perfect.
Any pictures of the process from someone who has done this? I would really like to see more detail on how the hole is cut. Is this really DIY, and what's the potential to screw up that cut? What equipment is necessary? The instal all looks pretty simple except for that.
Anyone know what kind of shop to call to see about professional install?
israndy
Supercharger Hunter
I just completed the install, but there were some issues:
1) There is no Tools list, so I didn't have all the items I needed to start
2) The procedure reveals issues with the Model 3 itself
3) There are issues with the Install, parts are not as TorkLift said
4) The install is back together but I am unable to attach the hitch to the car (kind of important)
The Tools list I used is:
Plastic trim removal tool, 8mm socket, 10mm socket, 15mm deep socket, torque wrench, T25 driver, large wrench or pliers, drill with pilot bit and 4" hole saw, a tube of caulk
All of the paper instructions are NOT clear, even with photos, the videos online are not clear, they use the same photos. Where is that screw? What kind of driver do I need? Fortunately, I have a big toolbox. How do I remove a Trunk Rest? A Middle Plastic Cover? It wasn't clear that the plastic pan stays attached to the bumper facia even after many re-readings of the directions, so it surprised us when it came too. Oh, I'll need a deep socket for the crash bar removal, off to the hardware store.
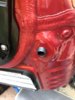
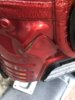
As I took the car apart I found the Tesla was missing a bolt on the bottom pan of the car. Under the bumper facia the rear air vents were water stained, is this normal? One side above those vents had a rubber grommet, the other side just a piece of metal tape that had been painted with the car, is this normal? When I took the Crash Bar Supports off, water poured out of one of them. They both had rust under them, not four weeks since we took delivery. The supports are unpainted and supposedly epoxied, but they got leaked into. When they were replaced by the tow hitch I sanded and covered the surface, hopefully, no more rust. I also caulked the area at top of the tow hitch side plates to keep it dry.
The factory flange nuts did NOT fit on the 6 bolts protruding from the hitch. I took the old nuts to the hardware store and found they were Metric 10 x 1.5 nuts. The bolts were the right size, but the thread was more fine than the original bolts. I found some 10 x 1.25 flange nuts and they were the correct ones.
Mistakes I made:
Made one, not two holes in the underside plastic and thought I was done, yet to be fixed. Didn't slide the plastic bottom pan under the bottom felt piece as the first step of putting the bumper facia back. It wasn't impossible later. Also dropped one torx screw when putting it back in the wheel well, it's somewhere in the belly pan. One of the pop pins shot across the driveway during removal. It'll show up. I fear I didn't plug in the sensors when I reinstalled the facia. That's trouble.
Now I need a bike rack and some help wiring in trailer lights. Cannot believe what tiny gauge the taillight wires are on the Model 3
-Randy
1) There is no Tools list, so I didn't have all the items I needed to start
2) The procedure reveals issues with the Model 3 itself
3) There are issues with the Install, parts are not as TorkLift said
4) The install is back together but I am unable to attach the hitch to the car (kind of important)
The Tools list I used is:
Plastic trim removal tool, 8mm socket, 10mm socket, 15mm deep socket, torque wrench, T25 driver, large wrench or pliers, drill with pilot bit and 4" hole saw, a tube of caulk
All of the paper instructions are NOT clear, even with photos, the videos online are not clear, they use the same photos. Where is that screw? What kind of driver do I need? Fortunately, I have a big toolbox. How do I remove a Trunk Rest? A Middle Plastic Cover? It wasn't clear that the plastic pan stays attached to the bumper facia even after many re-readings of the directions, so it surprised us when it came too. Oh, I'll need a deep socket for the crash bar removal, off to the hardware store.
As I took the car apart I found the Tesla was missing a bolt on the bottom pan of the car. Under the bumper facia the rear air vents were water stained, is this normal? One side above those vents had a rubber grommet, the other side just a piece of metal tape that had been painted with the car, is this normal? When I took the Crash Bar Supports off, water poured out of one of them. They both had rust under them, not four weeks since we took delivery. The supports are unpainted and supposedly epoxied, but they got leaked into. When they were replaced by the tow hitch I sanded and covered the surface, hopefully, no more rust. I also caulked the area at top of the tow hitch side plates to keep it dry.
The factory flange nuts did NOT fit on the 6 bolts protruding from the hitch. I took the old nuts to the hardware store and found they were Metric 10 x 1.5 nuts. The bolts were the right size, but the thread was more fine than the original bolts. I found some 10 x 1.25 flange nuts and they were the correct ones.
Mistakes I made:
Made one, not two holes in the underside plastic and thought I was done, yet to be fixed. Didn't slide the plastic bottom pan under the bottom felt piece as the first step of putting the bumper facia back. It wasn't impossible later. Also dropped one torx screw when putting it back in the wheel well, it's somewhere in the belly pan. One of the pop pins shot across the driveway during removal. It'll show up. I fear I didn't plug in the sensors when I reinstalled the facia. That's trouble.
Now I need a bike rack and some help wiring in trailer lights. Cannot believe what tiny gauge the taillight wires are on the Model 3
-Randy
Attachments
israndy
Supercharger Hunter
With the dawn I found the pop pin, and tested the backup sensors. They just don't respond, no error, drives fine, but when I back towards a Chevy Bolt no alert. Well, this will give me the chance to enlarge the belly pan hole while off the car, and find that torx screw.
-Randy
-Randy
Randy - thanks for posting all of this info! I was planning on doing my hitch install this weekend but got lazy. Now that I've seen your comments, I'll probably do a bit more prep/study before taking this on.
How much time do you think I need to set aside to do this?
Also, you mentioned on installing wiring for trailer lights, I don't intend to tow anything but I did ask my local SC about any potential warranty issues with installing a hitch and they made the comment that if I'm not adding wiring for lights, it's less likely to be an issue in the future if there's an issue with the motors.
Thanks again! Please keep us posting with any new developments or thoughts.
israndy
Supercharger Hunter
I would set aside 4 hours but I don't know your experience level. Once you have the right tools and if you know what your doing it's fast. Don't forget to get 6 new 10 x 1.25 flange nuts before you get started. Also, have some rust converter for under the supports. I didn't mask, but I have OptiCoat, though no overspray seen.
Yeah, warranty issues for installing hitch wiring is an issue. I also fear it might be like my Volvo where the current is NOT available at the tail lights, only a VERY specific amount is there that will drive the LEDs, no more, and there are sensors to complain when there is more draw.
-Randy
Yeah, warranty issues for installing hitch wiring is an issue. I also fear it might be like my Volvo where the current is NOT available at the tail lights, only a VERY specific amount is there that will drive the LEDs, no more, and there are sensors to complain when there is more draw.
-Randy
Daniel in SD
(supervised)
I'm glad I live in San Diego where we only get a few inches of rain a year. There may be a reason why the corrosion warranty is short. I don't think I would try to wire your trailer directly up to those wires. I think you're going to need to install some relays and thicker power wire. Maybe you could figure out who makes the connector and make a plug and play solution.
Maybe they'll make a version of this for the Model 3: 2016 Tesla Model S Custom Fit Vehicle Wiring - Tekonsha
It gets the signals without even touching the wires.
Maybe they'll make a version of this for the Model 3: 2016 Tesla Model S Custom Fit Vehicle Wiring - Tekonsha
It gets the signals without even touching the wires.
mekberg
Member
They also make bike racks that hook onto the trunk too...
Edit - not specifically for the Model 3 but I would imagine they would work
I would generally advise against this for multiple reasons.
- Trunk racks make contact with your paint.
- The presence of a bike on a trunk rack prevents use of the trunk.
- These racks typically don't extend far enough away from the vehicle to prevent pedals from contacting the bumper in all scenarios.
- Trunk racks do not hold bike as securely as newer hitch rack designs which clamp bicycle wheels.
- If you care about your bike do not clamp it by the frame (also wacky full suspension mountain bike frames).
Edit - Added #5 but I'm a minority who has bikes worth more than his current car.
Last edited:
Daniel in SD
(supervised)
Agree on all counts. I'm not one to keep my bikes or cars in pristine condition but I can't imagine putting a trunk rack on a $50k car. You're guaranteed to scratch your car and your bike.I would generally advise against this for multiple reasons.
- Trunk racks make contact with your paint.
- The presence of a bike on a trunk rack prevents use of the trunk.
- These racks typically don't extend far enough away from the vehicle to prevent pedals from contacting the bumper in all scenarios.
- Trunk racks do not hold bike as securely as newer hitch rack designs which clamp bicycle wheels.
- If you care about your bike do not clamp it by the frame (also wacky full suspension mountain bike frames).
Edit - Added #5 but I'm a minority who has bikes worth more than his current car.
israndy
Supercharger Hunter
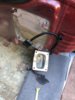
OK, got the hitch finished. Had to take the car back apart as I didn't connect the sensors on the back bumper and didn't cut a big enough hole to get my hand thru to add the hitch to the mount.
It's a LOT faster to do the second time. Sadly you start thinking you can put it together in any order, turns out that may not be true. Ended up putting it back together 4 times including the time I realized I had AGAIN forgotten to attach the sensor cable.
Cutting the hole bigger in the belly pan was easy, a utility knife just goes right thru the plastic, and I used the hole saw to expand the size of the hole over the single hole I made yesterday.

Still need to wash the car now. Get the bugs off.
Very happy with this adventure. Cannot wait to have someone else do it, to compare notes.
-Randy
It's a LOT faster to do the second time. Sadly you start thinking you can put it together in any order, turns out that may not be true. Ended up putting it back together 4 times including the time I realized I had AGAIN forgotten to attach the sensor cable.
Cutting the hole bigger in the belly pan was easy, a utility knife just goes right thru the plastic, and I used the hole saw to expand the size of the hole over the single hole I made yesterday.
Still need to wash the car now. Get the bugs off.
Very happy with this adventure. Cannot wait to have someone else do it, to compare notes.
-Randy
mekberg
Member
Is receiver removal and installation easy? Will you buy/fabricate a cover when the receiver is not installed?
israndy
Supercharger Hunter
They sell one for this, I guess I could easily fabricate one too. Add the hitch to the mount is a single screw, depending on how heavy the thing you are hooking up you can either finger tighten, or socket tighten. I may keep a socket in the car for this purpose.
I don't know how important sealing this hole is. Sure it's not aerodynamic, but it certainly isn't bad, and if you are concerned about getting stuff in the belly pan, too late! Your belly is full already. I was underwhelmed about how dirty the pan was after driving thru a VERY few rain showers.
-Randy
dhrivnak
Active Member
I did it as well Randy this weekend and similar to you because of the stupid M10x1.25 nuts it took 5 hours instead of 2. That said I thought the instructions were good, and I thought they said to cut 2 4" holes which worked out well for my hitch install. I also agree a list of tools would be helpful and I would add ramps or jacks as the underbelly bolts are not easy to reach. I thought the hitch was quite solid and I like how it attached to the car. The rear of the Model 3 is much more solid than the rear of my Volt, which I nearly pulled apart when I pulled our camper across the Rockies several times. Thank goodness for small town weldersOK, got the hitch finished. Had to take the car back apart as I didn't connect the sensors on the back bumper and didn't cut a big enough hole to get my hand thru to add the hitch to the mount.
It's a LOT faster to do the second time. Sadly you start thinking you can put it together in any order, turns out that may not be true. Ended up putting it back together 4 times including the time I realized I had AGAIN forgotten to attach the sensor cable.
Cutting the hole bigger in the belly pan was easy, a utility knife just goes right thru the plastic, and I used the hole saw to expand the size of the hole over the single hole I made yesterday.
View attachment 296260
Still need to wash the car now. Get the bugs off.
Very happy with this adventure. Cannot wait to have someone else do it, to compare notes.
-Randy
")
.JPG")
israndy
Supercharger Hunter
I got a call today from TorkLift asking if I had not installed the hitch yet. I told them I had and I'd found the reason why they were calling, the flange nuts. He apologized that they were different on my car and said there was no reason to believe the ones from Home Depot were any worse than the ones that came with the car. I suggested that they should re-write the manual to include a tools list and better descriptions of steps to remove things.
I have a hitch on my other car and when I back out of the drive it scrapes. Now when I back into the driveway the Tesla hits and STOPS. Probably not going to keep the hitch on the car all the time, but I can also approach the driveway at an angle.
Glad you got yours done. Did you see the water come out or rust that I documented? I lost one of the torx screws when reassembling. It dropped down inside and I never found it, even taking the bumper back off. Took the car to Tesla today to get a replacement for the missing bolt I discovered and asked if they also had that screw, I would be happy to pay, and they put it back for me. Ended up sitting for 4 hours while they worked on the car, they found things, I suggested we look at things. Ended up driving home in a loaner. All that for want of a missing bolt. They didn't say much about the hitch, certainly didn't mention I was busting my warranty.
-Randy
Daniel in SD
(supervised)
I was wondering about this after seeing other cars with similar hitches. Seems like it could do serious damage to the car if you were do that with any speed. I'm hoping Tesla has a factory hitch option that moves it up higher. It would probably be easy to modify the Torklift hitch to be higher but getting the bumper cut to look good would be tricky.I have a hitch on my other car and when I back out of the drive it scrapes. Now when I back into the driveway the Tesla hits and STOPS. Probably not going to keep the hitch on the car all the time, but I can also approach the driveway at an angle.
JCLeonard
Member
I have a hitch on my other car and when I back out of the drive it scrapes. Now when I back into the driveway the Tesla hits and STOPS. Probably not going to keep the hitch on the car all the time, but I can also approach the driveway at an angle.
Would you mind measuring the height from the ground to the bottom of the receiver? I would like to compare to the heigof the receiver on our Leaf.
Thanks!
Similar threads
- Replies
- 19
- Views
- 1K
- Replies
- 26
- Views
- 2K
- Replies
- 64
- Views
- 5K
- Replies
- 3
- Views
- 3K