The left side of the PEM is where you will feel the hot air leaving ( remember that being asked a while back). If you put your hand near the back of the charge port door area inside the trunk, you can feel it there.


Welcome to Tesla Motors Club
Discuss Tesla's Model S, Model 3, Model X, Model Y, Cybertruck, Roadster and More.
Register
Install the app
How to install the app on iOS
You can install our site as a web app on your iOS device by utilizing the Add to Home Screen feature in Safari. Please see this thread for more details on this.
Note: This feature may not be available in some browsers.
-
Want to remove ads? Register an account and login to see fewer ads, and become a Supporting Member to remove almost all ads.
You are using an out of date browser. It may not display this or other websites correctly.
You should upgrade or use an alternative browser.
You should upgrade or use an alternative browser.
scotty2541
Member
Yes, the electronic part of PEM is sealed. The heat sinks extend down into a duct in the bottom of the PEM that the cooling air flows thru. It is less than an inch tall so that's why it is prone to debris buildup.
I did what was suggested, and I can't feel ANY air exhaust. And my temps are slowly bubbling up...
40,41,42,43...42,41...42,43,44,45...44,43...44,45,46...
So I assume there is a heated air being built up in the PEM.
I cleaned the fans, and did a combo of 80+PSI air and a shop vac into and out of the ducts underneath. Repeatedly.
Cleaning the fans dropped the PEM from the 46-54 range, down to 42-50.
And there are two ducts, which seem to be completely independent.
Assuming I do NOT have any way to lift the PEM out and take it apart, what do I do?
Can I just unscrew all those spline bolts on the PEM top, and lift it off like a valve cover of a regular car?
Or at the base of that cover are hex bolts on a flange? Do I remove them? (but the three orange cables go in that cover from the passenger side)
I can also see three cables coming up to the back side of the PEM, pinched behind the rear trunk well.
Any advice is appreciated.
Scott
As MLAUTO said, the PEM is sealed. Opening it up will not give you access to the air duct. That is on the BOTTOM of the PEM. No air from the fan enters the electronics of the PEM. The only way I know of is to remove the PEM from the car, flip it over and clean out the passageways around the heat sinks. The second duct goes to the motor. When the PEM is out of the car you can clean the cooling fins around the motor after loosening the band that surrounds them. Pull the PEM. It is not difficult.
Rotarypower
Member
I did what was suggested, and I can't feel ANY air exhaust. And my temps are slowly bubbling up...
40,41,42,43...42,41...42,43,44,45...44,43...44,45,46...
So I assume there is a heated air being built up in the PEM.
I cleaned the fans, and did a combo of 80+PSI air and a shop vac into and out of the ducts underneath. Repeatedly.
Cleaning the fans dropped the PEM from the 46-54 range, down to 42-50.
And there are two ducts, which seem to be completely independent.
Assuming I do NOT have any way to lift the PEM out and take it apart, what do I do?
Can I just unscrew all those spline bolts on the PEM top, and lift it off like a valve cover of a regular car?
Or at the base of that cover are hex bolts on a flange? Do I remove them? (but the three orange cables go in that cover from the passenger side)
I can also see three cables coming up to the back side of the PEM, pinched behind the rear trunk well.
Any advice is appreciated.
Scott
Unfortunately unless you pull the PEM I’m skeptical that you can clear the debris by blindly blowing air. The PEM is a two person job to remove unless you have an engine hoist or some other way to support some of the load. It’s just too large and awkward to remove by your self. But once out it’s not difficult to clean. There is also a bolt on plastic cover that needs to be removed to get to additional heat sinks that undoubtedly will be clogged.
Taking the PEM apart from the top doesn’t provide access to the airflow chamber. It’s a completely separate part of the PEM. Sealed from the electronics section. Only the heatsinks are in the airflow chamber. Complete access to them requires removal of the PEM.
My mistake was not replacing the female connector pins on the blower motor harness. I’m now getting the 1146 errors and high PEM temps (edging yellow warning temps). I know I need to dive into this now as I am guessing the blower isn’t ramping up to fully demanded speed.
scotty2541
Member
Unfortunately unless you pull the PEM I’m skeptical that you can clear the debris by blindly blowing air. The PEM is a two person job to remove unless you have an engine hoist or some other way to support some of the load. It’s just too large and awkward to remove by your self. But once out it’s not difficult to clean. There is also a bolt on plastic cover that needs to be removed to get to additional heat sinks that undoubtedly will be clogged.
Taking the PEM apart from the top doesn’t provide access to the airflow chamber. It’s a completely separate part of the PEM. Sealed from the electronics section. Only the heatsinks are in the airflow chamber. Complete access to them requires removal of the PEM.
My mistake was not replacing the female connector pins on the blower motor harness. I’m now getting the 1146 errors and high PEM temps (edging yellow warning temps). I know I need to dive into this now as I am guessing the blower isn’t ramping up to fully demanded speed.
Well, I do have the resource of a neighbor/friend who used to work for Honda.
I saw the entire post on removing and cleaning the PEM. Mine is also a 2.5 Should be an identical process as that thread.
Is there, under normal conditions, ANY power on any of those large cables? Or are they essentially neutral when the car is off?
It looks like you almost like you need to wear gloves and insulate them while they are loose and dangling.
(My car has NO ferroid choke beads on it. And jams AM radios. Tesla, for months, said they couldn't figure out why it suddenly started doing that after my last service)
Speaking of "Speed Racer" ... (your icon) This was me about a year and a half after I got the car.
https://www.youtube.com/watch?v=T9-0N96HCNs&t=42
scotty2541
Member
Opening the top does not help other than to look at the pretty electronics.
Well, I may have to open it and look at the electronics...
After I did the fans, I also did the PEM.
DIY: Roadster 2.5 PEM cleaning - step by step
It was not too difficult. And everything was great for a few day. Then I got a PEM Fan motor fault. I can reach under and wiggle the connector and the fans will start and stop. Also, the connector is under the battery and charge cable terminals. So all that would need to be shut down.
QUESTION:
How long will it last on just the aux battery without hurting the battery?
I plan on removing the PEM again, and replacing the connector, plus opening thee PEM and verifying the male contact haven't be shaken loose from the solder. If there is a problem and I have to locate some part, the PEM may be out for more than a day or two.
I assume during that time, it's working only on the AUX battery. And without any charging cycle, that battery could drain out. I can replace the battery (I've done it before) but I'd like to avoid that... don't like servicing one thing and causing something else to die.
So, how long would I expect to let the car sit PEM-less and not hurt the Aux battery? (Coarse value in days)
Or can I feed it with a trickle charger on the black PEM connector next to the battery cables?
-Scott
It’s months more than days. I would also make sure the pin hasn’t been pushed in as identified by @petergrub I would for sure change the pins on the plug end while you are there
Plug is Molex 19418-0004
Pins are 19420-0003 for the gold plated ones.
Plug is Molex 19418-0004
Pins are 19420-0003 for the gold plated ones.
scotty2541
Member
It’s months more than days. I would also make sure the pin hasn’t been pushed in as identified by @petergrub I would for sure change the pins on the plug end while you are there
Plug is Molex 19418-0004
Pins are 19420-0003 for the gold plated ones.
Thanks. I ready picked them up from Mouser. Nice to have Mouser so close to me.
I am hoping that it's only the pins, but I want to be equipped for anything. The pin extractor is $28!! Normally I can extract pins with other extractors or paperclips, but having no practice on this Molex housing, I'm not taking any chances.
xiaoteshushu
Member
Hereby my experience so far with the "1146 DMC Motor Fan Problem":
The error started about a month ago.
But everything kept working fine.
Including temp's.
But a couple of weeks later the rear blower stopped working.
Temp of PEM went up quickly while driving and the first time for me in yellow.
Did some research here on TMC while I was on vacation.
And after my vacation I started taking a look at the PEM fan.
I found out that my trunk was wet and that there was leaking water from my trunk on the PEM fan:
View attachment 444760
After taking PEM fan of and cleaning the PEM fan and the 2 connectors the fan started working again.
PEM fan is working again, but still 1146 errors.
I ordered the molex connector for on the PEM side.
And I ordered a new PEM fan.
I will start with placing a new PEM connector.
And if I still get orrors I will also replace the PEM fan.
To be continued...
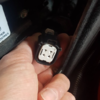
Does anyone have the part nr for thes connecters:
(the 2 connectors on the PEM fan side?)
View attachment 444764
So , Did you fixed the 1146 problem?
Now I just ordered the connector pin , and I am thinking to buy a motor fan . If your problem is connector pin ,then maybe I will not buy the fan now
HiSo , Did you fixed the 1146 problem?
Now I just ordered the connector pin , and I am thinking to buy a motor fan . If your problem is connector pin ,then maybe I will not buy the fan now
I solved my problem with the fan.
Hope yours can be solved easily too.
xiaoteshushu
Member
Hi
I solved my problem with the fan.
Hope yours can be solved easily too.
I am ordering a new fan, I will update when I get the fan
@xiaoteshushu I replaced the molex connector first.
1146 errors almost all disappeared. I had a couple (less than 10) after changing the connector.
But winter came here in The Netherlands.
I think it maybe also has something to do with outside temp.
I also ordered a fan, but didn't change it yet.
I ordered the PEM fan on ebay from a company from the UK.
Keep us updated on changing the fan and if the errors disappear.
I will change my fan when the errors come back.
Maybe this summer?
Good luck!
scotty2541
Member
The connector was dry and break easily. Don't buy the removal tool, a paperclicp pushed in the hole would work... Except the connector will have to be replaced.
I labeled the old wires!!
Snap it apart. Pull the pins. On mine I could just put them on the connector pin, and see they were loose.
(Also, one of the NEW pins from mouser was loose when I did the same test. So squeeze them just a little so they fit tighter)
I clipped off the connectors, and crimped on the new ones. Then inserted them in the new housing. (You did label the wires, right??") )
)
Put it back together and weeks later no problem.
Except, now I've got a
V_ess too high at start of precharge and
V_ess too low at end of precharge
I labeled the old wires!!
Snap it apart. Pull the pins. On mine I could just put them on the connector pin, and see they were loose.
(Also, one of the NEW pins from mouser was loose when I did the same test. So squeeze them just a little so they fit tighter)
I clipped off the connectors, and crimped on the new ones. Then inserted them in the new housing. (You did label the wires, right??
)Put it back together and weeks later no problem.
Except, now I've got a
V_ess too high at start of precharge and
V_ess too low at end of precharge
Rotarypower
Member
The connector was dry and break easily. Don't buy the removal tool, a paperclicp pushed in the hole would work... Except the connector will have to be replaced.
I labeled the old wires!!
Snap it apart. Pull the pins. On mine I could just put them on the connector pin, and see they were loose.
(Also, one of the NEW pins from mouser was loose when I did the same test. So squeeze them just a little so they fit tighter)
I clipped off the connectors, and crimped on the new ones. Then inserted them in the new housing. (You did label the wires, right??
Put it back together and weeks later no problem.
Except, now I've got a
V_ess too high at start of precharge and
V_ess too low at end of precharge
@scotty2541 any update on those error messages?
Hereby an update of my 1146 errors.
I only had them while driving.
But the day before yesterday they also started coming up (a lot) while charging.
And besides the 1146 error also a lot of 1144 errors started coming up while charging.
The pem connector looked good.
So my next step was to replace the pem fan.
I already had a new pem fan.
And yesterday I finally replaced my pem fan for the new one.
I did a one hour drive after replacing the fan and no more 1146 en 1144 errors.
And also no errors anymore while while charging.
Maybe a little bit to early to be sure.
But I think changing the pem fan solved the 1146 errors for me.
Attachments
Strong recommendation to check the connectors at the fan end of the wiring harness. Mine had a very loose connection, which I believe caused damage back up at the PEM end. See my thread Think I need a new PEM Fan... Anything else to check? on the last page, where I show how to tighten them up.
Also, just because the PEM-end isn't visibly smoked, doesn't mean that the connectors are making good contact. Testing with a common sewing pin, the contacts should be fairly snug. Be gentle and don't wiggle the pin! If they are loose, especially the two on the positive side (towards the rear of the car, as it's inserted), you will have trouble. In my opinion, the "spring" material in the female connector is very poor, and is easy to permanently deform, rendering the contact unable to carry any current. I would almost consider them to be a single-use item.
Also, just because the PEM-end isn't visibly smoked, doesn't mean that the connectors are making good contact. Testing with a common sewing pin, the contacts should be fairly snug. Be gentle and don't wiggle the pin! If they are loose, especially the two on the positive side (towards the rear of the car, as it's inserted), you will have trouble. In my opinion, the "spring" material in the female connector is very poor, and is easy to permanently deform, rendering the contact unable to carry any current. I would almost consider them to be a single-use item.
Similar threads
- Replies
- 4
- Views
- 152
- Replies
- 1
- Views
- 238
- Replies
- 6
- Views
- 1K