


Welcome to Tesla Motors Club
Discuss Tesla's Model S, Model 3, Model X, Model Y, Cybertruck, Roadster and More.
Register
Install the app
How to install the app on iOS
You can install our site as a web app on your iOS device by utilizing the Add to Home Screen feature in Safari. Please see this thread for more details on this.
Note: This feature may not be available in some browsers.
-
Want to remove ads? Register an account and login to see fewer ads, and become a Supporting Member to remove almost all ads.
You are using an out of date browser. It may not display this or other websites correctly.
You should upgrade or use an alternative browser.
You should upgrade or use an alternative browser.
Advice on charger location in garage
- Thread starter thefisch
- Start date
So long as I don't pull up too far then the door wouldn't hit it when open, but it would be close to the glass when opened. My main point was that it would hinder walking by on that side more than I thought in comparison to 3/4 conduit running horizontal on the wall about 46 inches off the ground. The conduit would be high enough that the doors on any of my cars, including the Y, would hit it.Absolutely. Install close to the garage door, especially if you park front end in. Definitely don’t install near the doors where you can hit the charger with your door.
Just one EV coming soon. Yes, I think that spot on the left side will be best long term. If we park on the left side closest to it, then it is a no brainer. If we regularly park the EV on the other side, then I can go over the garage door to reach that car for convenience. Going over the garage door like those other examples shared is not a big deal to undo if we swtich to the left side. Agreed, it wouldn't make sense to do that if you were parking on different sides all the time which we don't do.Do you have one EV or two?
If just one, then just install on the wall near the garage doors and always park EV in the left car spot. This is how we do in our garage.
If you have two EVs, and want to share one charger, a cleaner setup definitely would be at the location of the vacuum. And alternatively, use the initial wall location but just occasionally you have a charging cable laying on the garage floor when the second car is charging
Putting the charging cable above the garage door will limit you to charging the car only on the right spot because the length of the cable will not be enough to reach a charging port for the car on the left spot.
That was a possibility at first but based on comments it seemed to not make sense for us since we don't back into the garage.now looking at it. Best place is below the right circuit box.
I don’t see how the door would hit the charger if you install it on the right side. ( between water heater and box). The charging wire will be long enough to reach your car. And the wire from box to charger will be within the wall.So long as I don't pull up too far then the door wouldn't hit it when open, but it would be close to the glass when opened. My main point was that it would hinder walking by on that side more than I thought in comparison to 3/4 conduit running horizontal on the wall about 46 inches off the ground. The conduit would be high enough that the doors on any of my cars, including the Y, would hit it.
Just one EV coming soon. Yes, I think that spot on the left side will be best long term. If we park on the left side closest to it, then it is a no brainer. If we regularly park the EV on the other side, then I can go over the garage door to reach that car for convenience. Going over the garage door like those other examples shared is not a big deal to undo if we swtich to the left side. Agreed, it wouldn't make sense to do that if you were parking on different sides all the time which we don't do.
That was a possibility at first but based on comments it seemed to not make sense for us since we don't back into the garage.
If you go charger ne’er the garage door, with the structure inside the wall(studs???) how will you run the wires.
Did you get the charger already.
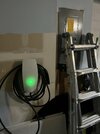
Here is how my looks. My box is on the back side of my garage and the charger is maybe 2 feet from my garage door
Bottom of the charger is about the same height as my door know. My wife is about 5’4 so it’s short enough for her and tall enough for me.
Attachments
Last edited:
Only if they park on the right side of the garage. Running that wire would be a PITA from the box to that spot.Tell her you will vacuum the car. Trust me. The best place to put the charger is where the shop vac is. You will only be vacuuming the car for a short period until she sees the wisdom in the charger location.
You will use the charger virtually every day. You use the shop vac — at most once a week? tell your passengers not to be slobs.
Sorry, I meant on the left side of the panel when I said it would be too close to the car door. Not an issue on the right side of the panel as you suggest. However, the right side of the panel means the charger is about 15 feet into the garage which limits the cable reaching any other position like on the driveway or on the other side of the garage (unless backed in).I don’t see how the door would hit the charger if you install it on the right side. ( between water heater and box). The charging wire will be long enough to reach your car. And the wire from box to charger will be within the wall.
If you go charger ne’er the garage door, with the structure inside the wall(studs???) how will you run the wires.
Did you get the charger already.
Here is how my looks. My box is on the back side of my garage and the charger is maybe 2 feet from my garage door
Bottom of the charger is about the same height as my door know. My wife is about 5’4 so it’s short enough for her and tall enough for me.
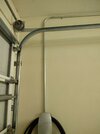
Here is a simulated install using some conduit I picked up for illustration. I borrowed my neighbors extra mounting bracket for his gen2 charger that was in his box to stand in for the charger. Wall is concrete block so would have to surface mount conduit to run wiring.
Pull elbow to come out of the bottom of the subpanel (could use LB instead)
10' EMT conduit running horizontal would be at about 46" high which clears my car doors (and the Y)
Would need straps at least every 3' to secure conduit
Middle of charger would be ~15" from end of wall, leaving about ~12" of clearance for cable wrap on the left side.
That works well. And looks clean also. Middle of my charger from the wall is 25 inches. Not that it matters.Sorry, I meant on the left side of the panel when I said it would be too close to the car door. Not an issue on the right side of the panel as you suggest. However, the right side of the panel means the charger is about 15 feet into the garage which limits the cable reaching any other position like on the driveway or on the other side of the garage (unless backed in).
Here is a simulated install using some conduit I picked up for illustration. I borrowed my neighbors extra mounting bracket for his gen2 charger that was in his box to stand in for the charger. Wall is concrete block so would have to surface mount conduit to run wiring.
Pull elbow to come out of the bottom of the subpanel (could use LB instead)
View attachment 916262
10' EMT conduit running horizontal would be at about 46" high which clears my car doors (and the Y)
View attachment 916264
Would need straps at least every 3' to secure conduit
View attachment 916263
Middle of charger would be ~15" from end of wall, leaving about ~12" of clearance for cable wrap on the left side.
View attachment 916265
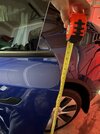
So I don’t know what car you currently have or which model tesla you got, but my wife has the model Y and with the 46 inch it still might hit the door. Here is a pic of my rear door and front door is about 2-3 inches shorter. This is the non performance. But if you’re not hitting the wall with the door, probably won’t hit that pipe either.
Attachments
Last edited:

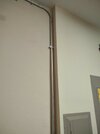
Yeah, the pipe would only come out about 1". The measurements should be close on all the MYs. I checked at the showroom and the most outward point on the front door is about 37" from the floor and 35" for the rear doors. The doors curve in above that so they shouldn't hit the conduit up at 46".


Nice. Btw, I am not trying to be negative. Just trying to be helpful. And as my wife always say, I just got say something about everything. Lol.Yeah, the pipe would only come out about 1". The measurements should be close on all the MYs. I checked at the showroom and the most outward point on the front door is about 37" from the floor and 35" for the rear doors. The doors curve in above that so they shouldn't hit the conduit up at 46".
View attachment 916283
View attachment 916282
Definitely a nice touch on the pipe for the wire from the box.
No worries, I saw your comments as helpful. I posted this for advice to get ideas and I got some great examples and feedback. Everyone is going to have there own personal preferences so you've got to take it all with a grain of salt.Nice. Btw, I am not trying to be negative. Just trying to be helpful. And as my wife always say, I just got say something about everything. Lol.
Definitely a nice touch on the pipe for the wire from the box.
STS-134
Active Member
Why are you putting the conduit below the panel and Wall Connector? Panels and the Wall Connector have an option for wire entry from the top, and going up keeps the conduit farther away from the doors and mostly out of view.Sorry, I meant on the left side of the panel when I said it would be too close to the car door. Not an issue on the right side of the panel as you suggest. However, the right side of the panel means the charger is about 15 feet into the garage which limits the cable reaching any other position like on the driveway or on the other side of the garage (unless backed in).
Here is a simulated install using some conduit I picked up for illustration. I borrowed my neighbors extra mounting bracket for his gen2 charger that was in his box to stand in for the charger. Wall is concrete block so would have to surface mount conduit to run wiring.
Pull elbow to come out of the bottom of the subpanel (could use LB instead)
View attachment 916262
10' EMT conduit running horizontal would be at about 46" high which clears my car doors (and the Y)
View attachment 916264
Would need straps at least every 3' to secure conduit
View attachment 916263
Middle of charger would be ~15" from end of wall, leaving about ~12" of clearance for cable wrap on the left side.
View attachment 916265
Short answer is because it is much cheaper and easier.Why are you putting the conduit below the panel and Wall Connector? Panels and the Wall Connector have an option for wire entry from the top, and going up keeps the conduit farther away from the doors and mostly out of view.
My panels are surface mounted on concrete block with 2x4's on each side and in between of them running up to the attic. On the bottom of the panels there is only drywall so access to the knockouts is easier there and there is no existing wiring in the way.
If my taller main panel (the one with room for the new breaker) was on the left, then we could cut through the wood and come out the left side of the panel with thhn in conduit and be high enough to come in above the charger (that's how my neighbor's gen2 is installed).
However, my main panel is on the right side with a full subpanel on the left and vertical 2x4's in between them. So coming out high from the main panel on the left would be very difficult. The wiring could pass from the main panel through to the subpanel via the conduit between them and out the left side, but the subpanel is short and the height gained doesn't really allow me to come in above the charger location without more bends to gain height. Plus the neutral bus bar is mounted high on the left side of the subpanel blocking the highest punch outs of the right size.
Going out the top of the panels would require Romex inside the chase as I can't really install conduit in those chases without removing a large section of drywall. And Romex would have to be 4 gauge for 60amps which is much more per foot than 6 gauge thhn. And I'd still have to navigate a horizontal run crossing the wiring for my house running vertical up that chase. In that case I'd be better off going up through the attic but access is difficult with the roof hip coming down along that wall not to mention it would take about 20' more wire for the attic option compared to a horizontal conduit run which adds $$.
While I would like for the conduit to be up 60" or more (above shoulder height to be out of the way, 46" isn't too bad.
STS-134
Active Member
Go out the bottom of the panel, up around the concrete block, and cross the bulk of the wall above, near the ceiling, and then come back down to the wall connector. At least that keeps the bulk of the conduit out of sight and out of the way.Short answer is because it is much cheaper and easier.
My panels are surface mounted on concrete block with 2x4's on each side and in between of them running up to the attic. On the bottom of the panels there is only drywall so access to the knockouts is easier there and there is no existing wiring in the way.
If my taller main panel (the one with room for the new breaker) was on the left, then we could cut through the wood and come out the left side of the panel with thhn in conduit and be high enough to come in above the charger (that's how my neighbor's gen2 is installed).
However, my main panel is on the right side with a full subpanel on the left and vertical 2x4's in between them. So coming out high from the main panel on the left would be very difficult. The wiring could pass from the main panel through to the subpanel via the conduit between them and out the left side, but the subpanel is short and the height gained doesn't really allow me to come in above the charger location without more bends to gain height. Plus the neutral bus bar is mounted high on the left side of the subpanel blocking the highest punch outs of the right size.
Going out the top of the panels would require Romex inside the chase as I can't really install conduit in those chases without removing a large section of drywall. And Romex would have to be 4 gauge for 60amps which is much more per foot than 6 gauge thhn. And I'd still have to navigate a horizontal run crossing the wiring for my house running vertical up that chase. In that case I'd be better off going up through the attic but access is difficult with the roof hip coming down along that wall not to mention it would take about 20' more wire for the attic option compared to a horizontal conduit run which adds $$.
While I would like for the conduit to be up 60" or more (above shoulder height to be out of the way, 46" isn't too bad.
I did consider that idea and may do it as it's only about 10' more wire and conduit with elbow fittings. Although the pull is more challenging with all those turns. And it may require a junction box or conduit body midway since there would be four 90 degree turns and with offsets/kicks it may exceed the 360 degree rule.Go out the bottom of the panel, up around the concrete block, and cross the bulk of the wall above, near the ceiling, and then come back down to the wall connector. At least that keeps the bulk of the conduit out of sight and out of the way.
Moving the conduit higher up the wall would mainly be for aesthetics and we have so much stuff on the other side of our garage I'm not sure we care that much. My main concern was clearing the car doors and 46" is plenty high for that, even for our Honda Pilot.
Not a problem at all. I use that charger spot to charge two Teslas in the garage, and the cord can reach three spots outside the garage for visitors or if I park outside. It is far and away the best spot to future proof for a fully tesla home fleet and teslas parked outside.Only if they park on the right side of the garage. Running that wire would be a PITA from the box to that spot.
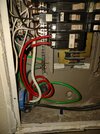
So phase 1 of the install is complete and we have a working charger. I will work on the overhead cable setup soon as that is still our preferred option.
My neighbor upgraded to a gen3 WC and gave me his 3.5 year old gen2 for helping out. So with the savings from a free charger, I increased my budget for wiring, conduit and fittings so I could run the wiring up close to the ceiling. Used 6 AWG for conductors and 8 AWG for ground, in 25' lengths. 20' foot of conduit plus fittings. Total cost with 60 amp breaker was around $170. If this gen2 doesn't last, I could easily swap it out for a gen3. So far so good charging at 48 amps, but time will tell.
Running closer to the ceiling, we avoided any elbow/shoulder bumps with a horizontal run along that wall and more than half the work is done if we decide later to relocate the charger to between the two garage doors. If we decide to do that longer run, I can reconfigure the last 5' of this install as the ceiling run is already high enough to be above the single garage door supports. I would need a junction box along with 10' more conduit, some fittings and about 12' more wiring for just under $100. There seems to be better deals on prepackaged 15' and 25' wiring than by the foot so it wouldn't have come out more expensive doing this in stages rather than all at once. The junction box would be needed anyway due to all the bends in the longer run.
The conduit took the longest due to cutting and accessing the main panel from below without removing too much drywall. Also, a couple of the tapcons didn't care for the concrete block wall so I had to upsize or switch to other anchors. Going to add one more strap between the LB and connector elbow but I haven't picked up more yet.
Here is it for now:
Attachments
STS-134
Active Member
And the Gen2 is a way better EVSE than the Gen3, capable of going all the way up to 80A.So phase 1 of the install is complete and we have a working charger. I will work on the overhead cable setup soon as that is still our preferred option.
My neighbor upgraded to a gen3 WC and gave me his 3.5 year old gen2 for helping out. So with the savings from a free charger, I increased my budget for wiring, conduit and fittings so I could run the wiring up close to the ceiling. Used 6 AWG for conductors and 8 AWG for ground, in 25' lengths. 20' foot of conduit plus fittings. Total cost with 60 amp breaker was around $170. If this gen2 doesn't last, I could easily swap it out for a gen3. So far so good charging at 48 amps, but time will tell.
Running closer to the ceiling, we avoided any elbow/shoulder bumps with a horizontal run along that wall and more than half the work is done if we decide later to relocate the charger to between the two garage doors. If we decide to do that longer run, I can reconfigure the last 5' of this install as the ceiling run is already high enough to be above the single garage door supports. I would need a junction box along with 10' more conduit, some fittings and about 12' more wiring for just under $100. There seems to be better deals on prepackaged 15' and 25' wiring than by the foot so it wouldn't have come out more expensive doing this in stages rather than all at once. The junction box would be needed anyway due to all the bends in the longer run.
The conduit took the longest due to cutting and accessing the main panel from below without removing too much drywall. Also, a couple of the tapcons didn't care for the concrete block wall so I had to upsize or switch to other anchors. Going to add one more strap between the LB and connector elbow but I haven't picked up more yet.
Here is it for now:
View attachment 922884
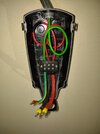
Yeah, it seems solid. I needed a magnifying glass to turn that dial to the correct setting. I couldn't imagine running 2 or 3 AWG wire for that kind of amperage.And the Gen2 is a way better EVSE than the Gen3, capable of going all the way up to 80A.
But since this particular Gen2 is 3.5 years old, I am not sure how much time I'll get out of it. The handle is already showing some separation. I tried sliding my hand along the cable from the charger to the handle to see if there was slack in the sheath but it didn't make a difference unfortunately.
STS-134
Active Member
Pretty sure you can get a new cable and connector for it if you need to. You shouldn't need to replace the entire EVSE just because a connector wore out.Yeah, it seems solid. I needed a magnifying glass to turn that dial to the correct setting. I couldn't imagine running 2 or 3 AWG wire for that kind of amperage.
But since this particular Gen2 is 3.5 years old, I am not sure how much time I'll get out of it. The handle is already showing some separation. I tried sliding my hand along the cable from the charger to the handle to see if there was slack in the sheath but it didn't make a difference unfortunately.
View attachment 923201
Thanks. I think I read on here that folks have tried to expoxy the handle to the sheath to keep it from getting worse. Another suggestion was for a hose clamp like on coolant hoses. Might look into those more to see what could be done.Pretty sure you can get a new cable and connector for it if you need to. You shouldn't need to replace the entire EVSE just because a connector wore out.
Tesla mobile replaced the handle connector on my Gen2 (or may be Gen 1?) wall charger. At the time it was under the car warranty because I bought it with the car. I ran over the handle . .. they replaced it for free anyway. out of warranty it still might be a reasonable charge, especially if mobile was there for something else already.
Similar threads
- Replies
- 42
- Views
- 8K
- Replies
- 24
- Views
- 2K
- Replies
- 6
- Views
- 4K
- Replies
- 31
- Views
- 1K
- Replies
- 1
- Views
- 812