Welcome to Tesla Motors Club
Discuss Tesla's Model S, Model 3, Model X, Model Y, Cybertruck, Roadster and More.
Register

Another subwoofer option - NVX Audio

This site may earn commission on affiliate links.
I installed my NVX sub kit over the weekend. I have an SR+, so I am using the TeslaOffer harness so I don’t tap factory wiring. They now list a harness with sub leads, you should probably get that one. I used the TeslaOffer installation video and the NVX installation video to get things installed.

Here are some of the things I used to mount and install the amp and LOC. These weren’t included in the NVX kit.

8 #8 ¾” machine screws
5 #8 1” machine screws
26 #8 washers
16 #8 or #10 bonded sealing washers (these have rubber on one side and metal on the other)
Loctite
24” x 18” x.25” Acrylic
TesslaOffer speaker activation harness
2 1’ square felt pieces
Heat shrink of various diameters
Wire Ferrules
Tessa Tape
Wire kit for LOC power
2 Male to Male RCA Adapter

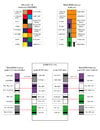
I tapped into the left and right front door woofers on the TeslaOffer harness. I used this pin out graphic for assistance in accessing the correct wires. Forgive me, i just saved the image and I don't remember who on this board posted it.
tesla-wiring.jpg

I was planning on removing the pins from the TeslaOffer harness to remove insulation and solder my new wires to the sub and seal with heat shrink, but wasn’t able to get the pins to properly release. I broke some of the plastic of the first pin I tried so decided to just use some taps instead. I used 16 gauge Red, brown and orange wires to match the factory harness colors, and I labeled with my labeler maker.

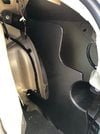
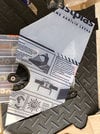
The SR+ has this piece of plastic on the right side of the trunk where the premium audio sub and amp are. I used this as the base for mounting the NVX LOC and amp.
factory bracket.jpg

acrylic-cut.jpg
I made a cardboard template of the area around the model 3 support bracket, then traced that onto the piece of 24” x 18” Acrylic I got from Home Depot. I got the thicker stuff that was almost ¼” thick. I used a hole saw for the curve, and a regular circular saw with a fine tooth blade for the straight edges.

When you are mounting the acrylic to the factory support, do a test fit to make sure things line up properly before drilling the holes.

I lined up the acrylic I cut and the factory bracket, then drilled holes. The factory bracket has a type of large honeycomb structure to add support to it. I used some clamps to hold the two pieces in place and drill my holes for mounting both together.
mounted.jpg
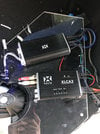
I mounted the amp and the LOC to the acrylic with some #6 ¾” bolts. I got some bonded sealing washers from home depot to use on both sides of the acrylic to reduce potential vibration. I also used Loctite on the bolts where the nuts would rest.

Mounting the acrylic to the M3 plastic piece I used #8 1” bolts with washers, nuts and Loctite. I used some felt between the two pieces to also reduce vibration.

I used a set of male to male RCA adapters to plug straight from the LOC to the amp using the existing amp pigtail. I had some large clear heatshrink, so I used that to help keep these connected. For the other wires I terminated with wire ferrules and heatshrink. For the ground, I found unpainted surface under one of the trunk hinge bolts.

My kit was missing the jacknut, so the speaker isn’t in the car yet. Everything is tested and working as I have it setup. I next need to work on tuning the amp and LOC.
 
View attachment 642484 Can someone that has already mounted their sub chime in on how you got the mount to lineup with the jack nut? The trim holes line up perfectly with the jack nut hole and hole in the rear, but pushing the sub all the way tight against the wheel well side of the trim, I'm still off by a few degrees and a couple inches

Solution found: The mounting bracket on the sub had shifted out of place. I was able to rotate it towards the mounting hole.
Yeah I had to loosen that nut to rotate my mounting bracket into position too
 
  • Like
Reactions: CoolBuddy
Wanted to post this to settle the ‘keep the stock sub connected or not’ debate

View attachment 642941

Huh. I wonder why they would say that. Since you are tapping off the inputs to the OEM sub (assuming premium system) I would think you would want the two subs to be in the same phase. Thankfully most powered subs have a phase button so I guess you can try it either way and see what sounds best, but just curious from a technical standpoint.
 
Huh. I wonder why they would say that. Since you are tapping off the inputs to the OEM sub (assuming premium system) I would think you would want the two subs to be in the same phase. Thankfully most powered subs have a phase button so I guess you can try it either way and see what sounds best, but just curious from a technical standpoint.
I believe it is because the subs are on the opposite sides of the car so the sound waves would cancel each other out? I guess it would depend on the wavelengths and actual distance between the two
 
I believe it is because the subs are on the opposite sides of the car so the sound waves would cancel each other out? I guess it would depend on the wavelengths and actual distance between the two
Your door speakers are also on opposite sides of the car and you don't wire those opposite from each other... Perhaps if you had REALLY long speaker wire runs, so much that it would cause an audio delay, you might want to set them out of phase so that when they play they would be closer to back in-phase. But that wouldn't be the case here, it's just the width of the car plus a little.
 
Your door speakers are also on opposite sides of the car and you don't wire those opposite from each other... Perhaps if you had REALLY long speaker wire runs, so much that it would cause an audio delay, you might want to set them out of phase so that when they play they would be closer to back in-phase. But that wouldn't be the case here, it's just the width of the car plus a little.
Yeah I mean the wavelength of low bass is going to be a little different but I agree it wouldn’t seem to make a difference in this case. Try it both ways I guess; as you said.
 
Ok Gang, so I finally completed my install of my NVX sub paired with a JL Audio 500/1 amp for y'all who are interested in swapping out the NVX VADM1. I have it wired 2 ohm and currently getting ~450W RMS which is plenty for what I need it for. The amp I got was specifically the RD500/1 which has a clipping LED which makes tuning the sub a breeze (turn the volume to 3/4, and play a 50Hz test tone and look for the clipping LED to barely flicker turn on). The only challenge im getting is tuning the XLCA2 in conjunction to my JL Amp.

Couple things to note:
1: Mounting anything larger than the NVX VADM1 was the main challenge. If youre going to go with a higher quality amp, you're gonna have to find somewhere clever to mount it. I decided to mount mine on the underside of the metal rear package tray. Drilled a couple M4 screws in there. Yes, I know it is not recommended to mount amps upside down but I did my DD on this and know for my applications, the amp will never get to overheating temperatures, especially in an open space in the trunk.

2: I have an extra jack nut if someone wants mine. I couldn't, if my life depended on it, get the metal plate to align with the hole so I decided to drill a m6 rivet nut and screwed my own hole with threading. It's way more secure and I was able to fit it in there super snug with minimal space in between the sub and the body of the car.

3: I have the stock sub plugged in so I am wiring mine out of phase with the +/- terminals swapped. I felt like the factory sub is still necessary to "fill in the gaps" the door woofers cannot. I'll do some more tests with the stock sub removed and report back my findings.

If anyone is in SoCal and has an NVX VADM1 installed, hit me up if you want to compare and do some A/B testing, or just if you're on the fence to purchase and don't know if you should upgrade the amp. IMHO, i would upgrade the amp if you don't mind drilling some holes.


IMG_7666.jpg
 
  • Like
Reactions: tlr1000
Huh. I wonder why they would say that. Since you are tapping off the inputs to the OEM sub (assuming premium system) I would think you would want the two subs to be in the same phase. Thankfully most powered subs have a phase button so I guess you can try it either way and see what sounds best, but just curious from a technical standpoint.
My only un-educated guess is that maybe it's because the subs are either a)firing in different directions or b) subs are of different size
 
Ok Gang, so I finally completed my install of my NVX sub paired with a JL Audio 500/1 amp for y'all who are interested in swapping out the NVX VADM1. I have it wired 2 ohm and currently getting ~450W RMS which is plenty for what I need it for. The amp I got was specifically the RD500/1 which has a clipping LED which makes tuning the sub a breeze (turn the volume to 3/4, and play a 50Hz test tone and look for the clipping LED to barely flicker turn on). The only challenge im getting is tuning the XLCA2 in conjunction to my JL Amp.

Couple things to note:
1: Mounting anything larger than the NVX VADM1 was the main challenge. If youre going to go with a higher quality amp, you're gonna have to find somewhere clever to mount it. I decided to mount mine on the underside of the metal rear package tray. Drilled a couple M4 screws in there. Yes, I know it is not recommended to mount amps upside down but I did my DD on this and know for my applications, the amp will never get to overheating temperatures, especially in an open space in the trunk.

2: I have an extra jack nut if someone wants mine. I couldn't, if my life depended on it, get the metal plate to align with the hole so I decided to drill a m6 rivet nut and screwed my own hole with threading. It's way more secure and I was able to fit it in there super snug with minimal space in between the sub and the body of the car.

3: I have the stock sub plugged in so I am wiring mine out of phase with the +/- terminals swapped. I felt like the factory sub is still necessary to "fill in the gaps" the door woofers cannot. I'll do some more tests with the stock sub removed and report back my findings.

If anyone is in SoCal and has an NVX VADM1 installed, hit me up if you want to compare and do some A/B testing, or just if you're on the fence to purchase and don't know if you should upgrade the amp. IMHO, i would upgrade the amp if you don't mind drilling some holes.


View attachment 643210
Looks good, that amp is huge! I hope you don’t run into the can’t maintain power issue. It’s a pain.
 
  • Like
Reactions: cdub715
What size are the wires at the oem amp for power, ground and sub? Was going to order some Posi-Taps to have on hand just in case. I am going to try the military splice where I break the jacket and solder new wires onto oem wires, but if that doesn't work I want the Posi-Taps. I was thinking I could get away with the blue 16-18 awg, am I correct that these would work?
 
What size are the wires at the oem amp for power, ground and sub? Was going to order some Posi-Taps to have on hand just in case. I am going to try the military splice where I break the jacket and solder new wires onto oem wires, but if that doesn't work I want the Posi-Taps. I was thinking I could get away with the blue 16-18 awg, am I correct that these would work?
You can see a photo of the T-taps I used on page 2. For most wires I used blue taps (14-16 AWG) and for the power/ground I used yellow taps since they were a bit bigger (12 AWG). I admit I didn’t measure the wires beforehand but everything worked well with those selections.
 
Great. You feel the bass presence, and that low bass is no longer nonexistent. Plus you can tune it to your liking.
Any chance you’re near Raleigh? I would love to hear it in person before I buy it. I have a cerwin Vega spare tire subwoofer sitting in a storage room I was considering using in the trunk well. I had it in my sq5 and it sounded pretty good. I could make something from wood to hold it in place.
 
What size are the wires at the oem amp for power, ground and sub? Was going to order some Posi-Taps to have on hand just in case. I am going to try the military splice where I break the jacket and solder new wires onto oem wires, but if that doesn't work I want the Posi-Taps. I was thinking I could get away with the blue 16-18 awg, am I correct that these would work?
I would get the Blue Positaps.