Welcome to Tesla Motors Club
Discuss Tesla's Model S, Model 3, Model X, Model Y, Cybertruck, Roadster and More.
Register

Ground Stud Nut over torqued

This site may earn commission on affiliate links.
At the SC now. They found that the "low coolant" alarm is valid! I was told that two valves are leaking in the coolant system, the 3-way valve and the 4-way valve. Both are being replaced. Not clear how much they were leaking or how low the coolant actually got.
As for the other electrical glitches (frunk latch alarm, headlight not working, and security alarm going off, I was told they replaced the ground point. Not clear if there is any connection between the coolant leaks and the ground point, or if it is totally a coincidence.
 
What's the cost?
Dunno. I have an extended service plan, so all I will pay is the $200 deductible. Also, it turns out that the leak repair was not initially successful, so they have to keep the car another day or two, and they need another part. So at this point I do not know the full extent of the repairs to the coolant system, nor do I know how they repaired or replaced the ground point. When they are done, I will try to find out what it would have cost without the ESA.
 
  • Like
Reactions: Droschke
At the SC now. They found that the "low coolant" alarm is valid! I was told that two valves are leaking in the coolant system, the 3-way valve and the 4-way valve. Both are being replaced. Not clear how much they were leaking or how low the coolant actually got.
As for the other electrical glitches (frunk latch alarm, headlight not working, and security alarm going off, I was told they replaced the ground point. Not clear if there is any connection between the coolant leaks and the ground point, or if it is totally a coincidence.
Seems strange the valves were leaking enough to alert the low coolant warning, but you had no signs of leaks?
 
Seems strange the valves were leaking enough to alert the low coolant warning, but you had no signs of leaks?
Right, I agree. But apparently the low coolant sensor is set to detect a fairly modest amount of leakage. Which is better than the sensor only detecting a leak just as it is becoming critical to repair before it causes damage to the battery.
Plus, never having experienced a leak like this in my Tesla, I am not sure I would have noticed it very readily. I park my car outdoors, and use cabin overheat protection. In our current warm weather, there is often a puddle under my car, from the AC condensate resulting from the AC running for cabin overheat protection, or from precooling the car. Would I have noticed if the fluid had a bit of antifreeze in it? Not sure, perhaps not. So all in all, I am glad the car flagged the low level early. The SC assured me that the amount of leakage so far was not enough to cause damage to the battery -- I hope that is true!
One odd detail is that the SC also replaced something called the "Thermal Controller with Label," which the parts catalog lists as part of the cabin AC system. I do not know what part the controller might have played in this, if any. I was told that it was out of spec when the system was tested after the valves were replaced. Which could be another coincidence, or possibly collateral damage from the repair work, or ....?
 
  • Like
Reactions: dark cloud
I have the same issue, frunk open error while driving, low coolant, random alarms, and for the first time the other night the right headlight. No coincidence mine is a 2015 March build as well.

Glad to see the issue is an easy fix for DIYers but if anyone can dumb down this process for a guy who isn't the most handy, I'd appreciate it. Is there anything dangerous I should know about? I am sure some others out there will appreciate it as well. If it is already dumbed down for most people and I just don't know it, I'll start to google specific steps and the reasons behind them.

Thanks in advance.

I’ll start:

1). Open the frunk, and remove the frunk liner and plastic tub. There are YouTube videos on this.

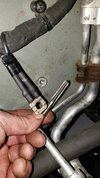
2). Find your ground studs (I circled one in a post above). These are metal studs that were welded to the frame and have large nuts holding a wire in position. There is one on each frame rail, near the wheel. Inspect them. They might be completely broken off or corroded and gross.

3) if broken off, you will need to take it to a mechanic or learn to drill and tap a new threaded hole.

4) if still intact, power down the car, remove the nut and clean everything with a small stainless steel wire brush. There’s a good chance it will break. Go back to step 3…

5) put it back together and cover everything with some thick waterproof grease (dielectric grease)

6) go back to eating popcorn and watching Twitter crash and burn.
 
Just an FYI for everyone.

If the drivers side ground stud breaks the car is not driveable. So if it looks corroded I would repair it before it leaves you stranded.

When the passenger side breaks the car is still able to drive.
The drivers side ground stud in my model S decided to give it up yesterday while making a turn at an intersection. Not a fun experience!!! I immediately lost all power steering as well lost 95% of my braking power. For me to slow down the car I needed all my weight on the brake pedal, not fun. Immediately had about 8 or 10 different error messages on the screen as well as a whole bunch of icons light up. Also had no drivers side headlight. Luckily I was only 2 blocks from home so I circled the block and drove home. As soon as I got home and put it in park that was it, no more putting it into gear. The car was not drivable at this point.
Lucky for me I immediately suspected the drivers side ground stud because of my previous experience with the passenger side one breaking. I pulled out the frunk and to my surprise the drivers stud was intact and only minor corrosion. It was also very secure. I removed the nut and disconnected the ground wires. I cleaned them up and the ground stud actually looked pretty good. I hooked up the wires and put the nut back on but as soon as I started to tighten it the stud snapped off. It must have been on the brink of breaking due to corrosion even though it looked good.
I drilled it out and installed a new 1/4-20 stud and hooked everything back up and all is now good again.
Learned a lesson when looking at the old stud as looks can be deceiving.
If you end up fixing one of these ground studs go ahead and do the other one at the same time.
I hope this info will help others.
 
Just finished. Used existing stud base, which after the threaded portion broke off left a sand'able, and thick, aluminum grounding point.
-W/Frunk/Coolant and headlight warnings, mine broke off with only ~3lbs of torque (like little more than the weight of a breaker bar). Never seen such subtle corrosion, but consistent with everyone else. Galvanic from washers Tesla used? The nuts?
-Tapped with fairly common M8 1.25, about 6.8mm thick w/threads, vs smaller 1/4 brass. Oil it, go back/forth lots. Go slow.
-I had the M8 tap on hand, it was bigger, but required using stainless as big box stores didn't have brass larger than 1/4"
-I think the stud is aluminum, judging from how easily tapped the hole is once you drill a larger than 6mm diameter pilot hole thru its center, and into the frame rail.
-I used Vaseline, instead of commercial grade dielectric grease. I'll watch it.
-Again, one thing I'm trying to note, here, is how easily tapped this area is. I used a ring file at the entrance to the hole, so the tap could bite its way through the rest (drill bit was undersized). The picture shows not only can you avoid a second frame rail hole, but you also get more threads for conductivity and capture/torque. Two stainless nuts and two brass washers, the Vaseline, and I was done. Already have the bolt set up for the other side. Sorta surprised as a New England'r who winters a 2015, I got to 2023.
-If I could do it again, I'd probably tap for 1/4 brass, buying the appropriate standard tap (available at HD/Lowes). IMO, Lowes is better for fasteners.

Pssgr Ground.jpg
 
Last edited: