


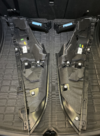
Left = 1622252-98-B (SP, C Pillar Upper Trim, ASY, LH) = I paid $70
Right = 162253-98-B (SP, C Pillar Upper Trim, ASY, RH) = I paid $70
Parcel Shelf = 1641293-97-B END ITEM, PARCEL SHELF = Waiting for it to come in, don't know the cost yet.
--------------
MYP, March '22 Build
I just finished installing the Parcel Shelf C Pillar Trim from parts ordered through my local SC.
I am still waiting on the parcel shelf itself, but the main C Pillar parts came in.
I thought I needed the lower trim pieces, but turns out I don't and the parts are basically identical for swapping.
Sorry, no video since I don't like being on video and I'm not a Youtuber, but use this video for some reference on removing trim panels
Plan on spending at least an hour doing this swap.
Items to note on the differences in the pieces:
Directions don't have to be followed in this order, it is just to give you an idea. Have fun, I know I did.
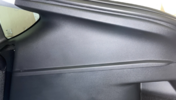
1. Start by pulling off weather seal nearest to the door panels and inside the hatch. This will give you access to pull off the panels much more easily.
2. You can start popping off panels on either side, but they all gotta pop out.
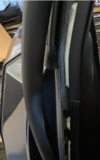
3. Pull apart the upper trim from the lower trim starting from the trunk along the seam.
4. Try and separate the pieces enough where you can separate the trim pieces and the upper piece is sitting on top of the lower piece. By now, your piece is just hanging from the top corner with the headliner.
5. Pulling out the C Pillar trim is quite tricky at the top corner is molded to fit with the headliner and is shaped to hook in underneath like a 'Question Mark' shape. This means you need to pull the headliner down while trying to un-hook it and pull out the trim piece at the same time in addition to
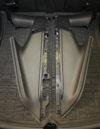
6. Once that is done, you'll need to get the lower seat belt anchor unscrewed. It is 15MM and I used an extended ratchet. The bolt is quite long so don't expect it to be short.
7. Once you have that done, there is a trim piece on the panel for the seat belt that needs to be removed and put onto the new C Pillar piece. The Belt, latch, and anchor portion all need to come through.
8. Move your old Insulation NVH foam to the new part and remove the foam it came with unless you want that one instead. I found the mine to be much better quality.
9. Reverse all steps and then give your hands a break.
Right = 162253-98-B (SP, C Pillar Upper Trim, ASY, RH) = I paid $70
Parcel Shelf = 1641293-97-B END ITEM, PARCEL SHELF = Waiting for it to come in, don't know the cost yet.
--------------
MYP, March '22 Build
I just finished installing the Parcel Shelf C Pillar Trim from parts ordered through my local SC.
I am still waiting on the parcel shelf itself, but the main C Pillar parts came in.
I thought I needed the lower trim pieces, but turns out I don't and the parts are basically identical for swapping.
Sorry, no video since I don't like being on video and I'm not a Youtuber, but use this video for some reference on removing trim panels
Plan on spending at least an hour doing this swap.
Items to note on the differences in the pieces:
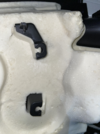
- The parts come with NVH felt/foam stuff. I think the foam insulation used in my car is much better, thicker and covers more surface area so I removed the pre-attached NVH that came with it. You can see the foam it came with in the picture, but sorry I did not take a picture of my insulation foam. I just wanted to get this thing done.
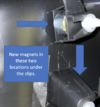
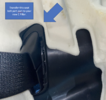
- If transferring your existing foam insulation, most likely it will transfer over identically. The parts where foam doesn't fit right are where the magnets glued in under the clips. The foam originally went into that cavity/void, but since the magnet is there the foam doesn't fit anymore.
- Picture of it attached.
Directions don't have to be followed in this order, it is just to give you an idea. Have fun, I know I did.
1. Start by pulling off weather seal nearest to the door panels and inside the hatch. This will give you access to pull off the panels much more easily.
2. You can start popping off panels on either side, but they all gotta pop out.
3. Pull apart the upper trim from the lower trim starting from the trunk along the seam.
4. Try and separate the pieces enough where you can separate the trim pieces and the upper piece is sitting on top of the lower piece. By now, your piece is just hanging from the top corner with the headliner.
5. Pulling out the C Pillar trim is quite tricky at the top corner is molded to fit with the headliner and is shaped to hook in underneath like a 'Question Mark' shape. This means you need to pull the headliner down while trying to un-hook it and pull out the trim piece at the same time in addition to
6. Once that is done, you'll need to get the lower seat belt anchor unscrewed. It is 15MM and I used an extended ratchet. The bolt is quite long so don't expect it to be short.
7. Once you have that done, there is a trim piece on the panel for the seat belt that needs to be removed and put onto the new C Pillar piece. The Belt, latch, and anchor portion all need to come through.
8. Move your old Insulation NVH foam to the new part and remove the foam it came with unless you want that one instead. I found the mine to be much better quality.
9. Reverse all steps and then give your hands a break.
Attachments
-
 Screen Shot 2022-07-22 at 8.37.13 PM.png3.9 MB · Views: 4,515
 -
 Screen Shot 2022-07-22 at 8.48.37 PM.png2.6 MB · Views: 1,292
 -
 Screen Shot 2022-07-22 at 8.29.43 PM.png3.3 MB · Views: 1,227
 -
 Screen Shot 2022-07-22 at 8.40.14 PM.png3.4 MB · Views: 1,253
 -
 Screen Shot 2022-07-22 at 8.28.52 PM.png2.2 MB · Views: 1,230
 -
 2.png3.9 MB · Views: 1,273
 -
 1.png2.8 MB · Views: 1,297
 -
 Screen Shot 2022-07-22 at 8.30.40 PM.png1.8 MB · Views: 1,337
 -
 Screen Shot 2022-07-22 at 8.30.24 PM.png2.4 MB · Views: 1,365
 -
 Screen Shot 2022-07-22 at 8.44.46 PM.png3.5 MB · Views: 1,414

