It might be helpful to recap a few of the challenges that we had to solve when doing the first refresh (and creating our refresh system years ago). I would not discourage anyone from trying their own modifications and solutions. However, as others have mentioned it is a slippery slope to get everything dialed in correctly. Here's a recap of a few:
1. A scenario in which the battery and 12V is depleted and in which access to the 12V is needed to make the car mobile for towing or service. New cars without the nose cone have a method for this but we ultimately needed to create a solution which is shown in action here:
2. Integration of AP1 without touching or impacting the calibration in any way. We found the best way was to design our refresh system in a way that retains the factory grill with radar cutout - in this way it fits as designed, the radar itself is never touched and the radar fits with integration the same as it was.
3. Retaining original location of the ultrasonic sensors. This is debatable as to any safety/functionality impact, but we did not want to change any of the parameters of what the car sees so the UP refresh keeps the front two ultrasonic sensors in similar locations to where they were on the nosecone (the newer Tesla bumper moves them) and naturally the firmware will not know that the bumper is changed so we like removing that variable and keeping things where the car thinks they naturally are.
4. As others have mentioned with regards to fitment, it can become a deep rabbit's hole in terms of swapping hoods which then involves frunk mating to hood issues, hood latch issues, etc. So many of the parts are inter-related. Like for example the lower plastic mesh grill shape matches the bumper shape so if you use the new bumper then the AP1 install is not clean, or how the louvers and ducting behind the bumper are different shapes and sizes, etc. The only solution we were comfortable with was what we did - came up with something new from scratch that adapts the old system without changing it and applies it to the new look.
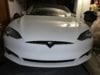
I'm not sure how well known it is - but Tesla themselves selected the UP Refresh for their corporate marketing car promoting their veteran's outreach program Tesla Vets. This may be implied already, but to spell it out - Tesla purchased our Refresh, despite having access to their entire parts catalog. They did so for all of the same reasons/challenges described in this thread. This does not mean that it can't be done other ways, but that was the solution that Tesla themselves chose.

PS - Some mentioned that we chose a slightly sportier look. We wanted to accent the car's sporty nature by making the grill deeper, the areas over the fog lights more sculpted and the lower edge (front lip spoiler area) a bit more aerodynamic in shape. We've received dozens of reports of range increase after fitting the UP refresh (due to the front spoiler design). The same front spoiler shape on our refresh was so popular that we ended up making the same shape as an add-on front lip spoiler for the new new facelifted bumper cars 2016.5+ as well, and those users have also reported a range gain from the bottom lip re-shaping. It by the way does not impact ground clearance at all, the bottom clearance height is still the same. Although there is always good reason for skepticism (as I'd expect) on the range gain topic, we did create an extensive white paper on our CFD work for the Model 3 front lip spoiler which might be of interest for those curious about aerodynamics and what is possible in the aftermarket that is not possible from factories due to various antiquated homologation laws (for example specific front lip angle to load cars on ferries). This aero work on the Model S predates the expensive/comprehensive Model 3 CFD study, so we only have anecdotal evidence of range gain but the feedback is consistent over the years, so it is worth mentioning.
Independent Aerodynamic Study of Tesla Model 3 by Unplugged Performance
For those curious there is a fairly lengthy gallery of refreshed cars at this link (including Tesla's, Ben Sullins of Teslanomics, Gene of Teslarati and many other interesting projects)
Unplugged Performance Refresh Front Fascia System for Tesla Model S