


Welcome to Tesla Motors Club
Discuss Tesla's Model S, Model 3, Model X, Model Y, Cybertruck, Roadster and More.
Register
Install the app
How to install the app on iOS
You can install our site as a web app on your iOS device by utilizing the Add to Home Screen feature in Safari. Please see this thread for more details on this.
Note: This feature may not be available in some browsers.
-
Want to remove ads? Register an account and login to see fewer ads, and become a Supporting Member to remove almost all ads.
You are using an out of date browser. It may not display this or other websites correctly.
You should upgrade or use an alternative browser.
You should upgrade or use an alternative browser.
My non-PUP has puddle lights
- Thread starter Maximapolak
- Start date
Cricket88
Member
No dealer activation required but getting the handles out and back in is a bear! You must remove the chrome window base trim from the top of the door on the outside and use a wrench to get the top bolt out.
I appreciate all of the info. I was inspecting my door handles trying to figure out where the Premium pkg handles had the LED emitting from but I couldnt see any place where the LED would go... I just assumed that Premium Pkg cars had different handles all together. Ill take a closer look once my car is released from being held hostage at the service center.
cwerlin
Member
If you pull on the handle, it is easier to see, you will find a black plastic filler piece which comes out easily from the inside when you take the handle apart the LED setup slides into it's spot.I appreciate all of the info. I was inspecting my door handles trying to figure out where the Premium pkg handles had the LED emitting from but I couldnt see any place where the LED would go... I just assumed that Premium Pkg cars had different handles all together. Ill take a closer look once my car is released from being held hostage at the service center.

steveho
Member
Now that you've done this, do you think there would have been a way to just cut the hole first, and then reach in to grab that harness? or was it taped pretty far up? Thanks in advance!
I was able to cut the hole first with an xacto knife, and pull off the speaker grill. Then I could reach the x-acto inside to cut the tape holding the wire up.
See my thread #8
Puddle Lamps
@steveho Thanks! I was able to do exactly that and got the rear puddle lights cut and installed (my car doesn't have PUP). The speaker grill comes off easily. Getting an exacto knife to reach the taped wires was a challenge. I ended up taping the knife to a screwdriver to get an extended reach. Be careful not to cut into the other wires.
Cutting the rectangle is easy, since the plastic is already pre-cut in the rear door and covered with the artificial leather. With a flashlight shining through the rectangular hole and the extended exacto knife, the second rear puddle lights only took about 3 minutes. And as you said, no need to remove the door panels.
Cutting the rectangle is easy, since the plastic is already pre-cut in the rear door and covered with the artificial leather. With a flashlight shining through the rectangular hole and the extended exacto knife, the second rear puddle lights only took about 3 minutes. And as you said, no need to remove the door panels.
how did the speaker grills come off? and can you reach the wire with your fingers, through the speaker grill?
how did the speaker grills come off? and can you reach the wire with your fingers, through the speaker grill?
The rear speaker grill just snaps off, just gently pull the edge from the bottom or side.
You can't reach the wire with your fingers until after you have cut the tape and released it. Then, use a screwdriver to bring it closer to reach with your fingers.
steveho
Member
Did you put in logo lights, or just white lights? Pic!@steveho Thanks! I was able to do exactly that and got the rear puddle lights cut and installed (my car doesn't have PUP). The speaker grill comes off easily. Getting an exacto knife to reach the taped wires was a challenge. I ended up taping the knife to a screwdriver to get an extended reach. Be careful not to cut into the other wires.
Cutting the rectangle is easy, since the plastic is already pre-cut in the rear door and covered with the artificial leather. With a flashlight shining through the rectangular hole and the extended exacto knife, the second rear puddle lights only took about 3 minutes. And as you said, no need to remove the door panels.
GasKilla
No Gas Know Peace
I didn't need to even take the speaker grill off, I just cut the hole, reached in, and pulled the connector out. I was able just to use force to pull it off the tape. On the passenger side the wires were black and white (I think they were blue and white on the driver side) and I just grabbed them and pulled. I have long fingers but you could probably use needle nose pliers if you can't reach the wires. Once you cut the hole and shine a flashlight up in the hole you'll see the empty connector and the wires you need to grab.how did the speaker grills come off? and can you reach the wire with your fingers, through the speaker grill?
I actually took the speaker grill off on the driver side but realized I didn't need to so just left it on the passenger side and pulled it out of the hole with no problems. No need to cut the tape for me.
BigTonyTones
Member
I just did the back door puddle lights . I must say that was a breeze! I didnt remove anything.
I cut the leather with an exacto. Lucky for me the first door had the wire hanging loose. Didnt take me 2 minutes
Second door took 5 minutes. Cut the leather and found the wire taped up. Used a pair of really long pliers and grabbed it. Pulled it hard and it came off. The tape is not tight at all.
I cut the leather with an exacto. Lucky for me the first door had the wire hanging loose. Didnt take me 2 minutes
Second door took 5 minutes. Cut the leather and found the wire taped up. Used a pair of really long pliers and grabbed it. Pulled it hard and it came off. The tape is not tight at all.
BigTonyTones
Member
BigTonyTones
Member
No dealer activation required but getting the handles out and back in is a bear! You must remove the chrome window base trim from the top of the door on the outside and use a wrench to get the top bolt out.
Thank you for your input. Do you mind doing a write up? Im very eager to hear your tips and tricks.
Did you do all 4 handles?
artisjr
Member
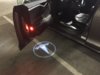
Here is a photo of the puddle/logo/welcome lights along with my rear lighted T + appliqué. Please note the brighter interior and red lighting from Abstract Ocean.Hey Max, before you put the "same old thing", in your rear door, maybe you want to consider these logo lights. Several of us have done them. Cost about the same as the standard lights.
Attachments

Last edited:
GasKilla
No Gas Know Peace
I've been told (by mechanics at the service center) the lighted door handles have a different wiring harness that isn't present on cars that weren't shipped with lighted handles.Thank you for your input. Do you mind doing a write up? Im very eager to hear your tips and tricks.
Did you do all 4 handles?
Someh
Somehow I doubt that because someone on this forum added the bulbs themselves.I've been told (by mechanics at the service center) the lighted door handles have a different wiring harness that isn't present on cars that weren't shipped with lighted handles.
GasKilla
No Gas Know Peace
I'd love to see that threadSomeh
Somehow I doubt that because someone on this forum added the bulbs themselves.
artisjr
Member
cwerlin
Member
Thank you for your input. Do you mind doing a write up? Im very eager to hear your tips and tricks.
Did you do all 4 handles?
Sorry guys, been offline for a couple weeks, but to answer your questions, I only did the front doors, I might try the backs later, but my local Tesla guys said they are more difficult to get the handles out. DM me and I'm happy to jump on the phone. I'll try to get a writeup together, but time is super tight for me currently.
The job is not terribly difficult, you must remove the interior door panels and you must remove the exterior door window trim which just pulls off with some reasonable pressure. I used some blue masking tape on the handle so I didn't scratch it. There are 4 bolts holding the handle on the door, one must be reached with a wrench from the outside going down next to the window, I used a ratcheting wrench to make it easier.. Once the handle is out of the car it's a breeze, 4 torx screws and the chrome handle comes off the mechanism, remove the black plastic blank and slide the led in, screw the handle back together and plug it in.
BigTonyTones
Member
Thank you for the great replySorry guys, been offline for a couple weeks, but to answer your questions, I only did the front doors, I might try the backs later, but my local Tesla guys said they are more difficult to get the handles out. DM me and I'm happy to jump on the phone. I'll try to get a writeup together, but time is super tight for me currently.
The job is not terribly difficult, you must remove the interior door panels and you must remove the exterior door window trim which just pulls off with some reasonable pressure. I used some blue masking tape on the handle so I didn't scratch it. There are 4 bolts holding the handle on the door, one must be reached with a wrench from the outside going down next to the window, I used a ratcheting wrench to make it easier.. Once the handle is out of the car it's a breeze, 4 torx screws and the chrome handle comes off the mechanism, remove the black plastic blank and slide the led in, screw the handle back together and plug it in.
Seems like I may attempt this. Your description has helped me tremendously
cwerlin
Member
Thank you for the great reply
Seems like I may attempt this. Your description has helped me tremendously
Glad I could help, the one additional tip when you are reinstalling the door handle mechanism. The fit between the threaded stud and the window glass is very tight, I actually used a plastic shim for installing a door frame in a house to help guide the handle mechanism over the stud (shims are nice and long, available at Lowes or Home depot for a couple bucks). I then used some double sided tape on the shim to hold the bolt on the stud while I used the wrench to get it threaded. The other 3 bolts which are accessed through service holes in the door are quite easy.
Similar threads
- Replies
- 0
- Views
- 241
- Replies
- 1
- Views
- 516
- Replies
- 29
- Views
- 2K
- Replies
- 208
- Views
- 10K