Welcome to Tesla Motors Club
Discuss Tesla's Model S, Model 3, Model X, Model Y, Cybertruck, Roadster and More.
Register

Vendor New Refresh Headlights & Taillights for Tesla Model S 2012-2020 | T Sportline x Alpharex collab NOVA Headlights and Pro Series Taillights

This site may earn commission on affiliate links.
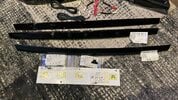
Also wanted to point out the differences and the center appliqué. So here are the 2 different ones that Tesla still sells and the top is the one that is included with the tail lights. Look through the photos you can see every single part number. There is one photo where you can see the appliqué that is it included (top) but next to there is a foam seal kit from Tesla that was a few dollars. It’s not included, but probably not necessary on the new appliqué that came with the tail lights. Also various parts like the newer clips. Best way if you want to look as oem as possible is to just buy the complete (middle) appliqué. It looks the best. The one on the bottom that came with all the extra parts was because I told Tesla I wanted the new one and they ordered both… & of corse wanted me to pay for there mistake so I just paid for them to save the headache. So the one in the bottom of the photo is for some 2022 models that had the new tail lights, but still had the chrome Tesla T
Hope this helps someone through this fiasco
IMG_1518.jpeg
IMG_1517.jpeg
IMG_1519.jpeg
IMG_1520.jpeg
 

Attachments

  • IMG_1516.jpeg
    IMG_1516.jpeg
    630.1 KB · Views: 11
  • Like
Reactions: spoonf20c
Just received my 2 sets.

I will try the installation on friday on my 2018 100d

I did not know the center trim was included in the package, so i ordered one from tesla 🤦🏻‍♂️

Also, they include a qr code on the box as a link to the installation guide, which doesn’t exist (yet)… it should be kinda straightforward for the pre refresh models o guess, but still i have some questions link disabling animations and dont want to break anything in the process 😂
The Tesla trim without the letters is a much better quality and only cost $4. I got that awhile back and didn't mind having the old lights with the newer trim.
 
  • Like
Reactions: misc3r
I’m in communication with them separately.

They already have the resistors in place and are testing them. No, the lights have not dimmed and work properly, all functions are working as expected. If all goes well today/tomorrow with their continued testing, they will send me a resistor kit as well to test.
What sized resistor? I'd like to see if I can put something together as well prior to them releasing anything officially.
 
16c37dd2-ff42-4db2-9b19-3d81f36f2165.jpeg
Finally fitted them.

They forgot to add wiring to pull reversing from right to left and fog. So i soldered sone wires on and they worked on both sides.

Hardest really was the side of the chargeport.. i have a motorized port so it was so hard to remove the unit… my charge port i almost totally dismanteled but eventually with some movements i was able to unscrew it from the unit…

And while i tried fitting the Alpharex I broke the side of the unit, i could cry! But glued it on again and it looks fine i guess…
096aa364-ca9c-4404-ba72-6a22232bbaea.jpeg


You know, i do retrofits for a living but i can say the charge port side was hard 😂 it needs practice obviously but for a first time i can say it was hard.

Ended up pulling wiring for the center units to the side from the existing harnass, else blinkers will not be full over 2 units but just the side (like oem i guess)

I did everything without removing the battery. Because i was to lazy te remove it. No errors in the end all functions work fine.
 
  • Like
Reactions: misc3r
View attachment 1051986Finally fitted them.

They forgot to add wiring to pull reversing from right to left and fog. So i soldered sone wires on and they worked on both sides.

Hardest really was the side of the chargeport.. i have a motorized port so it was so hard to remove the unit… my charge port i almost totally dismanteled but eventually with some movements i was able to unscrew it from the unit…

And while i tried fitting the Alpharex I broke the side of the unit, i could cry! But glued it on again and it looks fine i guess…
View attachment 1051991

You know, i do retrofits for a living but i can say the charge port side was hard 😂 it needs practice obviously but for a first time i can say it was hard.

Ended up pulling wiring for the center units to the side from the existing harnass, else blinkers will not be full over 2 units but just the side (like oem i guess)

I did everything without removing the battery. Because i was to lazy te remove it. No errors in the end all functions work fine.
you didn't disconnect the battery? so you then did not remove the charging port from the car in order to then fit it to the left hand side.... impressive but dangerous IMO. Disconnecting the battery takes less than 30 seconds! given that there are no instructions yet, may I ask which cables were missing ?
and how did you hooked them up? Were cable lengths good on your side ? I had to do some soldering to extend them
 
View attachment 1051986Finally fitted them.

They forgot to add wiring to pull reversing from right to left and fog. So i soldered sone wires on and they worked on both sides.

Hardest really was the side of the chargeport.. i have a motorized port so it was so hard to remove the unit… my charge port i almost totally dismanteled but eventually with some movements i was able to unscrew it from the unit…

And while i tried fitting the Alpharex I broke the side of the unit, i could cry! But glued it on again and it looks fine i guess…
View attachment 1051991

You know, i do retrofits for a living but i can say the charge port side was hard 😂 it needs practice obviously but for a first time i can say it was hard.

Ended up pulling wiring for the center units to the side from the existing harnass, else blinkers will not be full over 2 units but just the side (like oem i guess)

I did everything without removing the battery. Because i was to lazy te remove it. No errors in the end all functions work fine.
We do not have rear fog in the US. How would that work for US people?
 
you didn't disconnect the battery? so you then did not remove the charging port from the car in order to then fit it to the left hand side.... impressive but dangerous IMO. Disconnecting the battery takes less than 30 seconds! given that there are no instructions yet, may I ask which cables were missing ?
and how did you hooked them up? Were cable lengths good on your side ? I had to do some soldering to extend them
Most parts of the car is low voltage so i took that risk i guess. No i did not fully remove the charging port because the car was powered. Just the mechanics and surroundings. But i think european port is bigger so simply does not come out like us version when screws are removed. Really i had a hard time removing the left unit. Ended up turning the unit to an angle so i could unscrew the charge port from the unit. After i screwed the new unit on tried to fiddle it back in thats where i broke the side.

The blue white loop cable was missing to connect the middle units together. The blinker cables were actually long enough to connect outer unit to the inner unit.

I also noticed a green black connector i didnt use, not sure what thats for tho.

Cant wait to do it again on my cousins car 😅 this time none motorized charging port…might come out easier…
 
Last edited:
1647807-00-A $4.33 tax included.
I’m posted the part numbers above, but remember you will have to use your older clips and that thing comes non-painted. In fact I like the one that comes with the lights and terms of quality. It looks better than Teslas. As you can see above, I have all 3 versions. The “nicest“one in terms of quality is the one from Tesla that comes with everything already on it (already painted, Tesla spelled out but is flush to trim) foam. clips and it looks beautiful with the Tesla embedded in it vs painted with letters on top. Just my opinion
 
  • Like
Reactions: misc3r
Ok, so I’m no expert but if voltage is the issue couldn’t we just buy some of these and stabilize that voltage to 12V? (tap one on each side where the power is being supplied) if anybody thinks this will work let me know and I will give it a shot. My turd (aka June built 21 plaid) is about to go back for Lemon law finally so I’ll have a 24 plaid soon so I don’t really care what happens to this turd and don’t mind being the guinea pig

IMG_1524.jpeg
IMG_1528.jpeg
IMG_1522.jpeg
IMG_1525.jpeg
 
@Vrgs13 I'm no expert, but as I understand, it's not the voltage, but rather the power consumption, which, looks to be monitored by the tesla components, and since its not complying to the expected values, tesla components report a failure effectively tripping the e-fuse. By adding some resistors, in theory, the current (power usage) would be rather slower or limited (voltage would still be around 16v) and hopefully comply to meet the expected ranges for tesla module to not trip the e-fuse. in this case a relay could work but you would have to do cut cords and rewire to where you would be drawing the power source (eg charging tray or cigarrete port), either alpharexes' or teslas'.

I assume that the solution that alpharex would provide is an enclosure that would be having these resistors in place.
 
  • Like
Reactions: misc3r