This is from the Ohmmu web site. On their site at the bottom is a report button to keep informed on progress for resolution. Put yourself on the list.
Known Issue Working on it
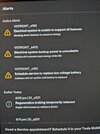
Tesla | Model 3 / Y | "Schedule service to replace low voltage battery" Error
If you wish to follow and receive updates on this Known Issue, please sign up or login (support.ohmmu.com) and click the "Report" button at the bottom of this page.
Otherwise, this article will be updated and we will provide additional information and status updates as we monitor and work on this issue, so please check back regularly.
Support Notice Information
A potential issue has been identified for customers with Tesla Model 3 and Model Y vehicles, running software updates 2021.36.x, 2021.40.x, and 2020.44.30.x.
Tesla has pushed several new features with their recent updates, which appear to alter the method and extent that the vehicle utilizes its 12V battery. Due to these changes, it is possible that you may receive error alerts for your 12V battery on your Model 3 or Model Y vehicle when it updates to these software versions.
IMPORTANT NOTES:
- We have identified the issues causing these errors.
- Ohmmu is currently developing a hardware revision to resolve this issue for existing customers, which should be available in January/February 2022.
- Ohmmu began developing a revised battery design in December 2021, which will also resolve and prevent these issues from occurring in the future. The revised batteries will be available in March/April 2022 for new customers and potentially existing customers on a case by case basis.
If you're experiencing error alerts, your battery is most likely healthy and your vehicle will continue to operate (some features may be turned off by Tesla software, such as USB ports and seat heaters).
However, if you receive this error alert and experience any other issues, please contact Ohmmu Support and we will walk you through a reset procedure or assess your situation and provide the necessary assistance.
To clear the error alerts and perform a software update (which may resolve these issues), please follow the RESET & SOFTWARE UPDATE PROCEDURE provided below.
RESET & SOFTWARE UPDATE PROCEDURE for Tesla Models 3/Y with Software Versions 2021.36.x, 2021.40.x, 2021.44.30.x
Support Notice For:
Vehicles: Tesla Model 3, Model Y (Does not apply to other makes/models)
Software Versions: 2021.36.x, 2021.40.x, 2021.44.30.x
Reset & Update Procedure (Est. Time to Complete: 15 mins)
1. If possible, drive your vehicle for ~10 mins prior to performing this procedure
2. Confirm that next Tesla software update version is staged for installation (12V alert does not effect this update from downloading to your vehicle)
3. Unplug all USB devices in vehicle cabin
4. IMPORTANT: Roll window down and leave the driver's door open for the ENTIRE PROCEDURE (Model 3: Also leave passenger side rear door open)
5. Open Frunk
6. On MCU (Tesla computer touchscreen in vehicle cabin), tap "Power Off" under "Safety and Security" menu and confirm
7. Exit vehicle (be careful not to close driver's side door) and lift open Frunk
8. Model 3 (All) and Model Y (2020 - Early 2021): Remove upper trim panel in Frunk by pulling up edges gently
9. Model Y (Late 2021+ w/ HEPA Filter): Remove the 2x 10mm bolts securing the HEPA filter, remove filter assembly, and then remove upper trim panel in Frunk by pulling up edges gently. You can watch a video of this process here:
Watch Video
10. Locate (DO NOT disconnect yet) High Voltage (HV) disconnect method for your vehicle - see below:
Model 3: Located under passenger side rear seat (to access, slide seat lock tab toward center driver side to unlatch, then lift seat cushion up, remove black foam block, and locate grey plug underneath)
Model Y: Located in Frunk on passenger side above wheel well (red/black connector near First Responder Loop w/ orange tag)
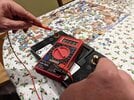
11. Using a 10mm wrench, loosen the negative terminal of the 12V battery (this is the terminal nearest the drivers side, without a red cover and no fuse attached)
12. Remove negative terminal -- be careful not to drop lead spacer! Position the negative connector lug so that it doesn’t fall back onto the negative battery terminal.
13. Disconnect HV
Model 3: Unlock Grey/black header by pinching top and rotating locking arm downwards, then pull up to disconnect
Model Y: Slide red lock open, then squeeze end of plug while pulling apart to disconnect
14. Wait 10 seconds
15. Reconnect HV
Model 3: Reconnect Grey/black header by pushing firmly back into place and then rotate locking arm upwards into locked position
Model Y: Push together connectors and slide red lock into closed position
16. Wait 20 seconds (Don’t need to wait any longer than this)
17. Reconnect negative terminal lug -- again, be careful not to drop the lead spacer!
18. Tighten negative lug connector using 10mm wrench
19. Model 3: replace foam block, then push rear seat down into position firmly, lift up to confirm it has latched
20. Model Y (Late 2021+ w/ HEPA Filter): Reinstall HEPA filter using 2x 10mm bolts
21. All Models: Secure top trim panel in frunk by placing into position then pressing along edges to snap together (will hear/feel snap)
22. Wait for vehicle to reboot
23. Disable sentry-mode under "Safety and Security" menu
24. Wait 1 hour (this gives 12V battery time to recharge before initiating update)
25. Update software
For Additional Support, Please Contact Us at:
Email:
[email protected]
Chat:
ohmmu.com
Our Commitment to You
Ohmmu is committed to our customers and the excellence of our products, and we apologize for any inconveniences you have experienced due to the recent Tesla software updates 2021.36.x, 2021.40.x, and/or 2021.44.30.x.
Please know that we are continuing to evaluate this issue and working hard on further developing solutions that will prevent occurrences like this from happening in the future.
Thank you so much for your patience and support -- if you have any questions or require additional assistance, please contact:
[email protected]
Experiencing this issue?
Report
Thanks! If you wish to follow & receive updates on this issue, please login and click report again.
Previous article
Next article
 Contact Us