


Welcome to Tesla Motors Club
Discuss Tesla's Model S, Model 3, Model X, Model Y, Cybertruck, Roadster and More.
Register
Install the app
How to install the app on iOS
You can install our site as a web app on your iOS device by utilizing the Add to Home Screen feature in Safari. Please see this thread for more details on this.
Note: This feature may not be available in some browsers.
-
Want to remove ads? Register an account and login to see fewer ads, and become a Supporting Member to remove almost all ads.
You are using an out of date browser. It may not display this or other websites correctly.
You should upgrade or use an alternative browser.
You should upgrade or use an alternative browser.
Preventive eMMC replacement on MCU1
- Thread starter widodh
- Start date
brkaus
Well-Known Member
Start at the beginning of this threadCan someone here give me some procedure for this job? I'm a DIY guy.
Tools for de-soldering.
Tools for copying the old eMMc to the new one.
What brand of the eMMc is good to use?

rooter
Member
@keon my HowTo's may help. I'm in the process of moving to Wikiversity, since DIYE uses Cloudflare which stupidly bans me for daring to deconstruct the shadow file.Can someone here give me some procedure for this job? I'm a DIY guy.
Tools for de-soldering.
Tools for copying the old eMMc to the new one.
What brand of the eMMc is good to use?
De/resoldering the eMMC requires a good deal of skill, and:
- JBC infrared soldering station
- Kester solder balls
- NC-256 flux
I've read it a thousand times but I don't see how to check p1 and p2jjas40 check my articles over on DIYElectriCar, particularly on backing up. (Quantum`)
I'm in the process of moving to WikiVersity.
p1 and p2 are squashfs and can’t me fsck.I've read it a thousand times but I don't see how to check p1 and p2
There are only used Read Only. Can you mount p1 or p2?
Thank you@keon my HowTo's may help. I'm in the process of moving to Wikiversity, since DIYE uses Cloudflare which stupidly bans me for daring to deconstruct the shadow file.
De/resoldering the eMMC requires a good deal of skill, and:
- JBC infrared soldering station
- Kester solder balls
- NC-256 flux
rooter
Member
Right, if you can mount them they're Ok. If you can do that check the firmware version in each one:p1 and p2 are squashfs and can’t me fsck.
There are only used Read Only. Can you mount p1 or p2?
# cat /mnt/deploy/platform.ver
You must not change versions on these respective partitions, as one or the other is active and is keyed to the boot flash using code-signing. If the system is running you can get the running version by pressing 'T' at the top.
For parts 3 & 4, set aside copies of the files and use e2fsck to check them. Forget fsck for ext* filesystems.
PS - widodh are you the author of that image-building script? If so have you tested it in practice?
Last edited:
I understand what you are saying. The SC indicated this was not normal but said on exit it was operating normally. Who knows what they put in they replaced it for yellow border (before UV trick).98% memory usage is normal. That's what Linux (what runs on the MCU) does. It will use up all available memory.
This has nothing to do with the eMMC which is the permanent storage of the MCU.
My Linux laptop which I'm typing this on uses 95% of it's 16GB of memory. Mainly caches. Memory (DRAM) is much faster then the NVMe SSD in my laptop and therefor Linux caches as much as it can.
The wear level of the eMMC is something different. A SSD/eMMC has a finite number of writes it can accept. Usually there is a counter which keeps track of the health. Some other people report the SeC can read out this value.
Yes, I wrote that script and it works. It only contains a empty image. You need to write the contents to it.Right, if you can mount them they're Ok. If you can do that check the firmware version in each one:
# cat /mnt/deploy/platform.ver
You must not change versions on these respective partitions, as one or the other is active and is keyed to the boot flash using code-signing. If the system is running you can get the running version by pressing 'T' at the top.
For parts 3 & 4, set aside copies of the files and use e2fsck to check them. Forget fsck for ext* filesystems.
PS - widodh are you the author of that image-building script? If so have you tested it in practice?
LuckyLuke
Model S P90DL
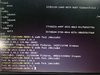
I'm moving forward in my emmc recovery.
P3 and P4 clean, but P1 and P2 I am not sure how to check.
here an image
I think I'm not checking well p1 and p2.
Anyone know how to get it right?
I try it with fsck
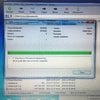
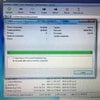
You can check the integrity of p1/p2 very easy on a Windows pc with the tool 7-zip, use the "Test archive" function.
You should get only one warning/error "There are some data after the end of the payload data", this is good/normal:
If you get any other errors like these then I would strongly suggest to search for a copy of the firmware file so you can use that instead of the corrupted dump.
rooter
Member
Ok I saw, but if you look at the hex of a stock image, a ways in there's a block of gibberish. Yours doesn't provide for that. Who knows what it is?Yes, I wrote that script and it works. It only contains a empty image. You need to write the contents to it.
bad news
P1 and P2 cannot be opened so I assume they are wrong.
I only have two possibilities:
1-transfer the car 700km to the sc and 3000 EUR.
2- someone would be kind enough to share their p1 and p2 files with firmware 2019.40.2.3 40ef2d4d1432
P1 and P2 cannot be opened so I assume they are wrong.
I only have two possibilities:
1-transfer the car 700km to the sc and 3000 EUR.
2- someone would be kind enough to share their p1 and p2 files with firmware 2019.40.2.3 40ef2d4d1432
Attachments
rooter
Member
If you're sure that's the version you need, it's easy. There's a complete library of firmware images (which I don't have access to anymore). Maybe someone will front you the image.
However do -not- try to write just any dd'ed image. They must be trimmed first using a hex editor. The images are only signed, and the signature is 64 bytes of non-zero data close to the end of the first or second partition. Cid-updater validates the signature after download. To be valid as an installed image, all you have to do is trim the file -AFTER- the signature. There is an area with 00 before the signature, and then after the 64 byte signature... cut this latter.
Also remember, on the new chip you can't just create partitions starting at block 0. There is null space before partition 1. wido has made a script to set up the parts, although there's a mystery block of gibberish within that null space. Best to restore a full image of the chip.
okIf you're sure that's the version you need, it's easy. There's a complete library of firmware images (which I don't have access to anymore). Maybe someone will front you the image.
However do -not- try to write just any dd'ed image. They must be trimmed first using a hex editor. The images are only signed, and the signature is 64 bytes of non-zero data close to the end of the first or second partition. Cid-updater validates the signature after download. To be valid as an installed image, all you have to do is trim the file -AFTER- the signature. There is an area with 00 before the signature, and then after the 64 byte signature... cut this latter.
Also remember, on the new chip you can't just create partitions starting at block 0. There is null space before partition 1. wido has made a script to set up the parts, although there's a mystery block of gibberish within that null space. Best to restore a full image of the chip.
If there is someone who can help me with these 2 partitions and a friend will win forever in Spain.
LuckyLuke
Model S P90DL
TonyT
Member
Is there some type of seal on the MCU that you need to break to get into the guts? Like a warranty seal?
The screws have Loctite on it, and some paint, Don't think it's an issue thought?
Similar threads
- Replies
- 6
- Views
- 3K
- Replies
- 41
- Views
- 11K
- Replies
- 240
- Views
- 50K