All of this is at your own risk, even reading it. I'm not an expert, I don't even get to play one on TV. The judge was very clear on that.
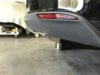
So, while on a dark unfamiliar road, a ditch jumped out and damaged my rear bumper shiny plastic trim thing...
Or maybe it was a conspiracy by Big Oil. In either case, some research landed me that it's a $250 part + 3 hours labor.
Being so broke I cannot afford gasoline (hence the Tesla) and (usually) enjoying repairing things. I undertook replacing it myself. What should be a $20 piece of plastic and 30 min job took me the part and about 2 hours. If I had to do it again, maybe an hour. Sorry for not enough photos, it's hard to get pics and keep working.
Backed up my car up on some ramps, and admired the barely visible to the human eye from people height damage... and almost considered just returning the part.
But, the show must go on.
1. car on ramps
2. 10mm 6 point socket and a torx, size 20 (I think, I have set)
3. 4 flat blade screw drivers
4. long thin arms/hands
5. gloves to keep hands pretty")
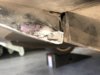
Jacked up the back end, and removed the 4 plastic/rubbery strips that are for air flow / preventing bottom damage.
This also removes 2 shields. they are super thin plastic pain in the butt. You have 2 types of screws. one is machine thread and goes into nicely threaded things, the other is coarse thread and goes into body clips. you can't interchange them. Also some plastic pop rivets. go slow, no rush
I found some gizmo connected by wire that doesn't come out velco'd to the top of the plastic shield. You can remove the connector on it, but not one of the wires, but it's not an issues, just don't go hacking into it or anything, it says antenna or something on it, size of a laptop charger box.
So, the 'correct' or manual way of trim piece replacement is to remove the rear bumper... which I wouldn't even know where to start with.
I was able to pop the first under motor shield completely off, while the more rearward one was still attached to a few points on the far sides.
From here I was able to get a screw driver under each of the tabs, they are a PITA, really look at how they work, just flat out pulling isn't going to work. you have to get the black plastic out of the way.
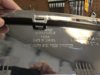
Ok, so now you have the shiny plastic thing bent back and a fun 2" gap between the bottom black plastic shield and the rest of the shiny piece. Since this $250 piece is mission critical an totally integral to the safe operation of your Tesla, you will find that it's now held in, in the center, by a coarse T20 or so bolt with a body clip on the trim piece. because... reasons dammit.
Get a 1/4" socket wrench up in there while wearing gloves and as a side note, don't use brake cleaner that afternoon due to all the new small cuts on your hands. It will burn, but you won't really know why until a few hours later... (I was also working on an out-drive gear fix)
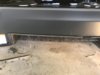
Once removed you'll be able to get the shiny plastic finally off the car. The bumper bends more than you'd expect, and is actually rather durable.
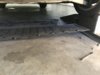
you'll have to move the body clip from the old to the new $250 plastic chunk. so, do that.
When putting the new one on, make sure you don't just push that sucker on, it will clip in so nice and smooth you'll forget all about the torx bolt and have to unclip the bottom row all over! Get your 1/4" wrench in there and lock that single bolt down, then reassemble paying attention to where the coarse bolts go and plastic body rivets.
Knowing what I do now, I would do this again, although my arms and chest and back were SOOO sore for 2 days after, so if you have a lift, use that. If you don't feel like this, $300 isn't all that bad a deal to just let Tesla do it...
Hope this helps I miss my wrangler... I could swap an axle in less time.
So, while on a dark unfamiliar road, a ditch jumped out and damaged my rear bumper shiny plastic trim thing...
Or maybe it was a conspiracy by Big Oil. In either case, some research landed me that it's a $250 part + 3 hours labor.
Being so broke I cannot afford gasoline (hence the Tesla) and (usually) enjoying repairing things. I undertook replacing it myself. What should be a $20 piece of plastic and 30 min job took me the part and about 2 hours. If I had to do it again, maybe an hour. Sorry for not enough photos, it's hard to get pics and keep working.
Backed up my car up on some ramps, and admired the barely visible to the human eye from people height damage... and almost considered just returning the part.
But, the show must go on.
1. car on ramps
2. 10mm 6 point socket and a torx, size 20 (I think, I have set)
3. 4 flat blade screw drivers
4. long thin arms/hands
5. gloves to keep hands pretty
Jacked up the back end, and removed the 4 plastic/rubbery strips that are for air flow / preventing bottom damage.
This also removes 2 shields. they are super thin plastic pain in the butt. You have 2 types of screws. one is machine thread and goes into nicely threaded things, the other is coarse thread and goes into body clips. you can't interchange them. Also some plastic pop rivets. go slow, no rush
I found some gizmo connected by wire that doesn't come out velco'd to the top of the plastic shield. You can remove the connector on it, but not one of the wires, but it's not an issues, just don't go hacking into it or anything, it says antenna or something on it, size of a laptop charger box.
So, the 'correct' or manual way of trim piece replacement is to remove the rear bumper... which I wouldn't even know where to start with.
I was able to pop the first under motor shield completely off, while the more rearward one was still attached to a few points on the far sides.
From here I was able to get a screw driver under each of the tabs, they are a PITA, really look at how they work, just flat out pulling isn't going to work. you have to get the black plastic out of the way.
Ok, so now you have the shiny plastic thing bent back and a fun 2" gap between the bottom black plastic shield and the rest of the shiny piece. Since this $250 piece is mission critical an totally integral to the safe operation of your Tesla, you will find that it's now held in, in the center, by a coarse T20 or so bolt with a body clip on the trim piece. because... reasons dammit.
Get a 1/4" socket wrench up in there while wearing gloves and as a side note, don't use brake cleaner that afternoon due to all the new small cuts on your hands. It will burn, but you won't really know why until a few hours later... (I was also working on an out-drive gear fix)
Once removed you'll be able to get the shiny plastic finally off the car. The bumper bends more than you'd expect, and is actually rather durable.
you'll have to move the body clip from the old to the new $250 plastic chunk. so, do that.
When putting the new one on, make sure you don't just push that sucker on, it will clip in so nice and smooth you'll forget all about the torx bolt and have to unclip the bottom row all over! Get your 1/4" wrench in there and lock that single bolt down, then reassemble paying attention to where the coarse bolts go and plastic body rivets.
Knowing what I do now, I would do this again, although my arms and chest and back were SOOO sore for 2 days after, so if you have a lift, use that. If you don't feel like this, $300 isn't all that bad a deal to just let Tesla do it...
Hope this helps
I miss my wrangler... I could swap an axle in less time.