I am going to try upload pictures. So if you look at the pictures in sequence, you can figure out how to remove the liner and install the shims. The first picture shows lifting off the service cover at the rear of the frunk. Start on either side near the rear and pull up. There are several pushpins holding it down. Place the cover aside.
Next remove the air intake on the passenger side of the car. It is held in with four pushpins. Just lift with your hand at each pin location and remove the duct. Be aware that the pins are snapped into the edges of the duct and can pop out of it. Hold the pin with your opposite hand while lifting the duct to prevent the push pin from possibly coming loose and ending up in the bellypan. Place the part aside.
Next remove the cover over the hood latch in the front of the frunk. Put you fingers in the hole that the hood striker goes into and with your other hand lifting at the gap at the bottom of the cover, lift it straight up to release the clips on the top of the cover. Note the position of the wire going to the switch in the cover where it passes between the body and the frunk liner. There is a little slit in the foam it should be in and it needs to be in the same location when you re-install the cover. Remove the connector from the switch and place the part aside.
Next remove the seven bolts that hold the frunk liner in place. They are all the same size 6 mm bolts. You will need a 10 mm socket to do this. There are two bolts in the front near the latch, two bolts at the bottom of the liner (under the carpet), two bolts under the shopping bag holders and most important a final bolt located by the firewall that holds the top of the washer fluid tank to the frunk liner.
Next, starting from the very back of the frunk liner (near the hood hinge) pull up on the rear edge to disengage a push pin. Then run your hand down the edges of the liner between the liner and the fender. There are four clips on each side that need to be disengaged from the fender. Lift the liner at each clip location and give it a little tug. The clips will release. The liner is now free to remove. Lift it by the sides tipping it up from the rear and Finally lift completely off the two guide pins near the latch. Place the liner aside.
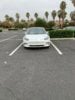
Next remove the six bolts that attach the bumper cover to the body of the car if you want to install shims. The two outer bolts on each side also pass through a plastic part that helps index the guide pins for the frunk. The center two bolts attach directly to the body. Using a 3 to 4 mm nylon fender washer, shim the bumper cover at each location. For the outer bolts, you can shim between the body and the plastic adapter or just lay the shim washers on top between the bumper cover and the adapter. In my picture, the outer shim washers are between the plastic part and the body. Once in place, close the hood and see where lines up with the front bumper cover. It should be recessed by about 3 mm. Open the hood and loosen the two bolts that hold the hood latch in place and raise the latch by the same amount you want to raise the hood. There are vertical slots in the latch to do this. trial and error will get it right. You will find that most, if not all, of the sunken hood is gone. At this point the hood bumpers cannot be adjusted as the liner is not in place so this needs to be done after everything is back together.
Reinstall everything in reverse order from how it was removed then set the hood bumpers to just lightly touch the liner. I did some additional work to get rid of some of the panel gaps in the hood. I moved the hood slightly forward to get the gap between the bumper cover and the hood correct. The gaps around the hood on my car are less then 3 mm. The rest of the car is 3 mm or more gap, the largest gaps are on the sides of the car at the doors. If you take you time, you can get this right. I hope this helps.
View attachment 287362